Using Upsert to Update or Create Records in Salesforce
So the way an Upsert operation works during a data load, is for each record Salesforce looks at the value loaded in the External Id column, and if the system already contains a record with the same External Id – it updates that record, otherwise – it creates a new one.
One other use of the Upsert operation that is very often overlooked is using an External Id field on a parent object in a master-detail or lookup relationship to create new records as children of that parent record or for reparenting existing records based on the parent External Id.
In this tutorial we’ll show both use cases for the Upsert operation using XL-Connector.
Upserting Account records
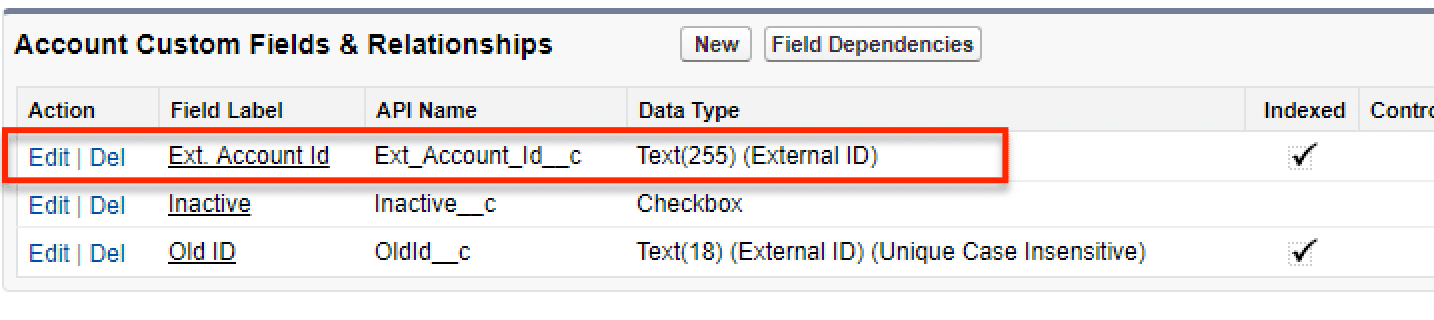
In our demo scenario, Accounts need to be synchronized with an external system, and therefore the Account object has a field named Ext. Account Id.
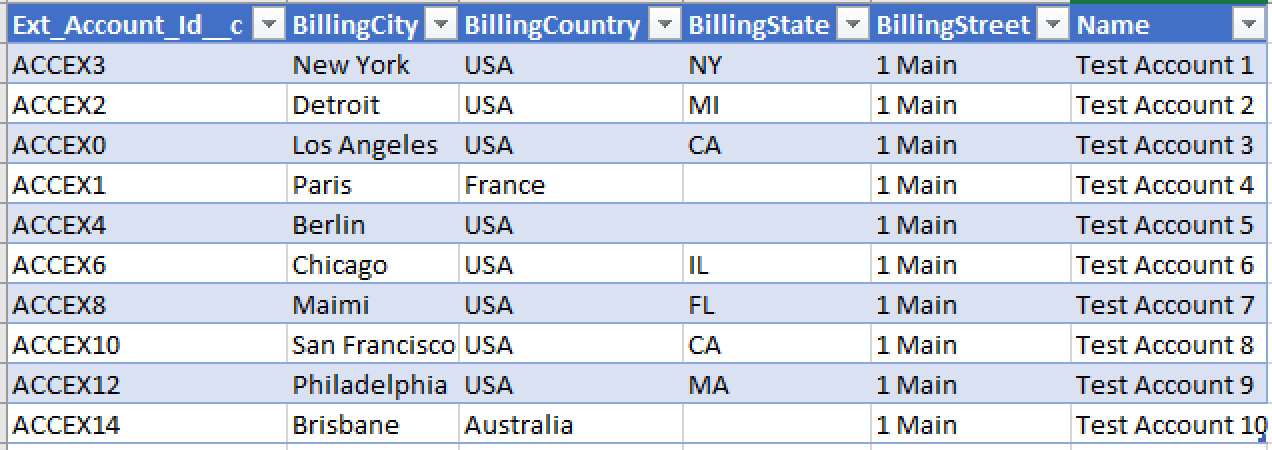
When we receive our opportunities from an external system, the file also has a column of External Ids:
Now to do an Upsert, click on Create/Modify button in the XL-Connector 365 sidebar, then choose whether to Upsert all rows in the current range or only selected ones:

You can define constant mappings and owner change settings in the Mapping page of each flow step.
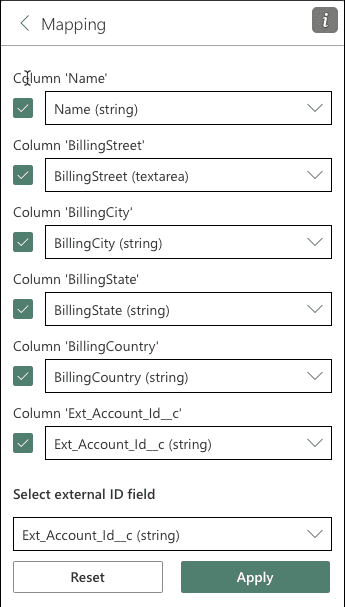
You’ll need to map your columns to fields in Salesforce and also specify which of the columns in your Excel data holds the External Ids:
Any manual push operation will be saved the mappings and other settings in a reusable “Flow Step” that can be later run separately or as a part of a larger Flow.
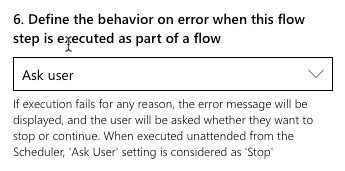
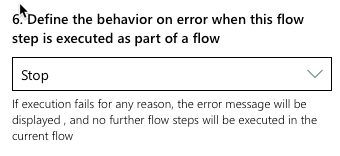
The following setting determines the behavior of the flow step if the operation returns at least one error:

There are also several options that you can adjust for each Upsert operation and the associated flow step:
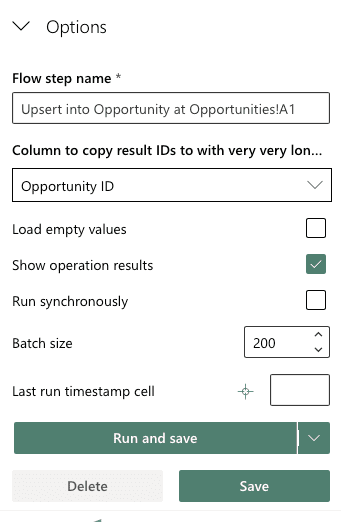
Click on Run and Save to run the Upsert operation according to the provided settings and save all the settings as a reusable Flow Step. In this case you’ll be able to run the same Update operation again from the same area in your sheet with a single click on the Run Flow or Run Flow Step button.
Click Run to only run the Upsert operation of the selected data and not save the mappings and other settings as a reusable Flow Step.
Click Save to save all the provided settings as a reusable Flow Step. In this case you’ll be able to run the same Upsert operation again from the same area in your sheet with a single click on the Run Flow or Run Flow Step button.
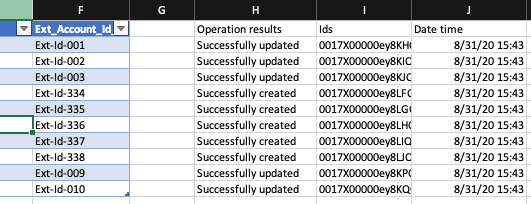
After the operation is completed, all operation results, along with the updated record Ids will be written on the right from your data, one column over:
Inserting records as children of records identified by an External Id
Now let’s consider another use case of the Upsert function: creating new records under records identified by an External Id.
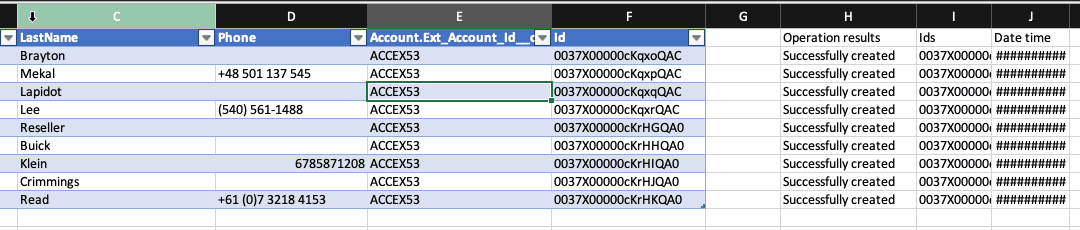
We’ll create new Contacts as children of Accounts identified by their External Id field.
Our Contact table may or may not have an External Id column. If there’s no External Id column, the Upsert will work solely to create new records.
For the purpose of this demo the Contact does not have an external Id column. We’ll create a spreadsheet with new contacts as follows:

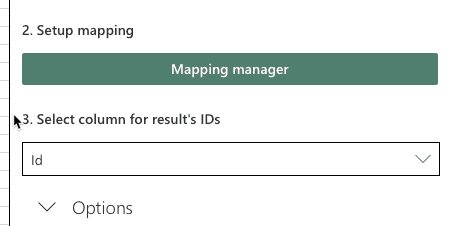
Please note, that we’ve created an empty Id column. It will be used as the external id column in the Upsert operation. We’ll later map it to the Contact’s Id field, which can also work as an external Id field. We’ll also populate that column with the Ids of the newly created records.
Then we select the five contacts to be inserted as shown in the picture above and click Upsert, then click on Map Columns.
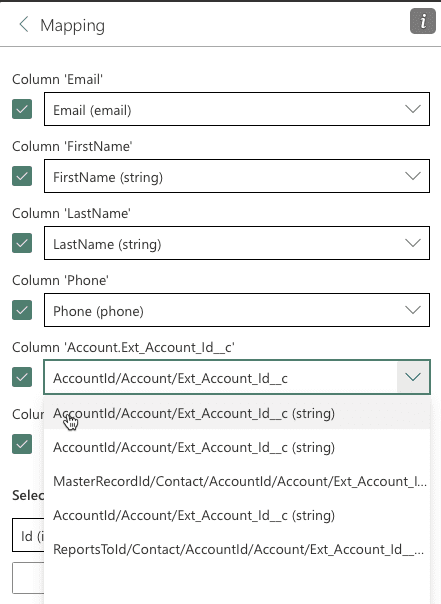
The Account External Id column by which Salesforce will identify under which account each contact needs to be placed, has to be mapped to the Ext. Account Id field on the Account object. The Mappings dialog that is generated for the Upsert operation differs from the same dialog used with the Insert and Update operations in that it not only lists all fields of the object you’re working with in the top table, but also contains External Id fields of all objects related to the object you work with via a Lookup or Master-detail relationship. In other words, if the object you’re working with is a child, whose parent has fields marked as External Id, these fields will be also listed in the list of fields that you can map your columns to. Such fields will look as follows <RelationalFieldName/ObjectName/ExtIdFieldName> (see above).
Since in this specific case we are inserting new records, you need to select the dummy Id column in this drop-down. Make sure to map this column to the Id field on the Contact object. We’ll also populate that column with the Salesforce Ids by selecting that column in the Select column for result Ids setting:
After you click Run and Save or Run in the dialog box above, the new contacts will get created and linked to the accounts identified by the corresponding external id. The Salesforce Ids of the newly created records will be also populated in the Id column: