Get Started Free


When you delete a Salesforce record, Salesforce does not remove it immediately. The record first moves to the Recycle Bin, where it normally remains for 15 days and can be restored. After Salesforce removes it from the Recycle Bin, you cannot use Undelete, but the record may remain available through certain APIs for a limited time.
By default, administrators can view and recover deleted records across the organization. Users can restore records from their own Recycle Bin, but they need the Modify All Data permission to restore records deleted by other users.
What Actually Happens When You Delete a Record?
Salesforce handles deleted records in three stages.
Stage 1: Soft delete
When you delete a record, Salesforce moves it to the Recycle Bin. Records normally remain there for 15 days. You can restore them from the Recycle Bin or use the undelete() API call.
Stage 2: Purged from the Recycle Bin
Once Salesforce removes a record from the Recycle Bin, you cannot restore it through the Salesforce UI or undelete(). However, the record may still be available through API tools such as Data Loader Export All or queryAll() for a limited time.
Salesforce does not specify one fixed retention period for this API access.
Stage 3: Physically deleted
After Salesforce permanently removes the record from its database, you cannot recover it using Salesforce’s native tools or APIs. At this point, you need an external backup or another copy of the data.
| Stage | What happened | Can you still get it back? |
|---|---|---|
| Soft delete | The record is in the Recycle Bin for up to 15 days. | Yes. Restore it from the Recycle Bin or use undelete(). |
| Purged / hard delete | The record has been removed from the Recycle Bin but may still be available through APIs for a limited time. | Not through Undelete. You may still retrieve it with tools such as Data Loader Export All or queryAll(). |
| Physically deleted | Salesforce has permanently removed the record from its database. | Not through Salesforce. Recovery requires an external backup or another copy of the data. |
Restoring Records from the Recycle Bin
You can restore deleted records from the Recycle Bin before Salesforce permanently deletes them. The steps vary between Lightning Experience and Salesforce Classic.
In Lightning Experience
-
1
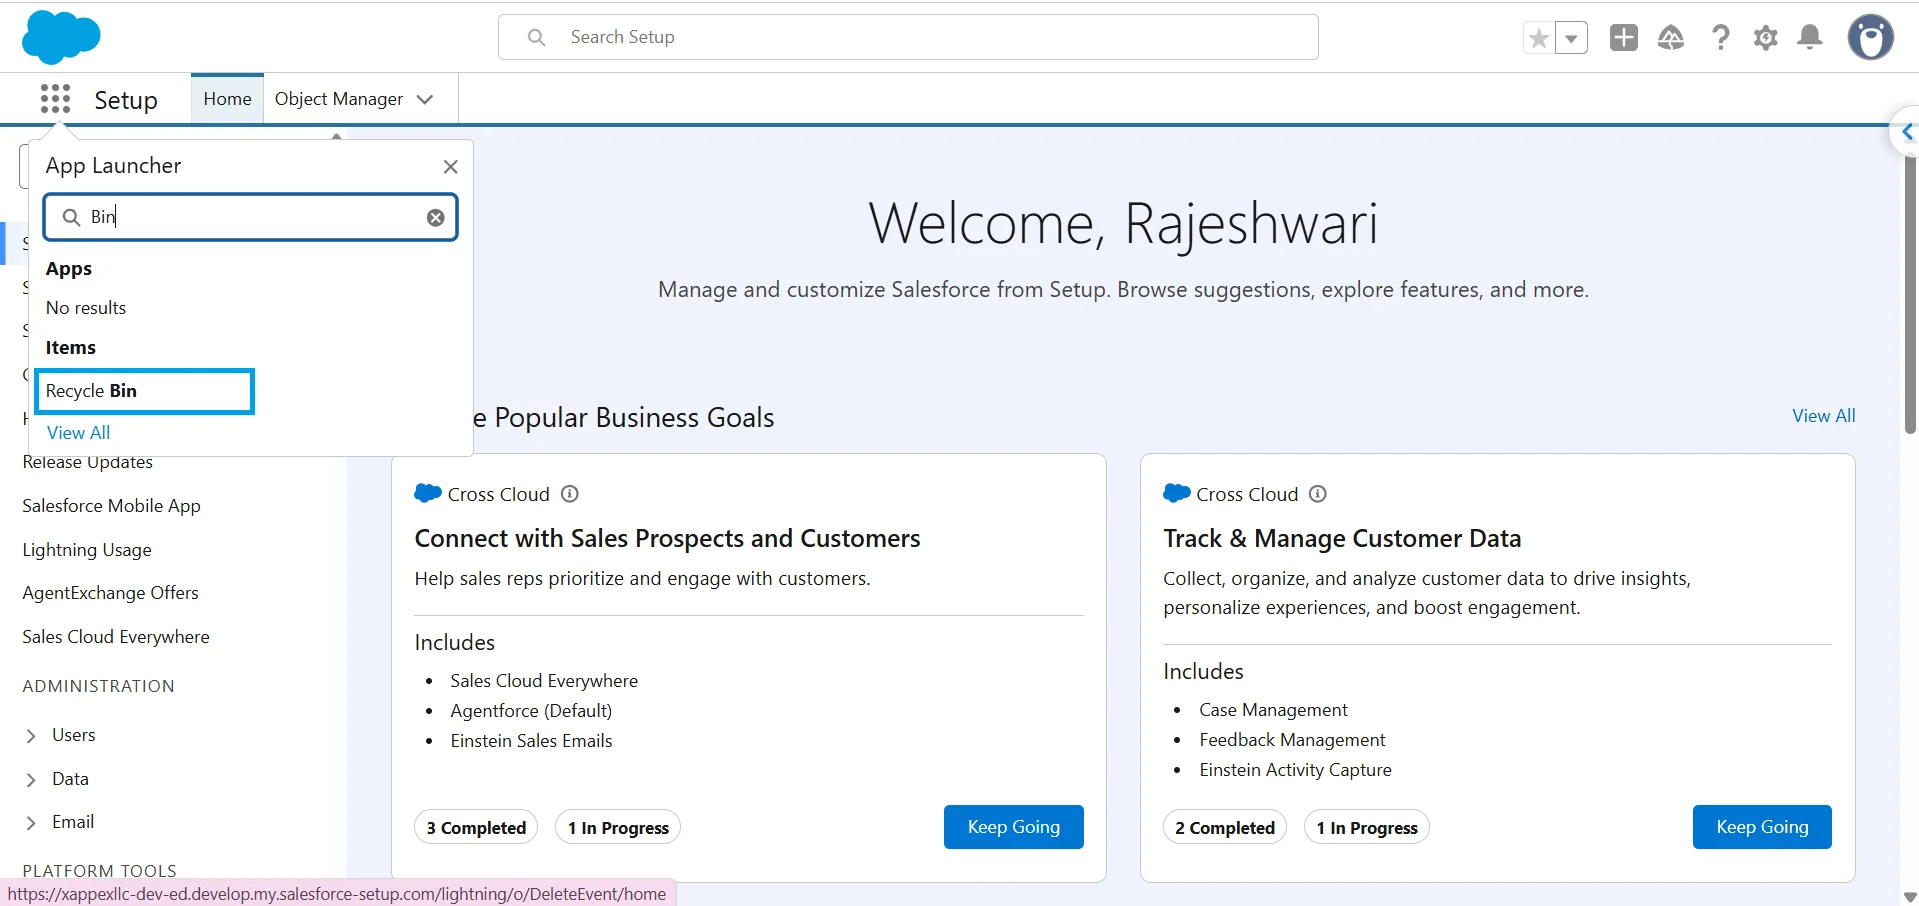
Open the App Launcher.
-
2
Type bin in the search box. Recycle Bin appears in the results.

-
3
Open Recycle Bin.
-
4
Select the checkbox next to the record you want to restore.
-
5
Click Restore.
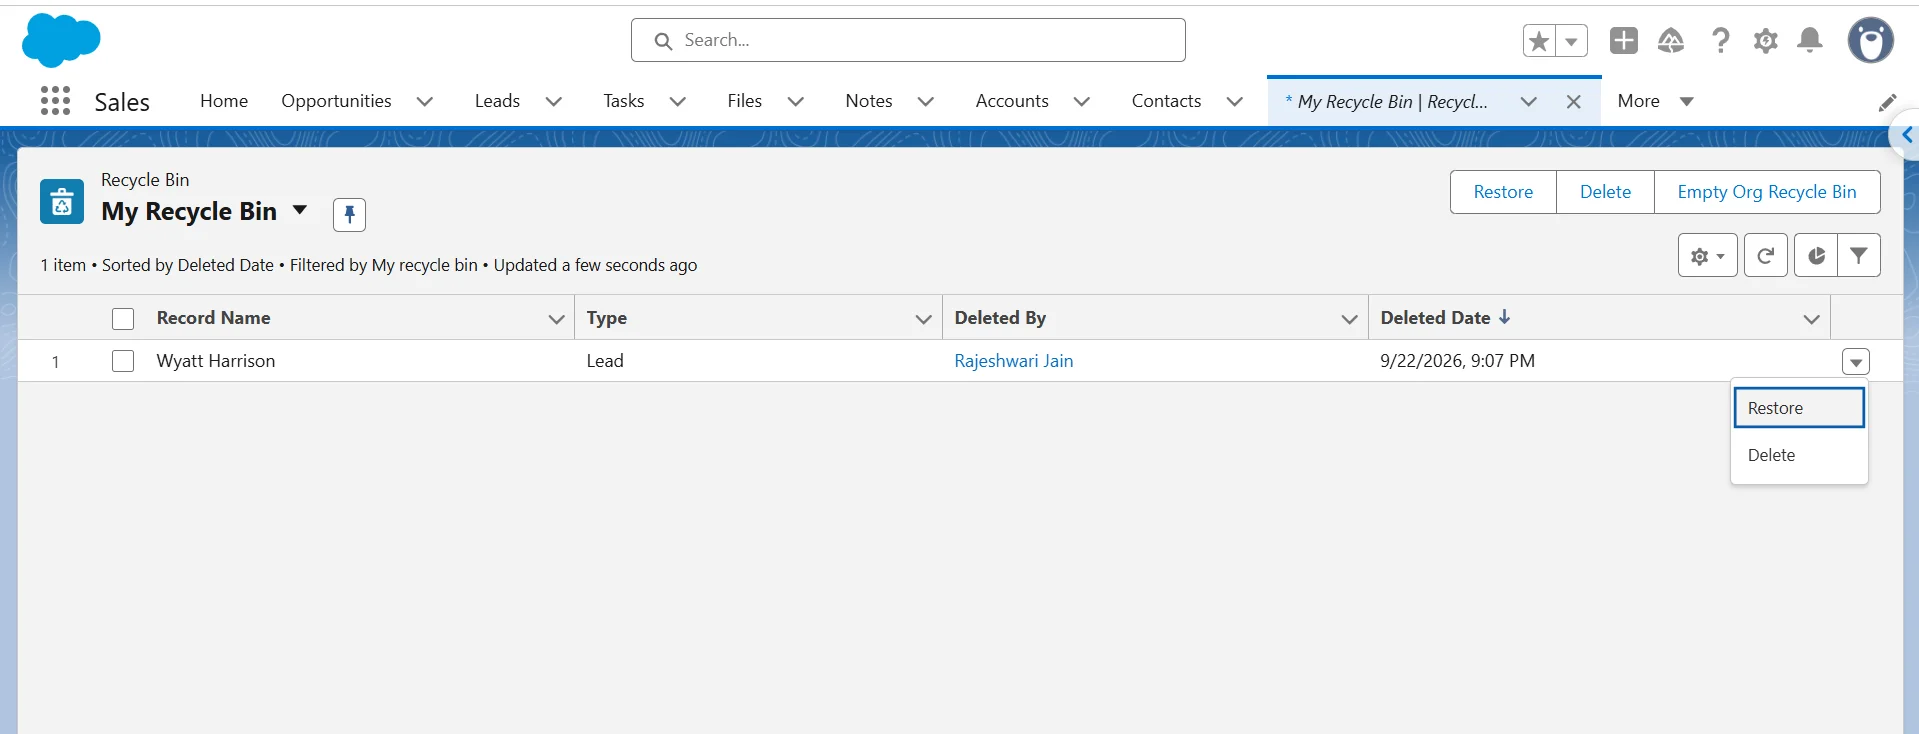
You can select multiple records and restore them at the same time.
In Salesforce Classic
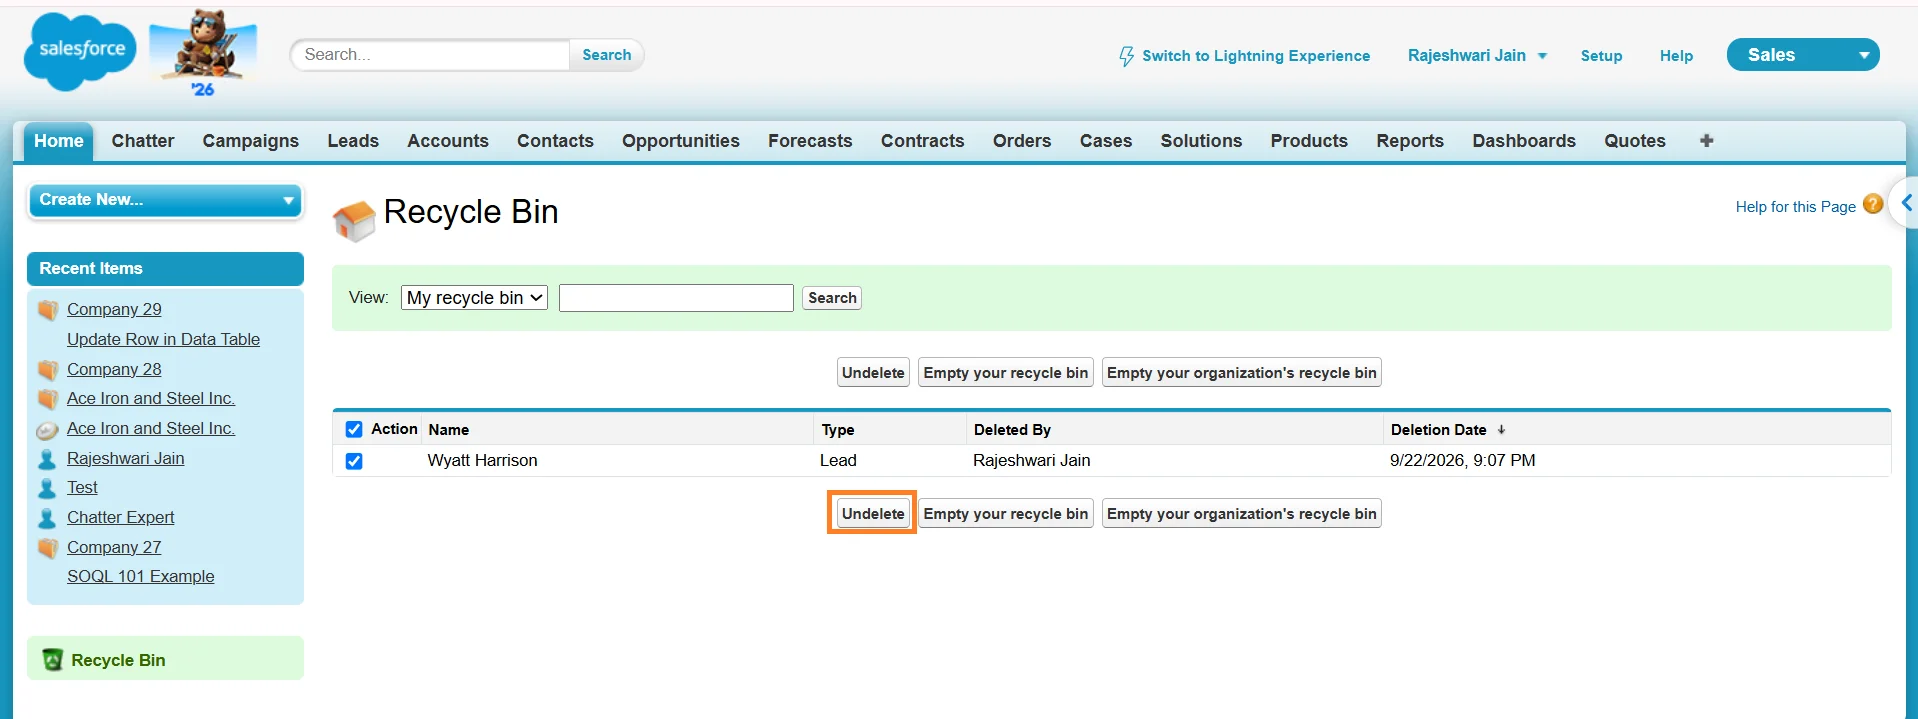
In Salesforce Classic, open the Home page and find Recycle Bin in the bottom-left sidebar.
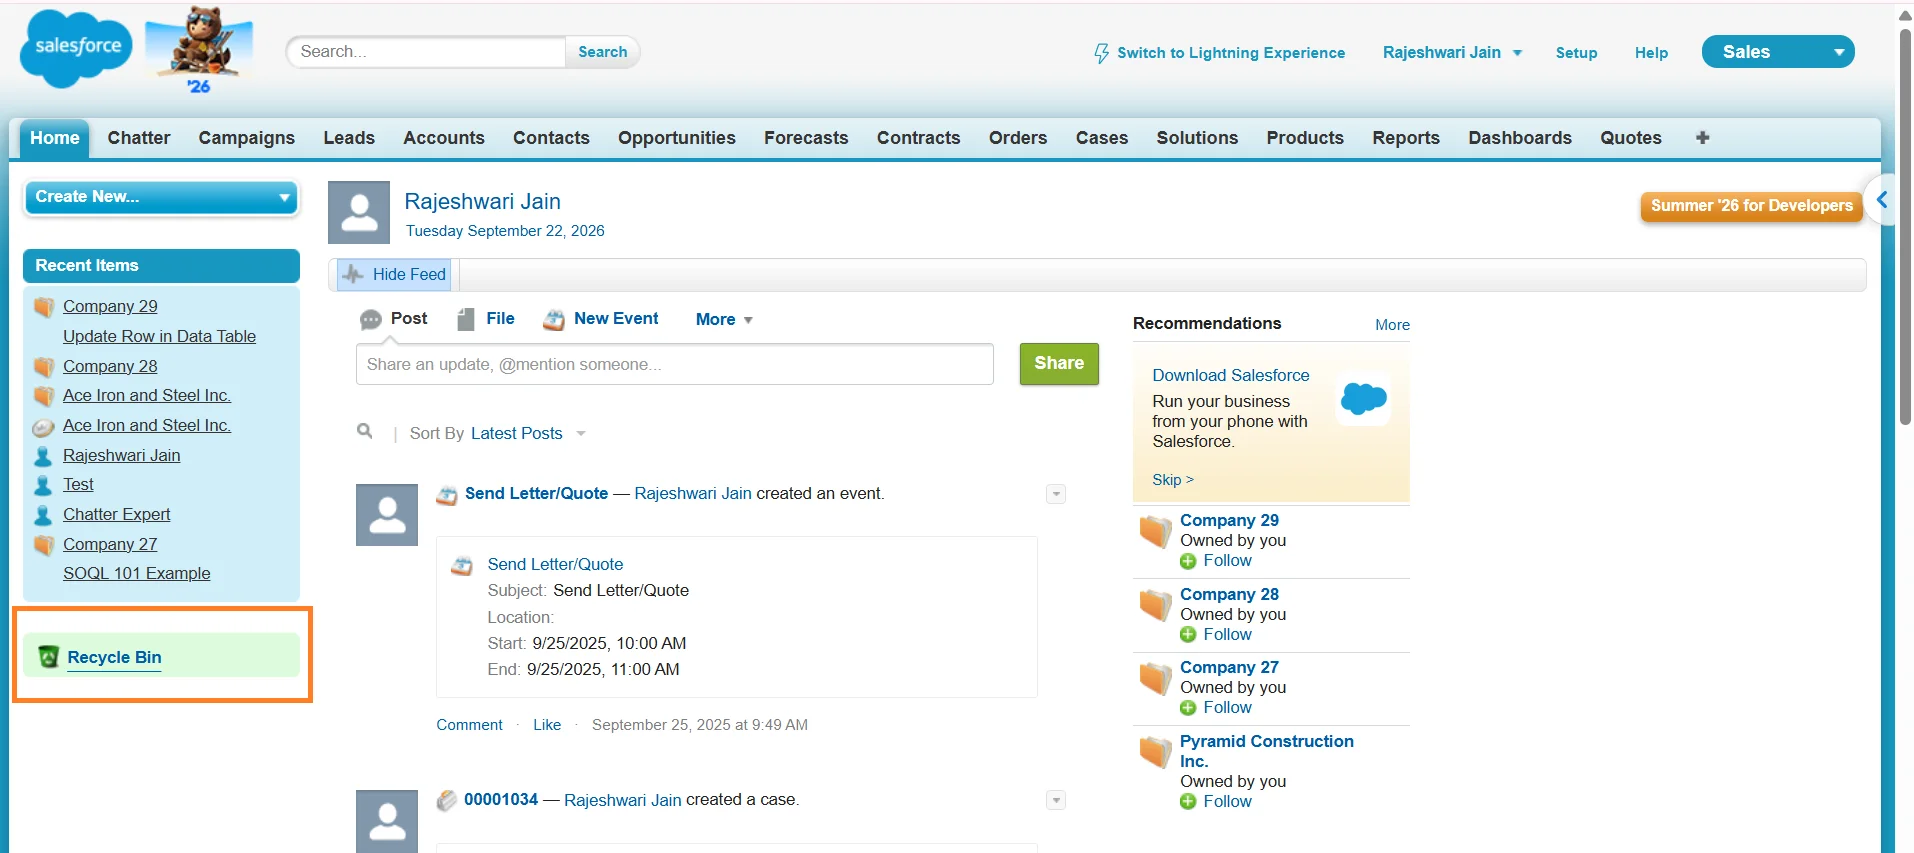
Open it, select the record you want to recover, and click Undelete.

Use Undo After Deleting
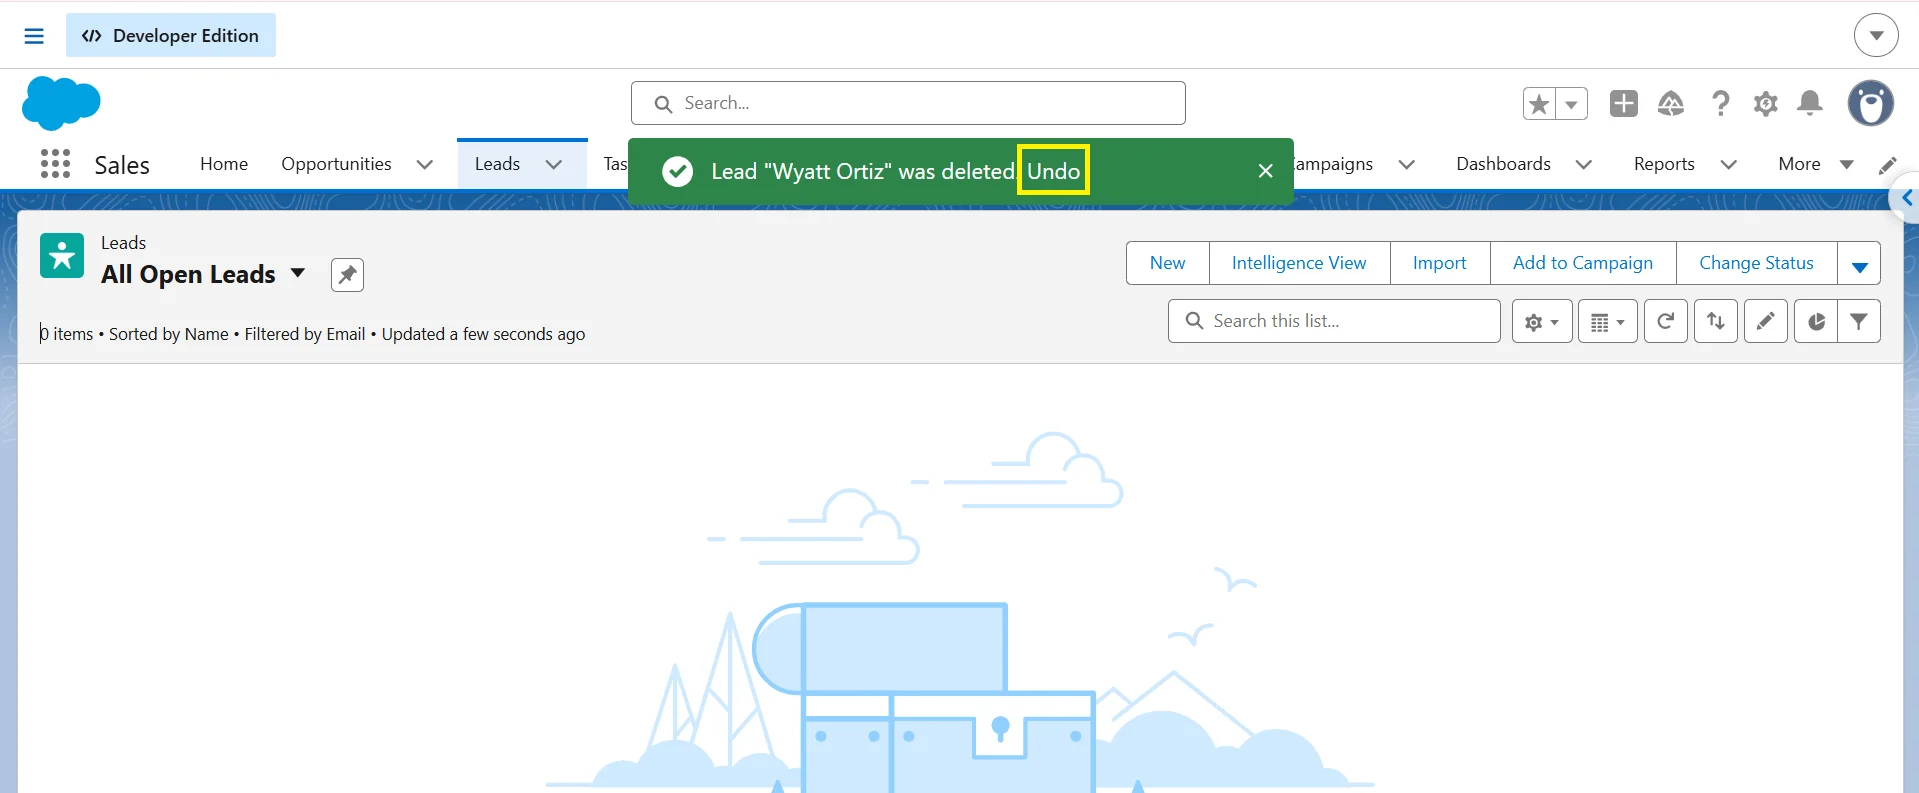
After you delete a record in Lightning Experience, Salesforce displays an Undo option in the notification. Click Undo to restore the record immediately without opening the Recycle Bin.
This option is available right after the deletion. If the notification disappears, open the Recycle Bin and restore the record from there.
How to Find Out Who Deleted a Record (Before You Restore It)
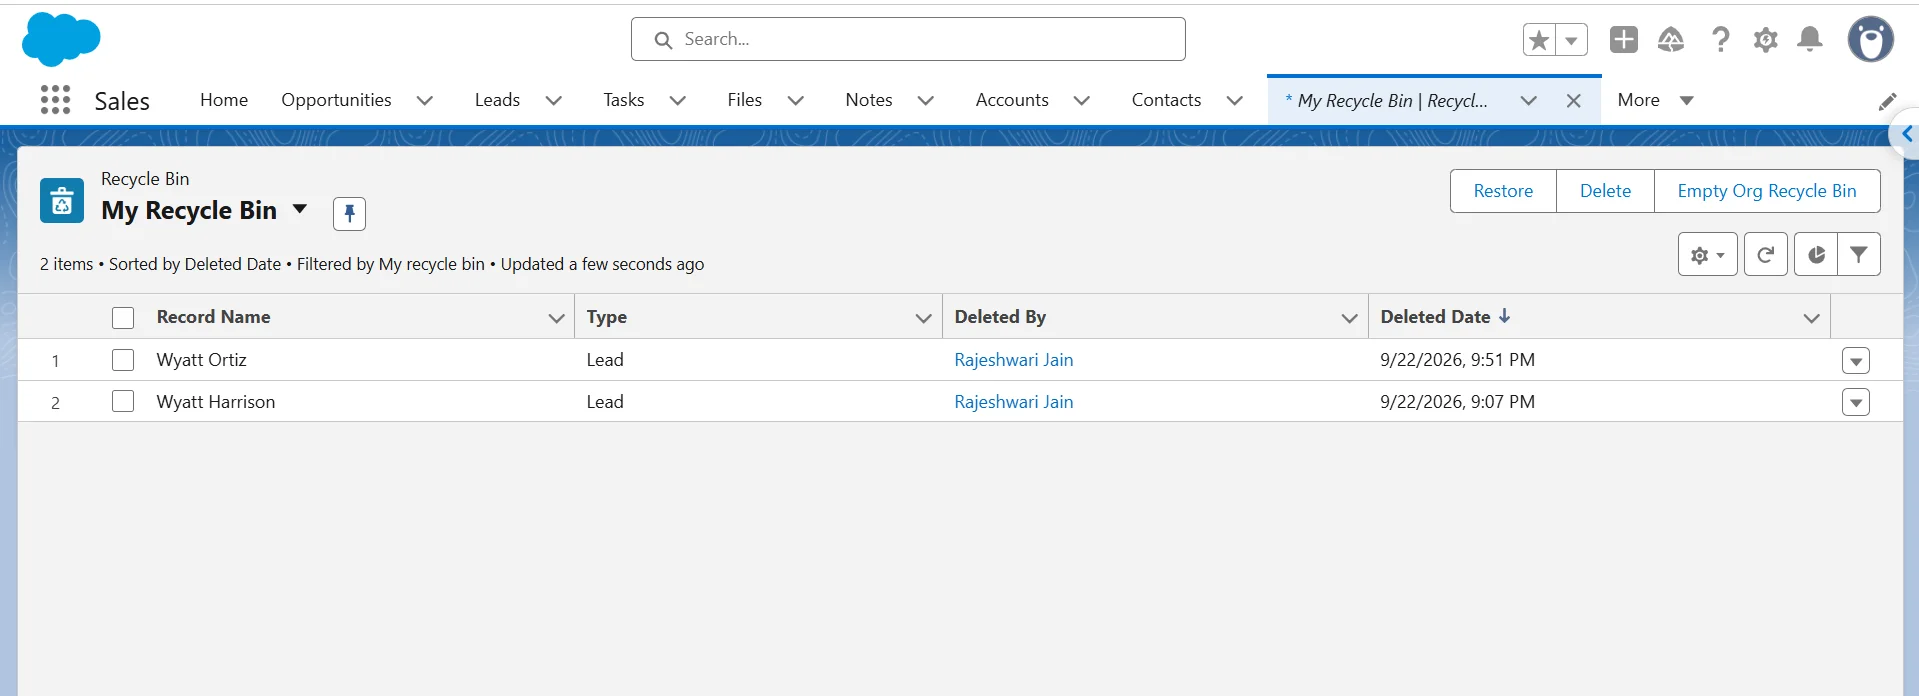
If you need to know who deleted a record, check the Recycle Bin before restoring it. The Recycle Bin shows the user who deleted each record in the Deleted By column.
Setup Audit Trail does not track record creation or deletion. It tracks changes to your org’s configuration. Field History Tracking records changes to tracked fields, but it does not record when a record is deleted.
Narrowing Down Records in the Recycle Bin
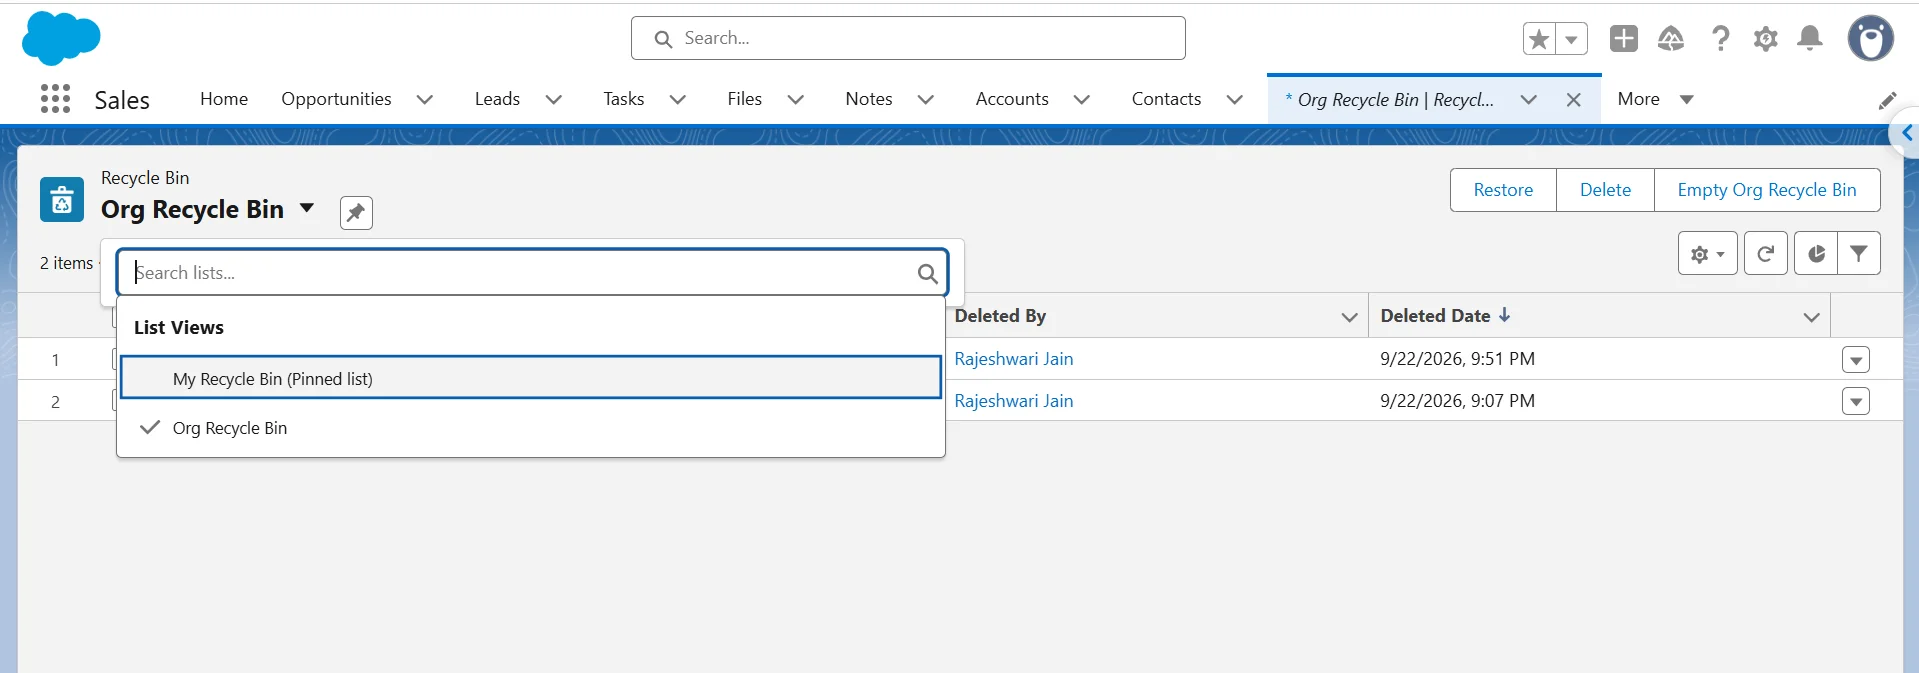
In Lightning Experience, the Recycle Bin provides list-view functionality for finding deleted records, including sorting and filtering. However, it doesn’t provide the same custom list-view creation and filtering experience available for standard object list views. You can switch between My Recycle Bin and the Org Recycle Bin to find deleted records. Viewing and restoring records deleted by other users requires the Modify All Data permission.
-
1
Open Recycle Bin from the App Launcher, or add it to the navigation bar.
-
2
Select My Recycle Bin or Org Recycle Bin.
-
3
Use the available Recycle Bin list-view options to sort and narrow the records you need.
-
4
For more precise programmatic retrieval, use Salesforce’s Get Deleted API, which retrieves deleted records for a specified object and date/time range. Review the records before restoring them.
For more ways to identify who deleted a record, see Find out who deleted a record in Salesforce.
Restoring Multiple Records at Once (Mass Restore)
Selecting records one by one in the Recycle Bin works for small batches, but it becomes impractical when you need to restore hundreds or thousands of records. Salesforce admins have run into this problem when dealing with very large numbers of deleted records.
Bulk-select records in the Recycle Bin
For a few dozen records, you can use the Recycle Bin directly. Select the records you want to restore and click Restore.
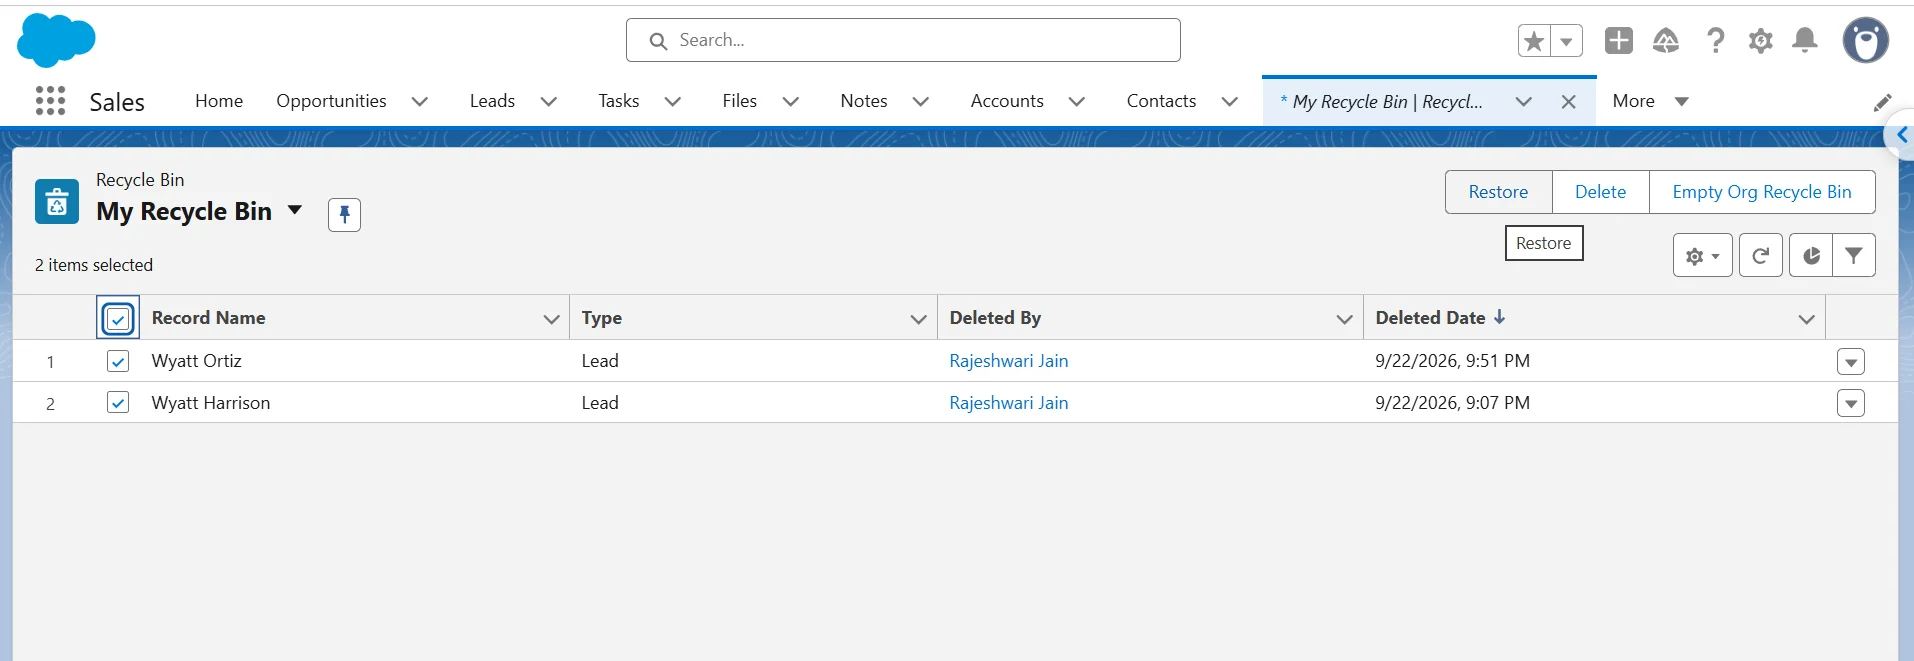
This method works well for small batches, but it does not scale to large data sets.
Data Loader: Export All and Undelete
Data Loader lets you find deleted records and restore them without writing code.
-
1
Open Data Loader and select Export All.
-
2
Select the object that contains the deleted records.
-
3
Select the Id field and filter the records with IsDeleted = true.
-
4
Export the results to a CSV file.
-
5
Review the IDs and remove any records you do not want to restore.
-
6
Select Undelete in Data Loader and upload the CSV containing the record IDs.
Data Loader requires installation, but it is a practical option when you need to restore hundreds or thousands of records.
Workbench: Query deleted records without installing a tool
Workbench provides another option if you do not want to install Data Loader and are comfortable with basic SOQL.
When selecting the object in Workbench, choose Include Deleted and Archived Records. Then use a query such as:
SELECT Id
FROM Lead
WHERE IsDeleted = TRUE
You do not add ALL ROWS to the query when using this Workbench option. Instead, the Include Deleted and Archived Records setting tells Workbench to include deleted records.
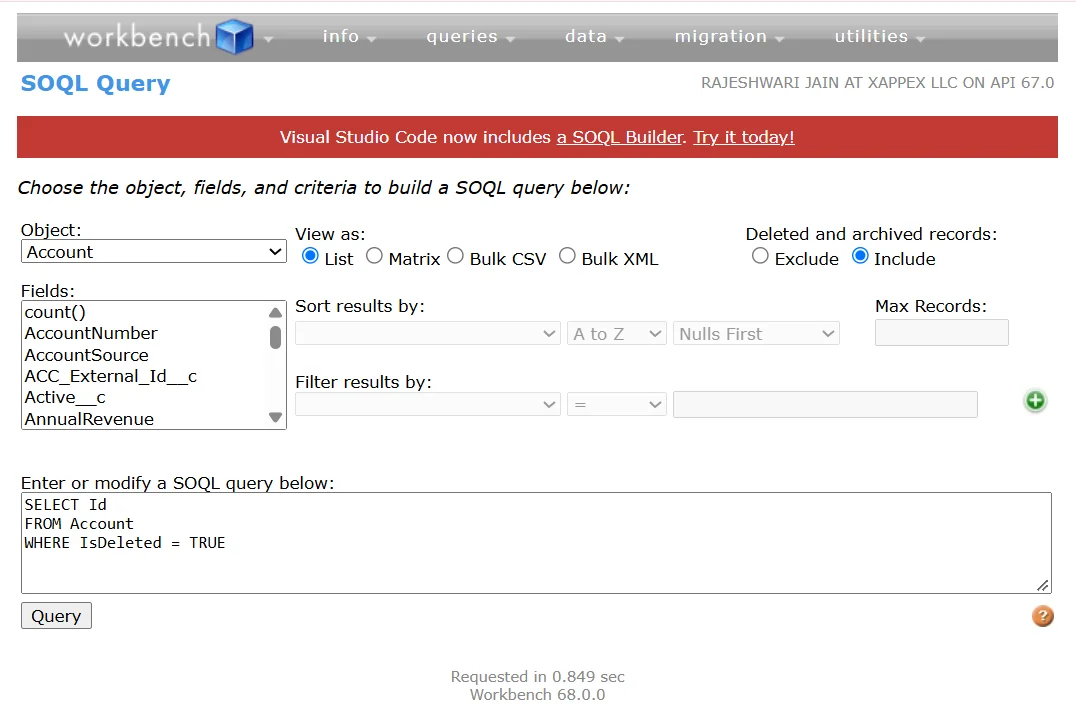
After running the query:
-
1
Export the record IDs.
-
2
Select Undelete from Choose any action in Workbench.
-
3
Run the undelete operation.
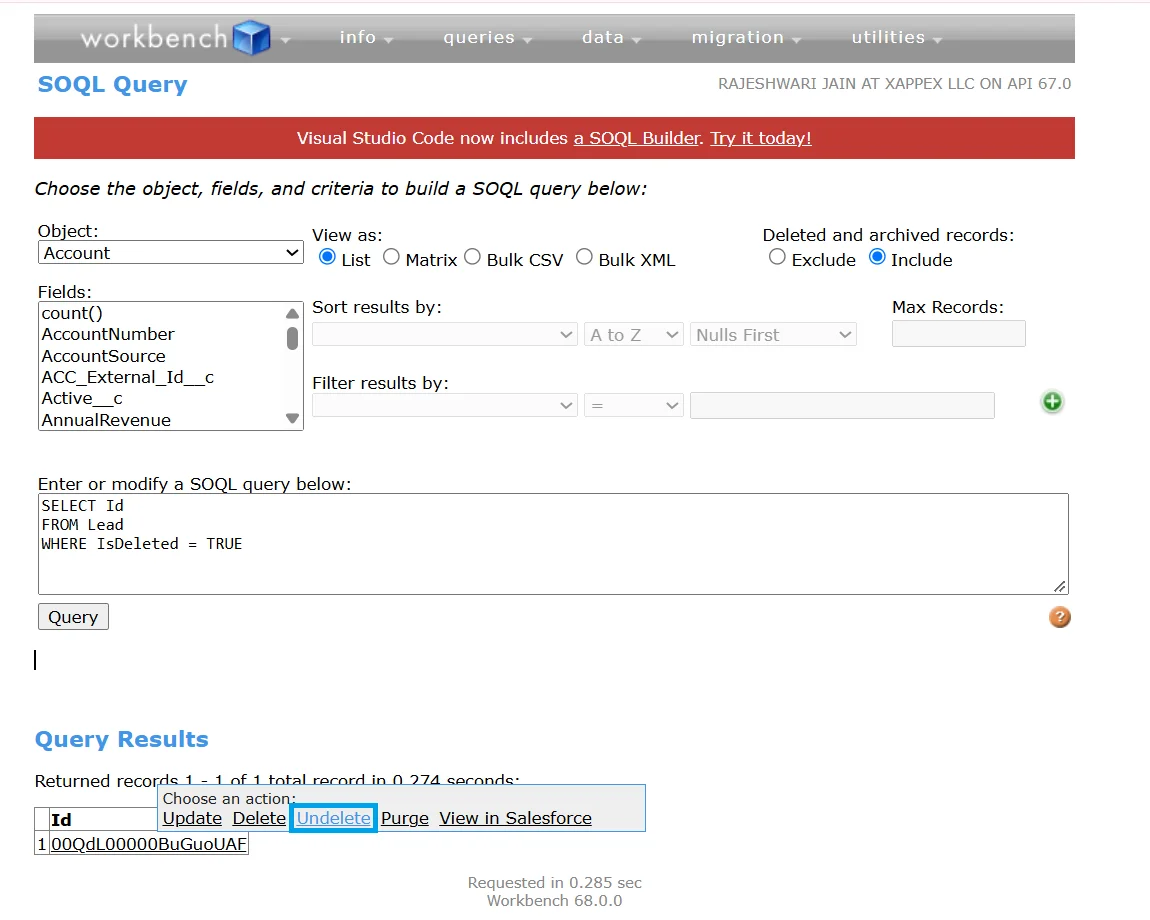
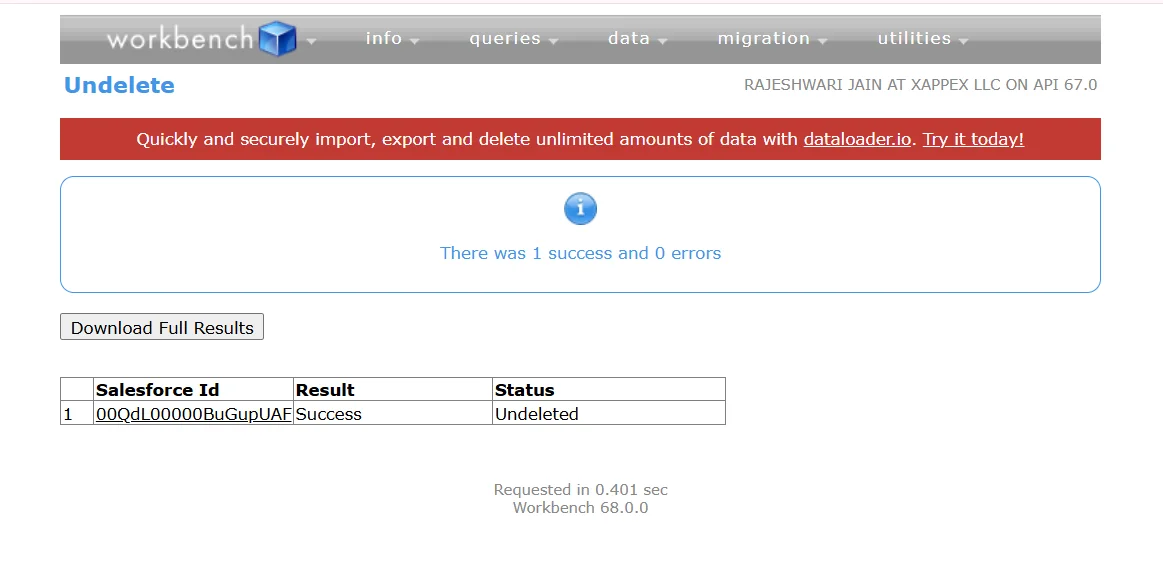
Workbench does not require installation, but you need basic SOQL knowledge to use it.
Apex: ALL ROWS and undelete
Developers can use Apex when they need more control over the restore process. ALL ROWS lets SOQL return deleted records, and the undelete DML statement restores them.
For example:
List<Account> deletedAccounts = [
    SELECT Id
    FROM Account
    WHERE IsDeleted = true
    ALL ROWS
];

undelete deletedAccounts;
What If the Record Is No Longer in the Recycle Bin?
If a record is no longer in the Recycle Bin, recovery depends on how it was deleted and whether related records were also deleted.
Check for cascade deletes
In a master-detail relationship, deleting a parent also deletes its child records. Restoring the parent restores the child records deleted with it.
The deletion order matters. If you delete the child first and then delete the parent, Salesforce permanently deletes the child. Restoring the parent later does not bring the child back.
Check whether a lookup relationship changed
Salesforce does not always restore a previous lookup relationship. It restores the original relationship only if the lookup has not been changed.
For example, an Asset may originally point to Product A. If Product A is deleted and the Asset is later linked to Product B, restoring Product A does not relink the Asset to Product A. The newer relationship remains in place.
Check related Files
Salesforce stores Files separately from the records they are linked to. ContentDocument stores the file, while ContentDocumentLink stores its relationship to a record.
If a restored record is missing a File, check whether the File and its link were also restored.
Use a backup if the record can not be undeleted
After Salesforce permanently deletes a record, you cannot recover it through the Recycle Bin or undelete(). You must use another source, such as a data export, Data Loader export, sandbox, or backup. If you recreate the record, Salesforce assigns it a new record ID.
Salesforce’s current native backup product, Backup & Recover Next, provides backup and recovery capabilities for Salesforce data. Check Salesforce’s current documentation for supported data, licensing, pricing, and recovery options before publishing specific figures.
Tip
The Recycle Bin has a record limit tied to your organization’s storage allocation. If the limit is reached, Salesforce can automatically remove older deleted records. For this reason, do not treat the Recycle Bin as a backup. Maintain a separate backup of important Salesforce data.
Recreating a Record from a Backup (and the Record ID Problem)
When you recreate a Salesforce record from an export or backup, Salesforce assigns it a new record ID. It does not reuse the original ID. This matters when other records reference the restored record through lookup or master-detail relationships.
For example, suppose you restore an Account and its Contacts. The restored Account gets a new ID, so the Contact backup still contains the old Account ID. You must replace that old ID with the new Account ID before importing the Contacts. Salesforce recommends handling this ID mapping externally, such as with Excel’s VLOOKUP function.
A typical recovery process looks like this:
-
1
Restore the parent records first. Import the Accounts, for example.
-
2
Export the restored records with their new Salesforce IDs.
-
3
Match the original IDs to the new IDs. In Excel, use VLOOKUP to create a mapping between the two.
-
4
Update the child records’ relationship fields with the new parent IDs.
-
5
Import the child records.
You can also avoid relying entirely on Salesforce record IDs by creating a custom External ID field and storing the original IDs in it. During an upsert, Salesforce can use that External ID to match records and establish relationships without requiring the original Salesforce ID.
If you work with large Excel-based imports, XL-Connector can also look up Salesforce IDs using fields such as External IDs and use those values for relationship fields.
For more context, see Lookup Relationship and Master-Detail Relationship.
Prevention Checklist
-
Schedule a weekly data export.
-
Limit Modify All Data and Delete permissions to users who need them.
-
Consider a dedicated backup solution if manual recovery is not practical for your org.
Conclusion
Check the Recycle Bin first. If the records are no longer there, identify the recovery stage and use the right method. When recovering related records, restore the parent before the child. For bulk recovery, choose Data Loader, Workbench, or Apex based on your technical comfort. Regular Salesforce backups can also help prevent permanent data loss.
FAQ
What permissions do I need to restore deleted Salesforce records?
You need Read access to the records in the Recycle Bin to view and restore your own deleted records. To access and restore records deleted by other users, you need the Modify All Data permission.
Can I permanently delete records from the Recycle Bin?
Yes. Users with the Modify All Data permission can permanently delete records from the Recycle Bin.
What permission is required to restore deleted public tags?
You need the Tag Manager permission to restore deleted public tags.
Does restoring a record re-trigger automation such as workflows or flows?
Restoring a record is an undelete operation, not an insert or update. Apex triggers can run after an undelete, but record-triggered flows don't have an undelete trigger. Time-dependent workflow actions that were removed when the record was deleted aren't restored when you undelete the record.
Does restoring records affect storage limits?
Yes. Records in the Recycle Bin don't count toward your org's storage usage. After you restore them, they become active records and count toward storage again.
Can I keep the same record ID when restoring records in bulk?
Yes. Use an Undelete operation to restore records from the Recycle Bin. Data Loader, Workbench, and Apex can perform undelete operations using the existing record IDs. If you reinsert the records instead, Salesforce creates new IDs.
Can I restore deleted Flows, Fields, or Reports the same way?
No. Salesforce provides different recovery options for these components. Deleted custom fields can be restored from Deleted Fields in Object Manager, while deleted reports and dashboards can be restored from the Recycle Bin. For supported flows, Flow Version Edit History lets you restore an earlier saved state of the current flow version.

Rajeshwari Jain
Content Manager
Rajeshwari Jain is a Technical Support Specialist and Content Writer at Xappex. She applies her practical experience to assist customers and create articles on how Xappex tools work with Salesforce to improve data management and increase efficiency.
She began her IT career in 2022 as a Quality Assurance professional before transitioning into Salesforce administration and technical writing in 2023. With Salesforce Certified Administrator and Associate certifications, Rajeshwari writes blogs on Salesforce flows, admin tools, and updates to expand her skills outside of work.
In her free time, she enjoys reading tech blogs and experimenting with new tools.
Feel free to reach out to Rajeshwari for collaborations or to check out her Salesforce-focused content.