Get Started Free


Salesforce sandbox seeding loads a sandbox with the data required for development, testing, training, or user acceptance testing (UAT). Instead of copying all production data, it imports only the records needed for specific business scenarios. A well-designed seeding process can maintain parent-child relationships and support data masking to protect sensitive information. Because Developer and Developer Pro sandboxes include metadata only, teams typically seed them before development and testing.
What Is Salesforce Sandbox Seeding?
Salesforce sandbox seeding loads a sandbox with representative data after creation or refresh. Instead of copying the entire production org, it imports only the records needed for development, testing, training, or user acceptance testing (UAT). It provides realistic test data without copying all production records.
Three related terms are often confused:
- Data seeding loads representative records into a sandbox for development and testing.
- Data masking involves substituting sensitive information, for example, personally identifiable information (PII), with realistic but fictitious values; while it protects the data, it does not generate test records.
- Sandbox refresh recreates a sandbox from production based on its type. It copies metadata and some or all production data depending on the sandbox type. A refresh replaces the existing sandbox, so previously seeded data must be loaded again.
After a sandbox is created or refreshed, teams usually seed it so developers and testers get the data they need. Automating this process ensures test environments remain consistent and reduces manual setup.
Many projects require only a subset of production data. Seeding only the needed records reduces the data stored and managed compared with copying the complete production dataset.
Sandbox Types and What Each One Needs
Sandbox licenses are hierarchical. A Full sandbox license can create any type of sandbox. A Partial Copy license can create Partial Copy, Developer Pro, and Developer sandboxes. A Developer Pro license can create Developer Pro and Developer sandboxes. A Developer license can create only Developer sandboxes. The amount of data in each Salesforce sandbox varies, so the seeding method depends on the sandbox type.
Salesforce requires a sandbox template for Partial Copy sandboxes and supports optional templates for Full sandboxes to control which production records are copied. Templates limit copied data to the records required for testing and other tasks.
Licenses are shown as either Available or In use. If you do not see a sandbox option or need more licenses, contact Salesforce.
Developer and Developer Pro
Developer and Developer Pro sandboxes copy production metadata, not records. Seed them before development, testing, or training. Developer Pro supports larger datasets and suits integration testing and user training when synthetic data suffices.
Partial Copy
Partial Copy sandboxes copy production metadata and a data sample defined by a sandbox template. The template is required and determines which objects are copied. Each selected object contributes up to 10,000 records. Teams add records for edge cases, integration testing, and scenarios the sample misses.
Full
A Full sandbox is a replica of your production org, including metadata, records, and attachments. When creating one, you can choose whether to include Field History Tracking data and Chatter activity. Field History Tracking is excluded by default. Including Chatter activity can significantly increase sandbox creation and refresh time.
It is the only sandbox type that supports performance testing, load testing, and staging. Because they have the longest refresh interval, most teams use Developer or Developer Pro sandboxes for day-to-day development.
Teams may add release-specific or edge-case test data that does not exist in production. If the sandbox contains sensitive information, apply data masking to meet your organization’s security and compliance requirements.
The Sandbox History tab logs sandbox creations and refreshes from the past year, up to 500 entries, with the most recent activity listed first.
| Sandbox type | Start with data? | Salesforce’s intended use | Typical seeding approach | License |
|---|---|---|---|---|
| Developer | Production configuration (metadata) only | Development and testing | Manual import, Apex with SandboxPostCopy, Salesforce CLI, Data Loader, or API-based tools | Developer sandbox license or any higher sandbox license |
| Developer Pro | Production configuration (metadata) only | Development, quality assurance, integration testing, and user training | Same as Developer, with higher storage limits | Developer Pro sandbox license or any higher sandbox license |
| Partial Copy | Production metadata and a sample of production data defined by a sandbox template | User acceptance testing, integration testing, training, and quality assurance | Add records for edge cases or missing test scenarios and apply data masking if needed | Partial Copy sandbox license or a Full sandbox license |
| Full | Complete production metadata and data | Staging, performance testing, load testing, and final validation | Add release-specific or edge-case test data and mask sensitive data when required | Full sandbox license |
How to Seed a Salesforce Sandbox: Methods & Tools
Manual Entry / Data Import Wizard
Manual entry works for a few test records but not for larger datasets.
The Data Import Wizard is a Salesforce tool available in Setup. It imports supported standard and custom objects without additional software.
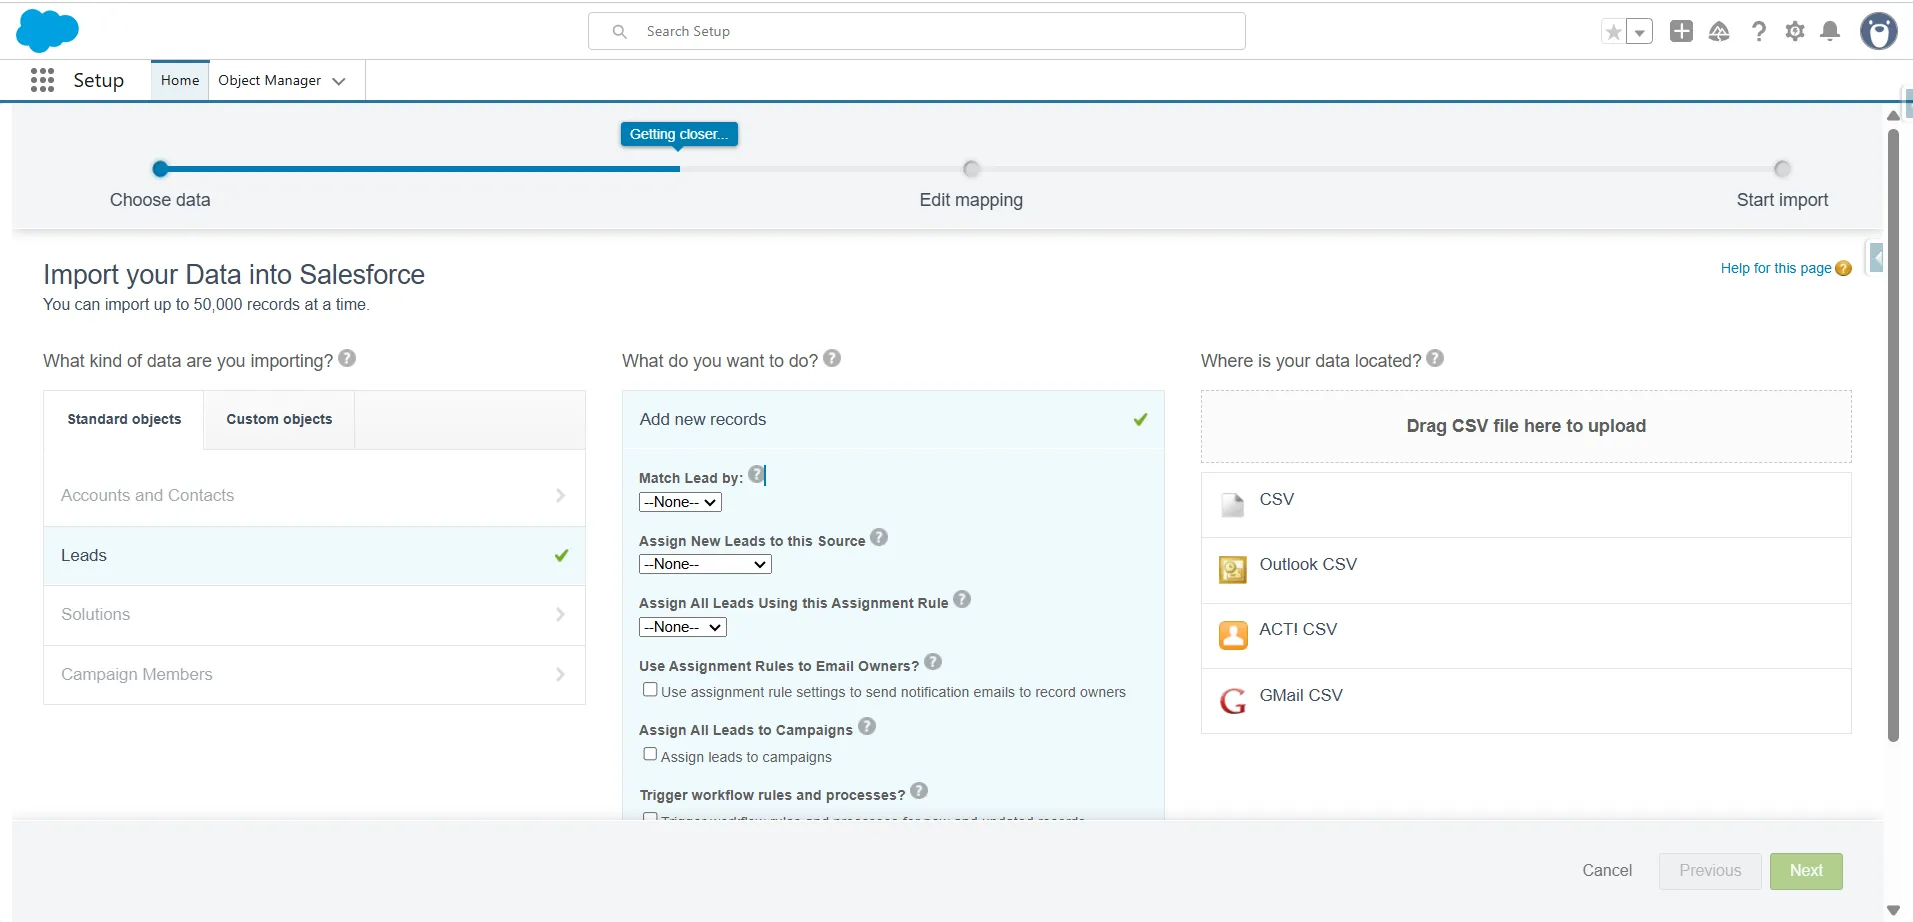
Use it for:
-
Small datasets
-
Single-object imports, with Accounts and Contacts as the main multi-object exception
-
Simple relationships
Key limits and capabilities:
- Supports selected standard objects including Accounts, Contacts, Leads, Solutions, Campaign Members, Person Accounts, and custom objects. It does not support Opportunities, Cases, Products, Orders, Assets, or Contracts.
- Supports up to 50,000 records per import.
- Accepts CSV files up to 100 MB or 32 MB compressed, with up to 90 fields and about 400 KB per record.
- Supports Insert, Update, and Upsert for supported objects using Salesforce IDs or External IDs where applicable.
- Does not support record export or deletion.
Use Data Loader for larger volumes or unsupported objects.
For related records across multiple objects, use Salesforce CLI’s sf data export tree and sf data import tree commands. These preserve parent-child relationships. The older sfdx force:data:tree:* commands are deprecated.
Salesforce CLI (Data Tree)
Salesforce CLI Data Tree provides sf data export tree and sf data import tree for exporting and importing related records while preserving parent-child relationships. The older sfdx force:data:tree:export and sfdx force:data:tree:import commands are deprecated aliases.
Use it for:
-
Small to medium relational datasets
-
Developer and sandbox environments
-
CI/CD pipelines and automated data seeding
Limits:
- sf data export tree supports SOQL queries returning up to 2,000 records.
- With –files, each JSON file can contain up to 200 records. With –plan, files can contain more than 200 records because the CLI batches them to meet the API limit.
- An sObject Tree request supports up to 200 records, five object types, and five levels of parent-child relationships.
- Data Tree does not handle junction tables or complex many-to-many relationships well. Load junction records separately when the required relationships can be managed manually.
For larger datasets or complex migrations, use Data Loader, Bulk API, or another bulk-loading tool.
Data Loader
Data Loader is Salesforce’s desktop application for importing, exporting, inserting, updating, upserting, deleting, and hard deleting records via CSV files. It supports standard and custom objects exposed through the Salesforce API and suits medium to large data loads.
Data Loader uses the SOAP API, Bulk API, or Bulk API 2.0 depending on the operation and configuration. API access is included in Enterprise, Unlimited, Performance, and Developer editions and can be enabled for Professional Edition.
Loading Related Records:
Load parent records before child records. For example, load Accounts before Contacts.
For Opportunity Products (OpportunityLineItem), load Products, create PricebookEntry records, assign a price book to the Opportunity, then load Opportunity Products. OpportunityLineItem references PricebookEntry, not Product2 directly.
Use External IDs to maintain relationships across sandbox refreshes or different orgs. Upsert parent records using the External ID then use that value to resolve parent relationships when loading child records. This avoids hardcoding Salesforce IDs.
Loading a child before its parent can cause INVALID_CROSS_REFERENCE_KEY or FIELD_INTEGRITY_EXCEPTION. MALFORMED_ID indicates an invalid Salesforce ID. A blank optional lookup leaves the relationship empty.
Data Loader supports field mapping and reusable mapping files, but you must prepare CSV files and manage record relationships yourself.
Anonymous Apex, Batch Apex & SandboxPostCopy
Developers can use Anonymous Apex, Batch Apex, and the SandboxPostCopy interface to automate sandbox data generation and post-copy setup.
These methods can:
-
Generate test data
-
Create parent-child relationships
-
Apply custom data-generation logic
-
Repeat seeding processes
Anonymous Apex suits one-time or small data-generation tasks. Batch Apex suits larger datasets because it processes records asynchronously in batches. Each batch runs in a separate transaction with its own governor limits.
A global class that implements System.SandboxPostCopy can run automatically after a sandbox is created or refreshed when configured for that sandbox. It implements the runApexClass(SandboxContext context) method for post-copy tasks.
Sandbox templates control which production records are copied into Partial Copy and Full sandboxes. They are required for Partial Copy sandboxes and optional for Full sandboxes. Developer and Developer Pro sandboxes do not support templates because they copy metadata only.
After a copy, SandboxPostCopy can create or modify data. For large datasets, use asynchronous Apex such as Batch Apex instead of processing all records in one transaction.
It is useful for Developer and Developer Pro sandboxes, which don’t copy production records. Developers can use Apex or data-loading tools to create the required test data.
Native Salesforce Seeding & Anonymize
Salesforce Seeding and Anonymize supports repeatable data seeding from a production org, sandbox, or supported backup source into Salesforce sandboxes with options to anonymize sensitive data. Seeding from a backup requires the Backup & Recover capability.
Seeding templates define the objects, relationships, records, and filters to include. Anonymization templates define how selected fields are anonymized.
Template Types
- Nodes: Select objects manually, starting with root objects and adding related child or parent objects to control the data hierarchy precisely.
- Levels: Select root objects and set how many child-record levels to include. Related records are added automatically.
- Generate: Create synthetic test data without a source org. Combine it with an Anonymization template to define objects and replacement values.
Key Capabilities
- Filter records before seeding.
- Use Sample on root objects to select records based on finite-value fields.
- Schedule one-time or recurring seeding jobs.
- Run incremental seeds to add records missing from the destination.
- Reuse or clone templates for repeatable jobs.
- Apply an Anonymization template to source data before copying it.
- Configure supported automation settings to control automation during seeding.
Spreadsheet-Based Seeding
Admins can maintain reusable seed datasets in Excel or Google Sheets and use External IDs to preserve parent-child relationships across sandboxes without relying on Salesforce record IDs.
Xappex offers:
-
XL-Connector: Excel for Windows
-
XL-Connector 365: Excel for Windows, macOS, and Excel Online
-
G-Connector: Google Sheets
These tools import spreadsheet data into Salesforce and match related records using External IDs. The same datasets can be updated and reused after sandbox refreshes.
They do not provide built-in data masking. Anonymize production data before loading it into a sandbox.
Salesforce Sandbox Seeding from Excel
Need to insert new records and match related records for Salesforce sandbox seeding from Excel with XL-Connector?
Dedicated Seeding / DevOps Platforms
Dedicated seeding and DevOps platforms are better suited for organizations that manage multiple sandboxes, complex data models, or large datasets.
Common capabilities include:
-
Automated dependency mapping
-
Data masking
-
Reusable seeding templates
-
Scheduled or automated data refreshes
-
Relationship preservation
These platforms automate sandbox seeding and help maintain consistent, reliable test data across environments.
Sandbox Seeding Methods Comparison
| Method | Best for | Handles relationships? | Masking? | Skill level | Cost |
|---|---|---|---|---|---|
| Data Import Wizard | Single-object loads (up to 50,000 records on supported objects) | No (complex relationships) | No | Beginner | Free |
| Data Loader | CSV imports for medium to large datasets | Yes (manual, or with External IDs) | No | Intermediate | Free (requires API access) |
| Salesforce CLI (Data Tree) | Small to medium relational datasets | Yes (record limits apply) | No | Developer | Free |
| Anonymous Apex / Batch Apex + SandboxPostCopy | Repeatable, code-driven seeding | Yes | If implemented | Developer | Free |
| Native Salesforce Seeding & Anonymize | Template-based, scheduled seeding | Yes | Yes | Intermediate | Licensing applies |
| Spreadsheet-Based (XL-Connector / G-Connector) | No-code relational seeding and quick reseeds | Yes (using External IDs) | No (mask before loading) | Admin / No-code | Subscription |
| Dedicated Seeding / DevOps Platforms | Large orgs requiring automated masking and dependency management | Yes | Yes | Intermediate | Subscription |

Best Practice
When using Data Loader or any CSV import method, insert parent records before child records that reference them. If the parent object has an External ID, use it instead of the Salesforce record ID. This lets you reuse the same import files after every sandbox refresh.
What Breaks Sandbox Seeding (and How to Avoid It)
Sandbox seeding can fail when validation rules, automation, integrations, or other record-processing logic reject, modify, or create records during the load. Review these dependencies before loading data.
Validation Rules Block Inserts
Validation rules run when Salesforce creates or updates records, including those imported through Salesforce APIs. If an imported record violates an active validation rule, Salesforce rejects it. Data Loader has no setting to bypass validation rules. A bypass must be implemented in the org, such as a Custom Permission referenced by the validation rule.
For example, a validation rule that requires an email Id when the Lead source is Web.
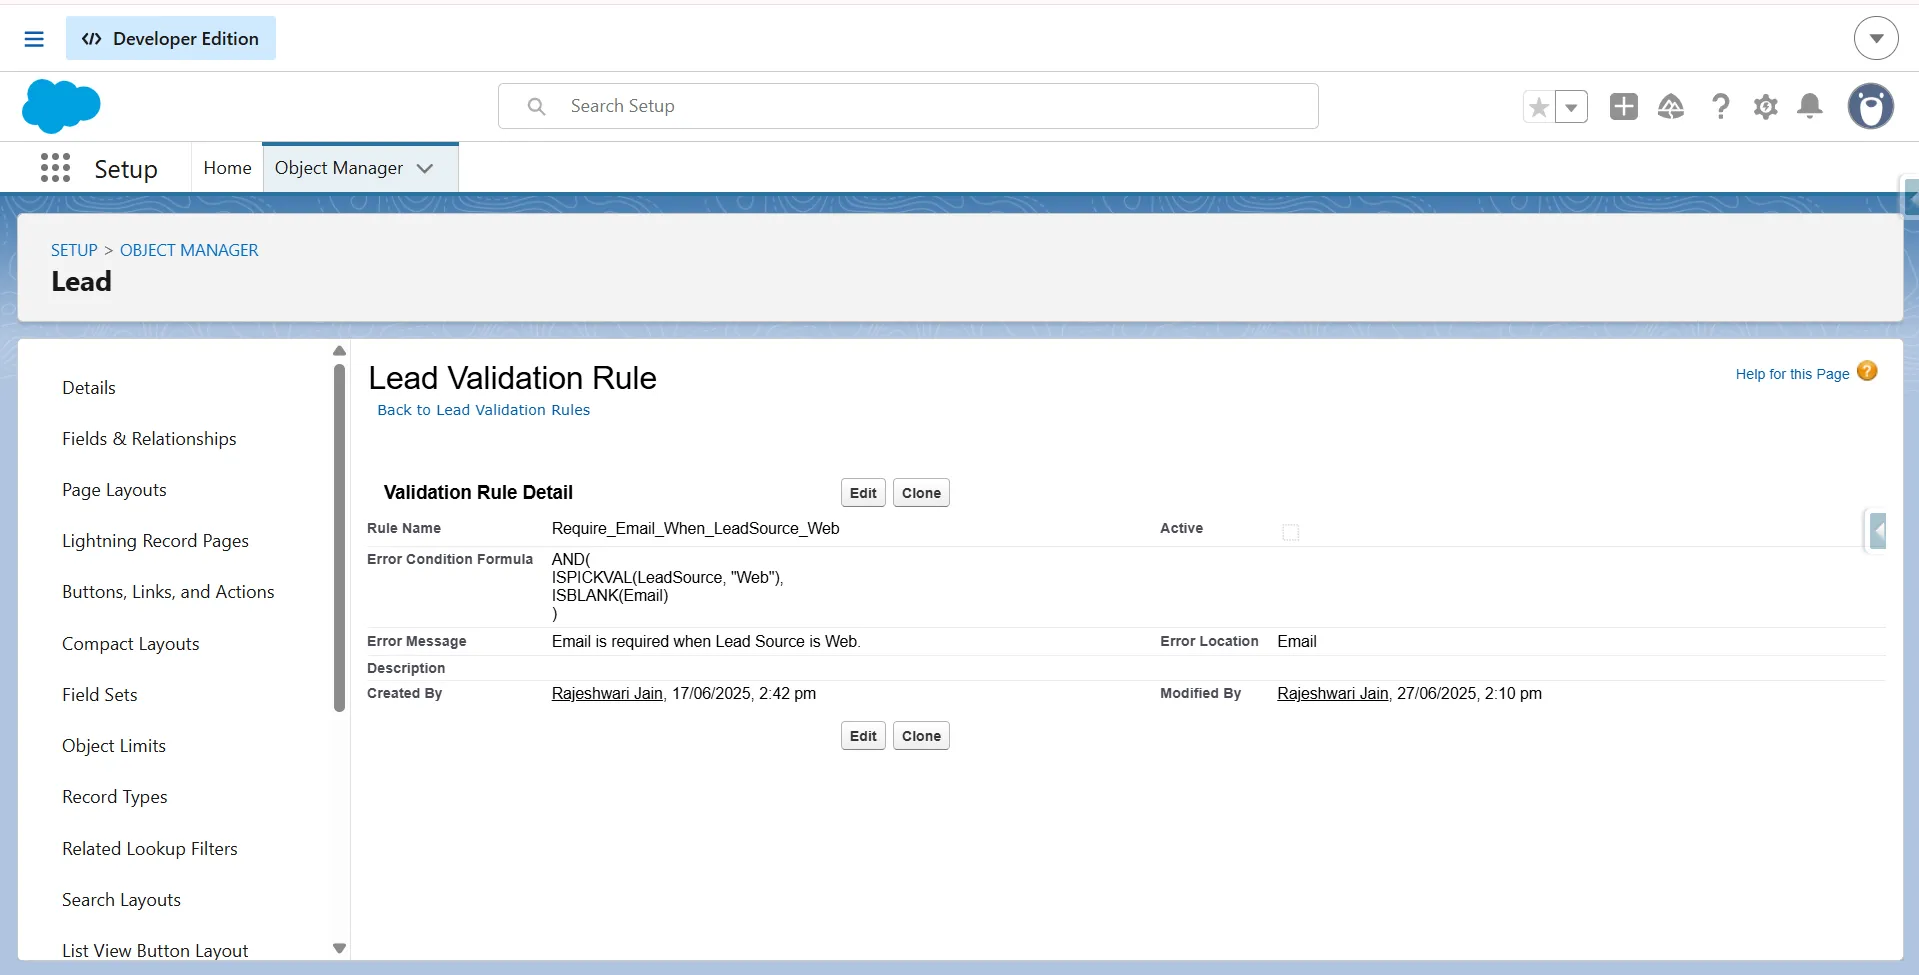
Before loading data, review active validation rules on the objects being seeded. If the org has a bypass mechanism like a Custom Permission referenced by the validation rule, use it during the load instead of disabling validation rules. Salesforce supports Custom Permissions for conditionally bypassing selected validation rules.
Triggers, Flows, and Legacy Automation Can Affect Seeding
Records created or updated during a seed can invoke active Apex triggers, record-triggered Flows, Workflow Rules, and Process Builder processes. These automations may modify seeded records, create related records, or initiate additional processing.
Salesforce ended support for Workflow Rules and Process Builder on December 31, 2025. Existing active automation continues to run, but Salesforce no longer provides customer support or bug fixes for these features. Salesforce recommends migrating legacy automation to Flow Builder.
Automation can:
-
Update seeded records.
-
Create related records.
-
Consume CPU, SOQL, and DML governor limits.
-
Cause record or transaction failures.
-
Invoke external integrations.
New and refreshed sandboxes default to System email only, limiting Salesforce-generated email. Sandboxes created before Spring ’13 may default to All email, so verify the setting.
Email settings do not block Apex callouts, external integrations, or platform-event processing.
A trigger that starts asynchronous Apex can still send requests to an external system. If the sandbox points to a production endpoint, seeding may cause unintended requests. Trigger-driven callouts generally use Queueable Apex, @future, or Batch Apex.
If available, use an automation bypass framework during seeding. Custom Permissions can bypass selected validation rules and trigger logic. Flow can use permissions to control automation.
Otherwise, temporarily disable nonessential automation after reviewing dependencies. Do not disable critical validation, security, or business logic.
Disabled automation can leave derived fields or related records incomplete. After seeding, restore automation, reconcile data, and verify the dataset.
Load Parent Records Before Child Records
Many Salesforce objects use lookup or master-detail relationships. A child record can fail when a populated relationship field references a parent that doesn’t exist in the destination sandbox. Master-detail children require a parent. Lookup fields are optional unless configured as required. A blank lookup can be inserted, but an invalid populated lookup can return INVALID_CROSS_REFERENCE_KEY.
To avoid relationship errors:
-
Load parent objects before child objects. For junction objects with two master-detail relationships, load both parents first.
-
Use External IDs for supported relationship mappings instead of hardcoded Salesforce IDs. In Data Loader, map the child relationship through the related object’s External ID field, such as Account:External_ID__c. Other tools may use different relationship syntax.
-
Handle self-referencing relationships in two passes. For Account Parent, Contact Reports To, or Case Parent, insert records with the self-reference blank, then update the relationship.
-
Verify reference records before loading dependent objects.
External IDs don’t apply to every reference field. Data Loader doesn’t support standard External ID relationship mapping for polymorphic fields such as Activity WhatId and WhoId. OwnerId can reference a User or Queue and requires destination-org-specific mapping.
Use a writable Text or Number External ID when Upsert matching is required. Auto Number External IDs can still support relationship lookups where supported.
For RecordTypeId, OwnerId, and Queue references, don’t use hardcoded source-org IDs. Resolve them using destination-org identifiers or supported mapping methods. For Record Types, map by Developer Name with the object context.
Loading data in dependency order reduces relationship-related seed failures.
Assignment and Auto-Response Rules on Data Import
Assignment Rules and Auto-Response Rules do not behave like standard record automation during API imports. Their behavior depends on the API and request settings.
Assignment Rules
- SOAP API: Assignment Rules for Cases and Leads run only when the request includes AssignmentRuleHeader. Set either useDefaultRule = true to use the active default rule or assignmentRuleId to run a specific rule. Do not use both. If the header is omitted, Case and Lead Assignment Rules do not run. For Accounts, the header controls territory assignment rules.
- REST API: Active Assignment Rules run by default for Accounts, Cases, and Leads. If Sforce-Auto-Assign is omitted, Salesforce treats it as TRUE. Set Sforce-Auto-Assign: FALSE to prevent the rules from running, or provide an Assignment Rule ID to run a specific rule. The setting also applies to related Account, Case, or Lead updates caused by the request.
- Bulk API 1.0 and 2.0: Set assignmentRuleId on the job to run a specific Assignment Rule for Cases or Leads. Bulk API 2.0 supports this property from API version 49.0.
- Data Loader: Enter an Assignment Rule ID under Settings → Assignment rule to apply that rule during insert, update, or upsert operations.
Auto-Response Rules
Auto-Response Rules are separate from Assignment Rules and do not run automatically for API-created Cases or Leads.
With the SOAP API, set EmailHeader.triggerAutoResponseEmail = true to trigger the active Auto-Response Rule. Apex DML can also set the corresponding Database.DMLOptions.EmailHeader.triggerAutoResponseEmail property.
REST API does not provide the SOAP EmailHeader for this purpose. For REST-based loads that require auto-response behavior, implement the required email logic with Flow or Apex.
Note
Escalation Rules apply only to Cases and have no API header equivalent to AssignmentRuleHeader or Sforce-Auto-Assign. They cannot be disabled for an individual API request.
Duplicate Rules Interfere with Seed Data
Duplicate Rules run during imports and API data loads. Masked or anonymized records can match existing records and prevent inserts or updates.
Depending on the load, you can:
-
Temporarily deactivate the Duplicate Rules.
-
Exclude the integration or data-loading user with a current-user condition in the Duplicate Rule.
-
Use DuplicateRuleHeader with allowSave when duplicate matches should not block the save.
allowSave has two limitations. It overrides rules with the Alert action but not those with the Block action. Data Loader does not expose this option in its interface but it is available through the SOAP API and Apex using Database.DMLOptions.
Field History Keeps Original Values
Masking current field values does not change historical values stored through Field History Tracking.
Developer, Developer Pro, and Partial Copy sandboxes do not copy field history. Full sandboxes can copy it for 0 to 180 days, in 30-day increments. The default is 0 days.
If field history is copied, users with access to the records may still see original production values after the current fields are masked.
When configuring a Full sandbox, include only the history required for testing. Keeping the history period low reduces sandbox copy time.
Preserve Original CreatedDate and CreatedBy
By default, Salesforce assigns new audit values when records are inserted. Fields like CreatedDate, CreatedBy, LastModifiedDate, and LastModifiedBy reflect the import instead of the original production record.
To preserve the original audit fields:
-
Enable Set Audit Fields upon Record Creation in Setup → User Interface under the Setup section.
-
Grant the required user permission. Standard profiles, including System Administrator, cannot have this permission. Use a permission set or custom profile instead.
-
Use a supported API-based import method. Data Import Wizard doesn’t support setting audit fields.
-
Confirm that the objects support preserving audit fields.
-
Ensure the referenced users exist in the destination org.
Audit fields can only be set when records are created. Salesforce does not allow changes afterward. To correct them, delete and re-import the records with the correct values.
If the requirements are not met, the import fails when audit fields are included. If they are not included, Salesforce assigns new audit values.
Salesforce generally recommends enabling this setting only during a migration unless recurring imports require it.
Objects with Complex Automation Can Fail Large Imports
Objects with extensive validation rules, Flows, Apex triggers, or other automation increase transaction complexity. Large import batches can exceed governor limits, such as CPU time, and fail as a result.
If imports fail consistently:
- Reduce the batch size.
- Disable unnecessary automation during the seed process when possible.
Smaller batches reduce transaction complexity and make failed records easier to troubleshoot.
Seeded Record IDs Won't Match Production
Salesforce generates new record IDs whenever records are inserted into another org.
Any process that depends on hardcoded Salesforce record IDs will fail after sandbox seeding.
Instead of referencing Salesforce IDs directly:
-
Use External IDs to maintain parent-child relationships.
-
Query records dynamically in Apex or integrations.
-
Store configuration in Custom Metadata Types or Custom Settings instead of hardcoded record IDs.
This makes sandbox refreshes and repeated seed operations more reliable.
Best Practice
Review your org’s validation rules, automation, data relationships, assignment rule behavior, duplicate rules, audit field requirements, and your data-loading tool’s configuration before every sandbox seed. Most seeding failures result from org configuration rather than the import tool itself.
Conclusion
Effective Salesforce sandbox seeding depends on the sandbox type, data volume, relationships, and testing requirements. Teams can choose Data Import Wizard, Data Loader, Salesforce CLI, Apex, native Salesforce seeding, spreadsheet-based tools, or dedicated DevOps platforms based on these requirements.
Before seeding, review validation rules, automation, assignment and auto-response rules, duplicate rules, audit-field requirements, and record dependencies. Use External IDs instead of hardcoded Salesforce IDs and load parent records before child records to support repeatable seeding after sandbox refreshes.
Seed only the data required for development, testing, training, or UAT. A repeatable seeding process keeps sandbox data consistent and reduces relationship, automation, and data integrity issues.
FAQ
What’s the difference between a sandbox refresh and sandbox seeding?
A sandbox refresh replaces the sandbox with a new copy of its source org. You must activate the refreshed sandbox before using it. Developer and Developer Pro sandboxes copy metadata only; Partial Copy and Full sandboxes copy data and support sandbox templates.
Sandbox seeding adds test data to the sandbox. Developer and Developer Pro sandboxes require seeding when test data is needed.
Do I have to reseed after every refresh?
Yes, if the data isn’t included in the refresh. Refreshing replaces the sandbox contents, including previously seeded data.
Refresh intervals are 1 day for Developer and Developer Pro, 5 days for Partial Copy, and 29 days for Full sandboxes.
Can I automate sandbox seeding?
Yes. Options include Apex, Batch Apex, SandboxPostCopy, Salesforce CLI, REST and Bulk APIs, and data-loading tools.
How much data should I seed?
Seed only what your test scenarios require. Storage limits are:
- Developer: 200 MB
- Developer Pro: 1 GB
- Partial Copy: 5 GB
- Full: Same as production
Partial Copy sandbox templates support approximately 10,000 records per object.
Start with core records such as Accounts, Contacts, and Opportunities, then add required related records. Load parents before children when relationships depend on parent IDs.
What’s the difference between data seeding and data masking?
Data seeding adds test data. Data masking changes sensitive values to protect information such as personally identifiable information.
For Partial Copy and Full sandboxes, masking occurs after the copy, so production values exist until the masking job runs. Developer and Developer Pro sandboxes don’t receive production data.
Do I need developer skills to seed a sandbox?
No. Admins can use Data Loader, Data Import Wizard, Workbench, Salesforce CLI, and spreadsheet-based tools such as XL-Connector.
Salesforce CLI uses the command line and JSON plan files but doesn’t require Apex. Use Apex when seeding requires generated data, custom logic, or automation beyond standard data-loading tools.
Why don’t my seeded record IDs match production?
Records inserted during seeding receive new IDs. Records copied during a Partial Copy or Full refresh retain their source IDs, but Salesforce doesn’t synchronize the orgs after the refresh.
Use External IDs with upsert instead of Salesforce record IDs when matching records across environments.
What happens to users and email after a refresh?
Salesforce appends .invalid to copied user email addresses to prevent email delivery. The user who starts the refresh keeps their production email address. Email deliverability defaults to System email only.
Review user access, record ownership, and email automation after the refresh.

Rajeshwari Jain
Content Manager
Rajeshwari Jain is a Technical Support Specialist and Content Writer at Xappex. She applies her practical experience to assist customers and create articles on how Xappex tools work with Salesforce to improve data management and increase efficiency.
She began her IT career in 2022 as a Quality Assurance professional before transitioning into Salesforce administration and technical writing in 2023. With Salesforce Certified Administrator and Associate certifications, Rajeshwari writes blogs on Salesforce flows, admin tools, and updates to expand her skills outside of work.
In her free time, she enjoys reading tech blogs and experimenting with new tools.
Feel free to reach out to Rajeshwari for collaborations or to check out her Salesforce-focused content.