Get Started Free


Salesforce SharePoint integration lets you link Salesforce records to documents in SharePoint or move Salesforce data into workbooks stored there. You can do this using Files Connect, AppExchange apps, Power Automate, middleware, or custom APIs. The best choice depends on whether you want to access files, share documents, or sync Salesforce data.
Salesforce SharePoint integration can refer to connecting documents to Salesforce records or transferring Salesforce data to workbooks stored in SharePoint.
Files: Documents stay in SharePoint, and Salesforce shows links or lets you open them from related records. This reduces Salesforce file storage, prevents duplicate copies, and makes it easier for teams like HR, finance, and legal to share documents. People without Salesforce licenses can still access files in SharePoint if they have the right permissions.
Data: Some teams use this integration to export Salesforce records or reports to Excel workbooks in SharePoint and refresh them on a schedule. Microsoft Power Automate’s Salesforce connector is a Premium connector. It lets you get, create, update, and delete Salesforce records depending on your permissions and connector limits. You can set up a flow to move Salesforce data to SharePoint lists, but this does not create two-way sync. One-way flows work but can be hard to maintain.
If you need Salesforce data in Excel rather than document integration, XL-Connector 365 can pull Salesforce records into workbooks stored in SharePoint or OneDrive and refresh the data on a schedule.
Why Connect Salesforce and SharePoint?
Connecting Salesforce and SharePoint makes it easier for organizations to manage documents and reduces their reliance on Salesforce file storage.
- Storage: Salesforce gives each organization file storage based on its edition and number of user licenses. SharePoint Online offers 1 TB for the whole organization, plus 10 GB for each eligible license. You can buy more storage on either platform if needed.
- File size: Most uploads to Salesforce are limited to 2 GB, including those through the REST API and Connect REST API. The Lightning file upload tool allows files up to 10 GB, but Experience Cloud sites have lower limits. SharePoint supports files as large as 250 GB.
- Access: SharePoint allows organizations to share documents with authorized users who do not have Salesforce licenses. These users’ access is controlled by SharePoint permissions and sharing policies.
- Version history: Salesforce Files lets users upload new versions and see previous ones. SharePoint also tracks version history and lets multiple users edit compatible Office documents at the same time.
- Usability: Admins often mention that sorting options for files attached to records are limited. Without integration, teams using both systems might need to upload the same file twice.
SharePoint vs Salesforce for documents comes down to their primary purposes. Salesforce Files connects files to CRM records, while SharePoint organizes documents for storage and collaboration.
| Feature | Salesforce Files | SharePoint |
|---|---|---|
| Main purpose | Attach and share files alongside Salesforce records, libraries, and Chatter | Store, organize, and collaborate on documents |
| Storage | 10 GB per org, plus 2 GB per user license on Enterprise, Performance, and Unlimited editions (612 MB per license on Contact Manager, Group, and Professional). Essentials and Starter get 1 GB per org. | 1 TB per organization, plus 10 GB per eligible license purchased |
| Maximum file size | 10 GB in Files Home, libraries, and a record's Files related list; 2 GB in Chatter posts and comments. Experience Cloud sites have lower limits. | 250 GB per file |
| Version history | Supports uploading new versions and viewing previous versions | Supports version history and restoration, depending on library settings |
| Access | Files in Files Home are private until shared. Library files inherit the library's sharing settings. Files can also inherit record permissions. | Controlled by SharePoint permissions at the site, library, folder, or item level |
| File organization | Linked to records, grouped in libraries, or shared in Chatter | Organized in sites, document libraries, and folders |
Things to keep in mind
-
Storage varies by license. The Salesforce allocations apply to standard Salesforce and Salesforce Platform licenses. Orgs with custom user licenses should check Setup > Storage Usage for their actual limits.
-
Small orgs get a flat amount. Contact Manager, Group, and Professional orgs with fewer than 10 users receive 1 GB of per-user file storage in total.
-
Experience Cloud sites have lower file limits. Sites on the Salesforce-provided my.site.com URL allow up to 128 MB per file. Sites with a custom domain allow up to 500 MB.
-
Older file types have tighter limits. Classic attachments are capped at 25 MB and the Documents tab at 5 MB.
-
File sharing has a cap. A Salesforce file can be shared a maximum of 2,000 times.
Integration Options Compared
Choose Files Connect if users only need to access existing SharePoint files from Salesforce. The files stay in SharePoint and are only referenced from Salesforce, so nothing is uploaded or moved.
Choose an AppExchange app or custom integration if they also need to upload files, create folders automatically, or move files from Salesforce storage to SharePoint. For admins without developer support, an AppExchange app is usually the easiest option for these advanced workflows.
| Option | Choose it if | Upload and folders from Salesforce | Flow automation | Admin effort | Cost |
|---|---|---|---|---|---|
| Files Connect | Users need to access and share existing SharePoint files from Salesforce. | It only accesses, searches, and links existing SharePoint files; it can’t upload files or create folders natively. | No native Flow actions. | Configure authentication, the external data source, and user permissions. No custom code required. | Included in Professional, Enterprise, Performance, Unlimited, and Developer editions. |
| AppExchange apps | Users who need to upload files, create SharePoint folders automatically, or sync files between Salesforce and SharePoint. | Depends on the app. Files can remain in SharePoint rather than being stored in Salesforce. | Some apps provide Flow actions or Apex methods to automate folder creation, file uploads, and synchronization. | Install the app, connect it to Microsoft 365, and configure authentication. A Salesforce admin typically assigns the app’s permission sets, and a Microsoft 365 admin grants the app access to SharePoint. | Varies by app, subscription, and pricing model. |
| Power Automate | Syncing SharePoint lists with Salesforce records, or automating actions triggered by Salesforce record changes (created or modified). | Not a dedicated interface for managing files on Salesforce records. | Yes, through Power Automate flows. | Admin or power user, depending on complexity. | Salesforce connector requires a Premium license. |
| Middleware (MuleSoft, Zapier) | Connecting several systems. MuleSoft suits complex data mapping; Zapier suits simple workflows. | Custom, depending on connectors and workflow. | Custom workflows: integration flows and APIs (MuleSoft), trigger-action workflows (Zapier) | MuleSoft: IT/developers (Composer is no-code). Zapier: no-code, admin or business user. | MuleSoft: from $2,000/month, billed annually, credit-based. Zapier: Salesforce needs a paid plan, from $19.99/month billed annually (750 tasks). |
| Custom build | You need functionality that existing products do not provide. | Custom, using Microsoft Graph and Salesforce components. | Custom automation. | Developer required for authentication, Apex, LWC, testing, and maintenance. | Development and maintenance costs. |
Files Connect lets users access and share external files by storing copies in Salesforce or referencing files in SharePoint. However, it doesn’t provide a complete document-management workflow out of the box.
AppExchange apps may add features such as file uploads, automatic folder creation, and Flow automation. Check each vendor’s listing for supported features and pricing.
If users already have access to Salesforce and SharePoint, linking a SharePoint folder to a Salesforce record or embedding a SharePoint page may be enough. These options don’t automatically upload files, create folders, or sync file details. Users still need the required SharePoint permissions.
Custom Development with Microsoft Graph
A custom integration gives you control over how users access and manage SharePoint files in Salesforce. Register an application in Microsoft Entra ID and configure the required Microsoft Graph permissions. In Salesforce, set up an Auth Provider and Named Credentials for authentication and secure API callouts. Use Apex to retrieve and manage files, and a Lightning Web Component (LWC) to display them on Salesforce record pages.
You need the Microsoft tenant ID, SharePoint site ID, and document library’s drive ID. Retrieve these values using Microsoft Graph:
- GET /sites/{hostname}:/teams/hr retrieves the SharePoint site.
- GET /sites/{siteId}/drive retrieves the site’s default document library.
- GET /sites/{siteId}/drives lists the site’s document libraries.
Grant the permissions required for the operations your integration performs.

Tip
Never expose client secrets in front-end code. Store authentication details securely and use Named Credentials for authenticated API callouts.
How to Set Up Files Connect
Before connecting Salesforce to SharePoint Online, make sure you have:
-
Required permissions: Salesforce permissions for Customize Application and Manage Auth. Providers, along with access to the Microsoft Entra admin center or Azure portal.
-
SharePoint site URL: The HTTPS URL of your site, site collection, or web application. Do not use a page URL ending in SitePages/Home.aspx.
-
Identity type: Choose Per User to authenticate each user with their own Microsoft account, or Named Principal to use shared credentials for the data source.
Setup Steps
Enable Files Connect and Choose a File-Sharing Mode
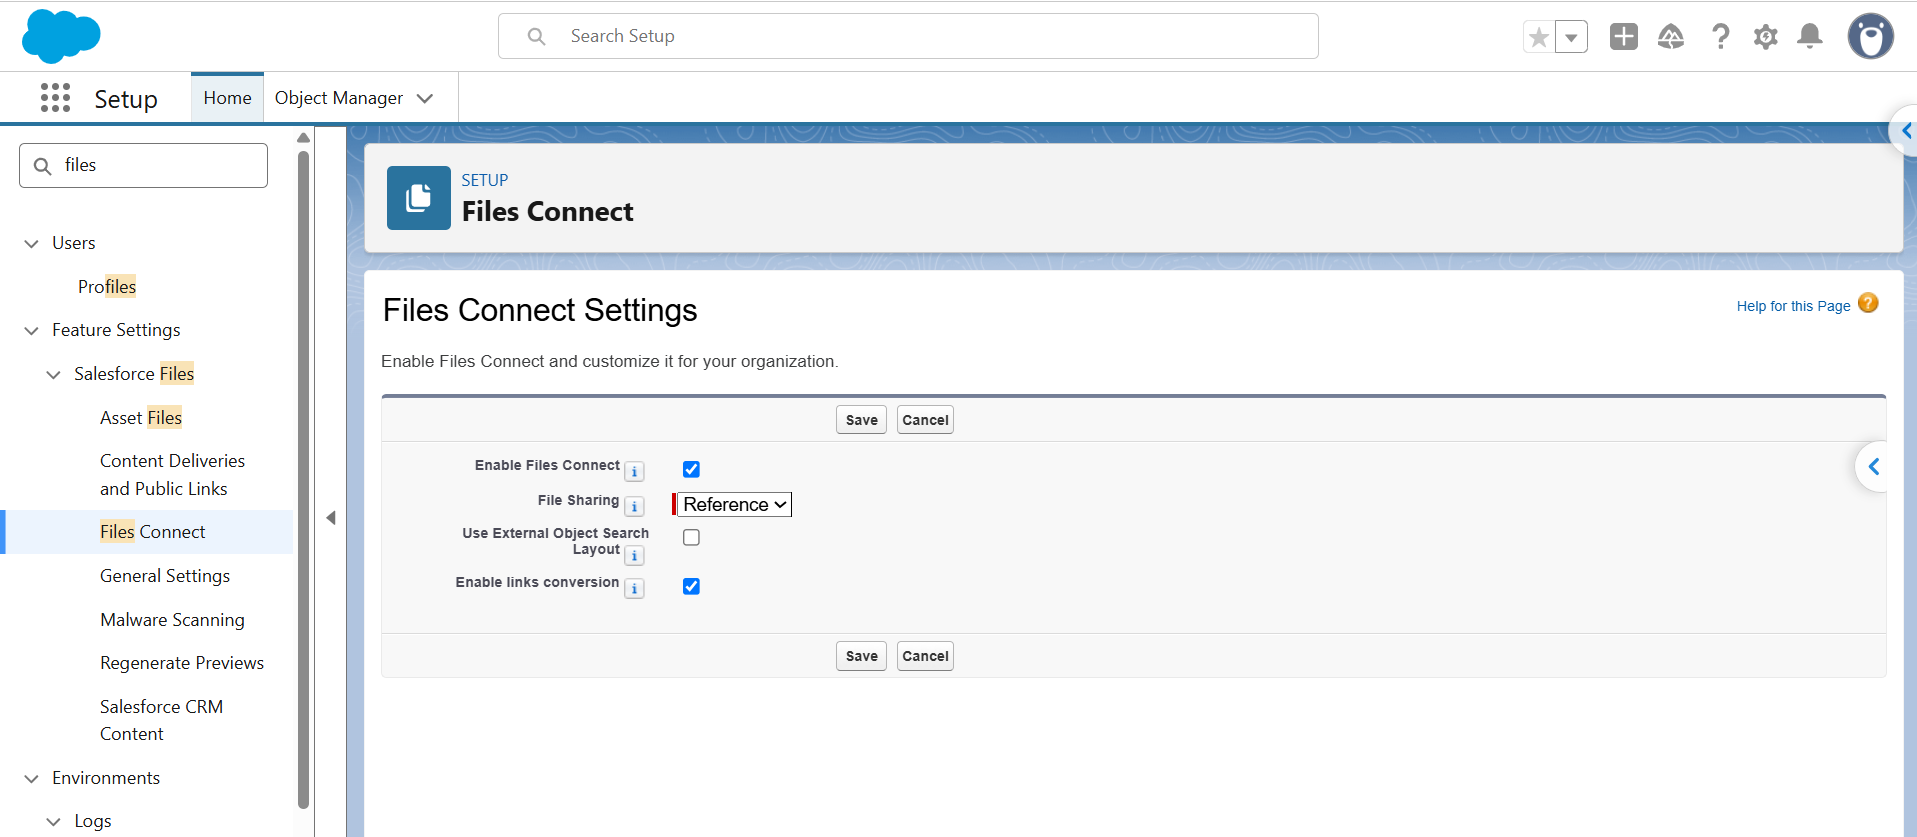
In Salesforce Setup, search for Files Connect, click Edit, and select Enable Files Connect. Then choose a file-sharing mode based on how users need to access SharePoint files.
- Reference: Keeps files in SharePoint and follows SharePoint’s access permissions. Users need the required SharePoint access to download files, and file previews aren’t available.
- Copy: Stores a separate copy of each file in Salesforce. Choose this mode when sharing files with external customers or partners. Chatter group members can access shared copies without needing access to the original SharePoint files.
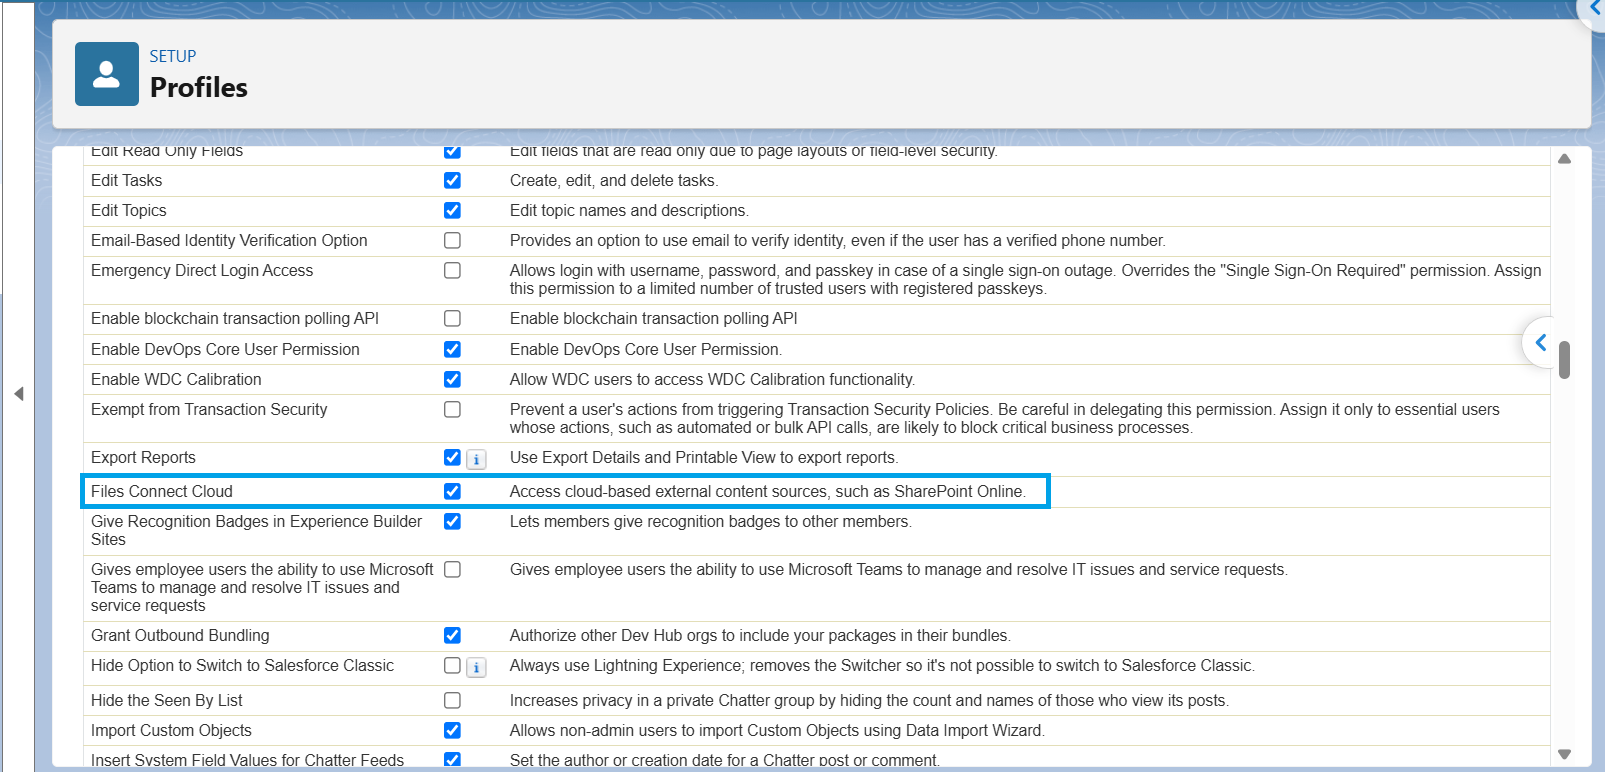
Next, create a permission set or edit a profile and enable the Files Connect Cloud system permission. In a permission set, find it under System Permissions. In a profile, find it under Administrative Permissions. Assign it to users who need access and administrators who configure data sources.
Files Connect lets Salesforce users access documents stored in SharePoint Online without leaving Salesforce. Setup requires an authentication provider in Salesforce, an app registration in Microsoft Azure, and an external data source.
Create an Authentication Provider in Salesforce
Azure requires a Salesforce callback URL, while Salesforce needs credentials from Azure. To resolve this dependency, create a placeholder authentication provider in Salesforce, register the Azure application, and then update the provider with the actual credentials.
Keep a temporary text file to store the callback URL, application ID, and client secret during setup.
-
1
In Salesforce Setup, search for Auth. Providers and open it.
-
2
Click New.
-
3
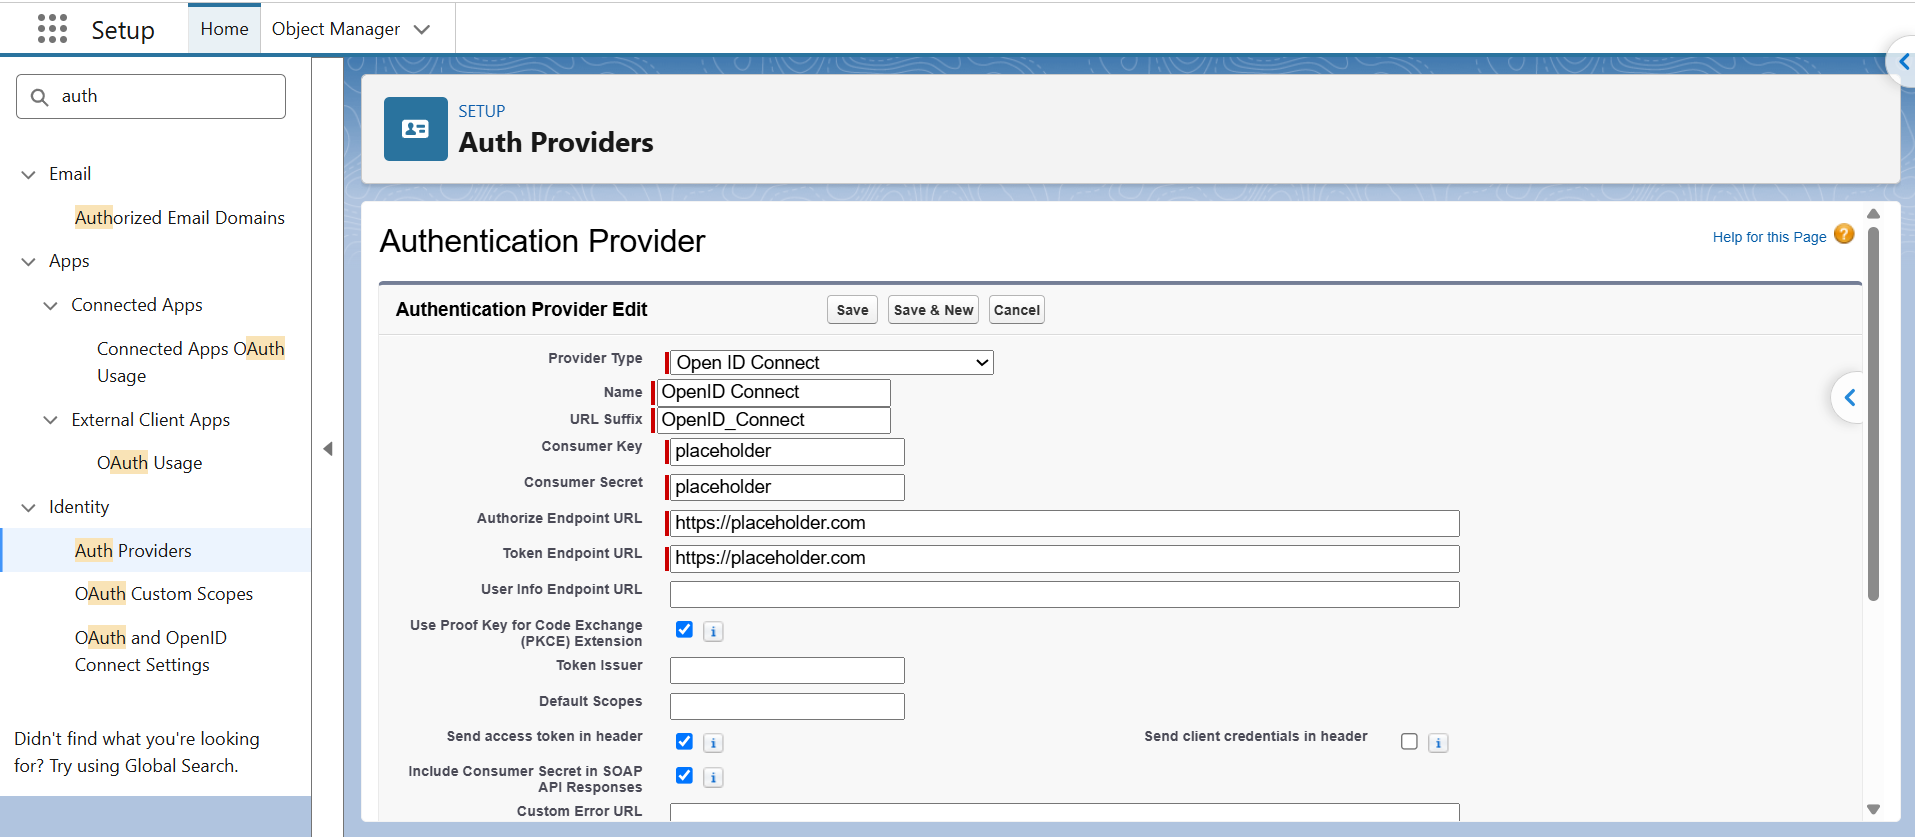
Configure the Auth Provider with OpenID Connect as the provider type, a descriptive name, and a unique URL suffix. Enter temporary values for the Consumer Key, Consumer Secret, Authorize Endpoint URL, and Token Endpoint URL. Use HTTPS for both endpoint URLs and leave Default Scopes blank. Click Save to create the Auth Provider.

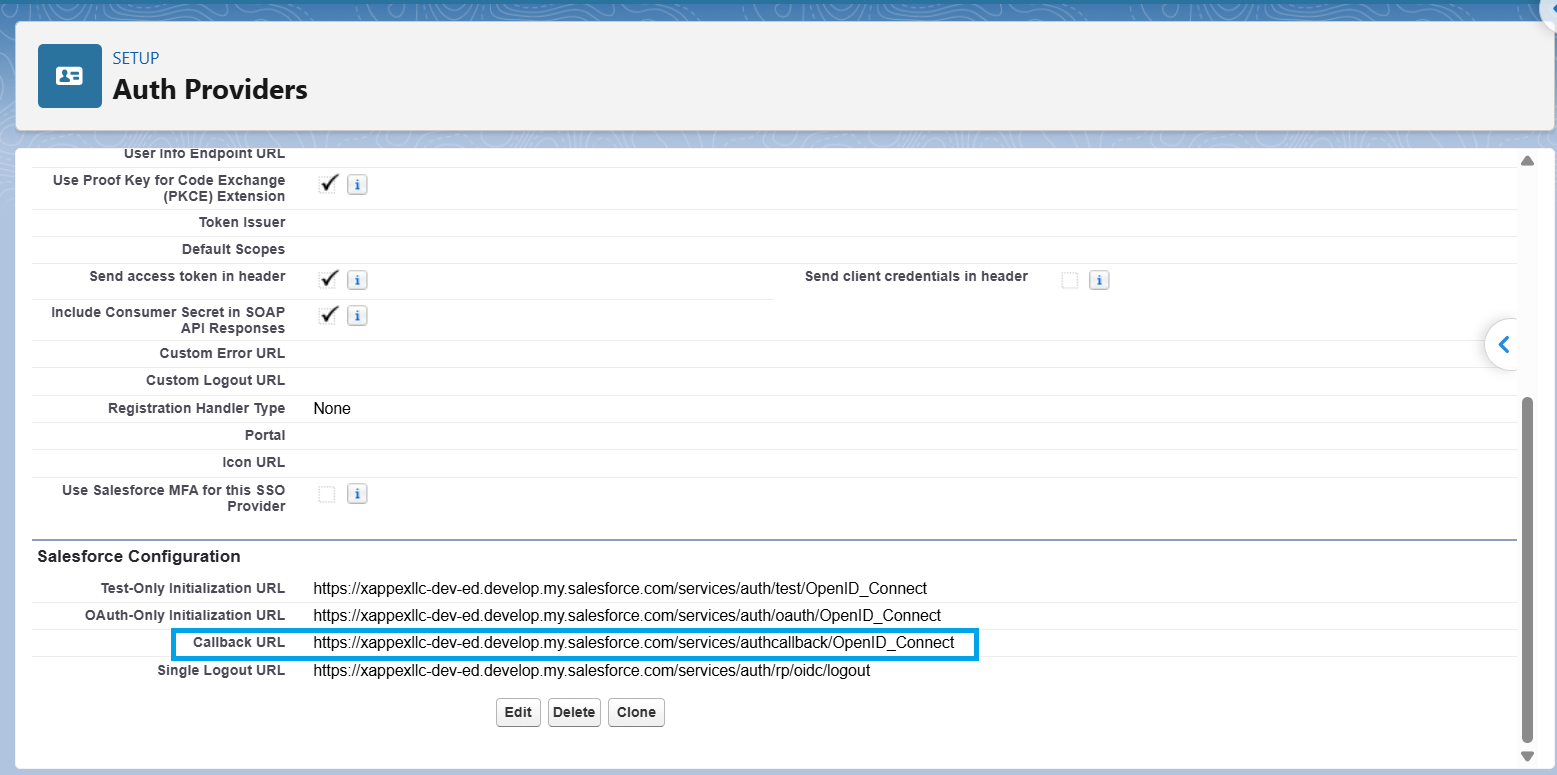
On the provider’s detail page, copy the Callback URL into your text file.
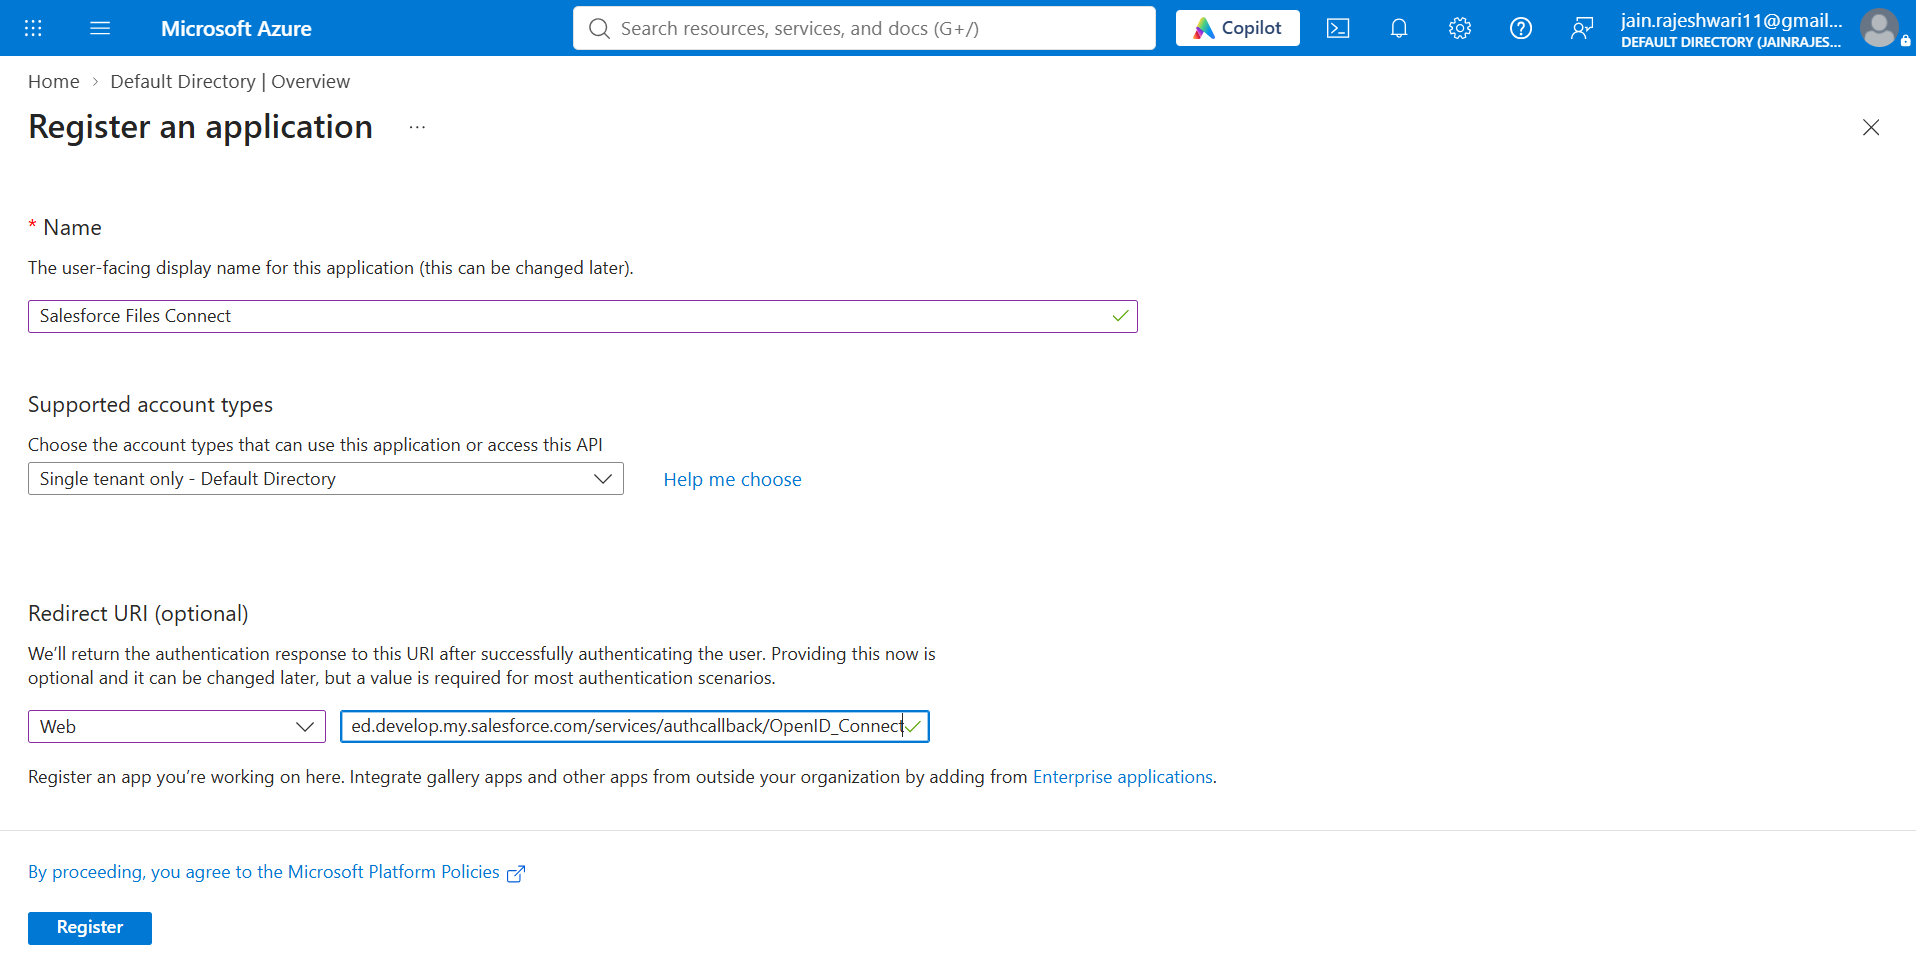
Register the Application in Microsoft Azure: Sign in to the Microsoft Azure portal and open App registrations. Click New registration.
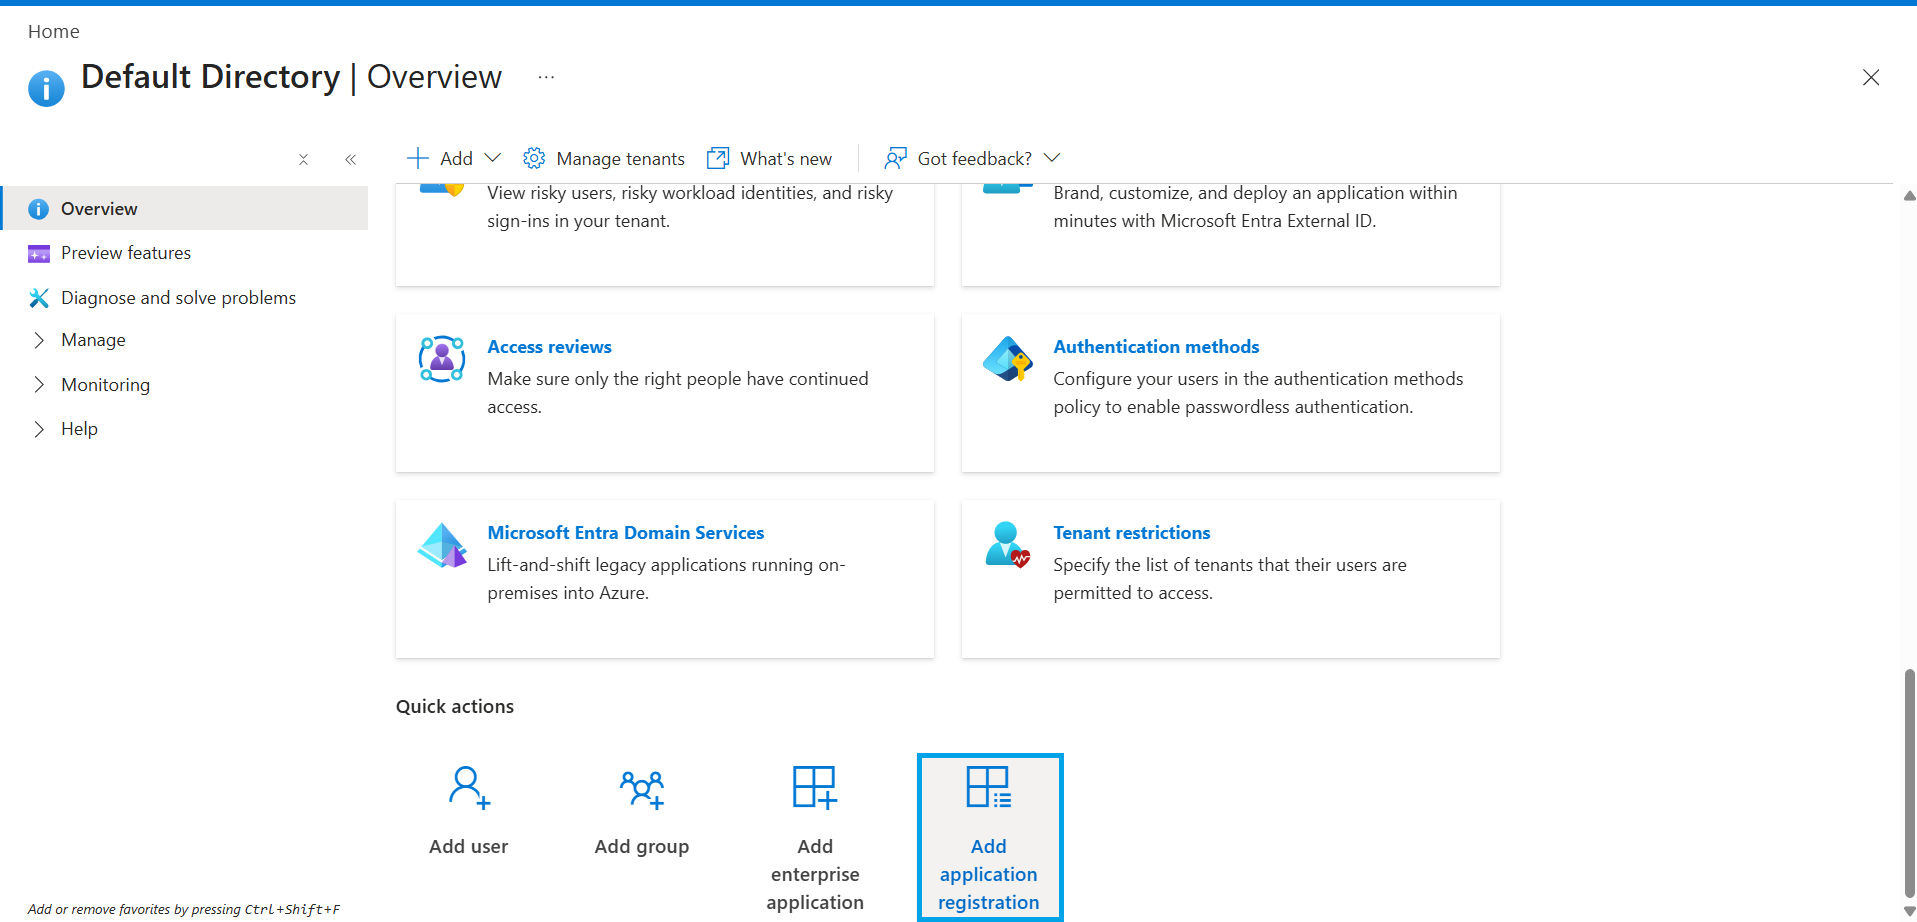
Sign in to the Microsoft Azure portal and open App Registrations. Click New registration, enter a display name for the application, and click Register to create it.
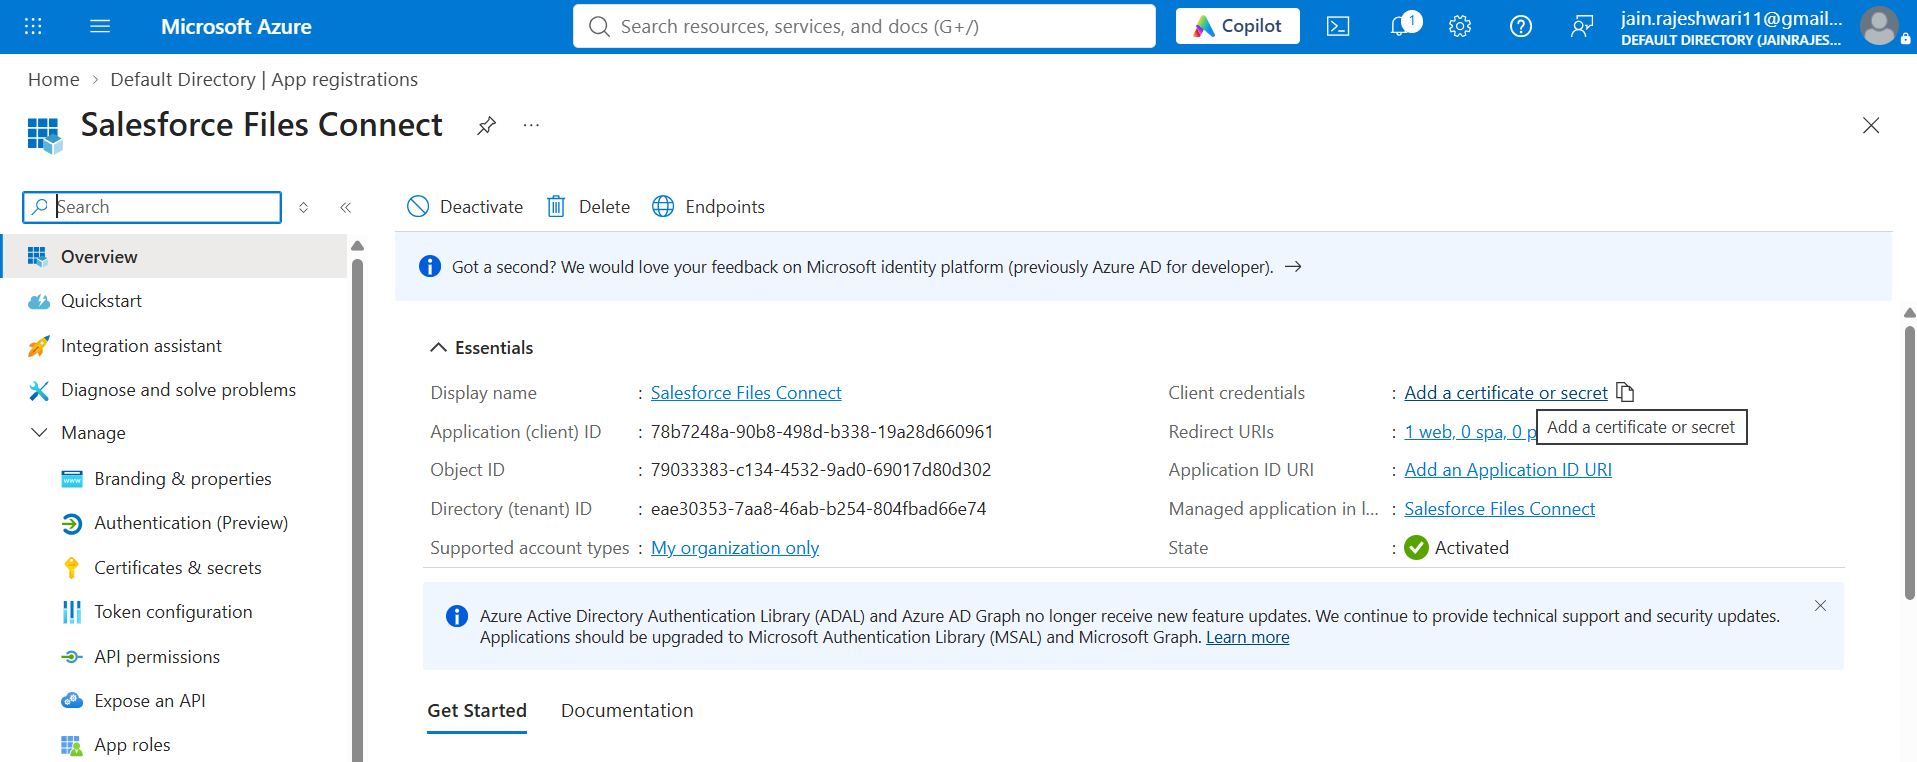
On the application overview page, copy the Application (client) ID into your text file.
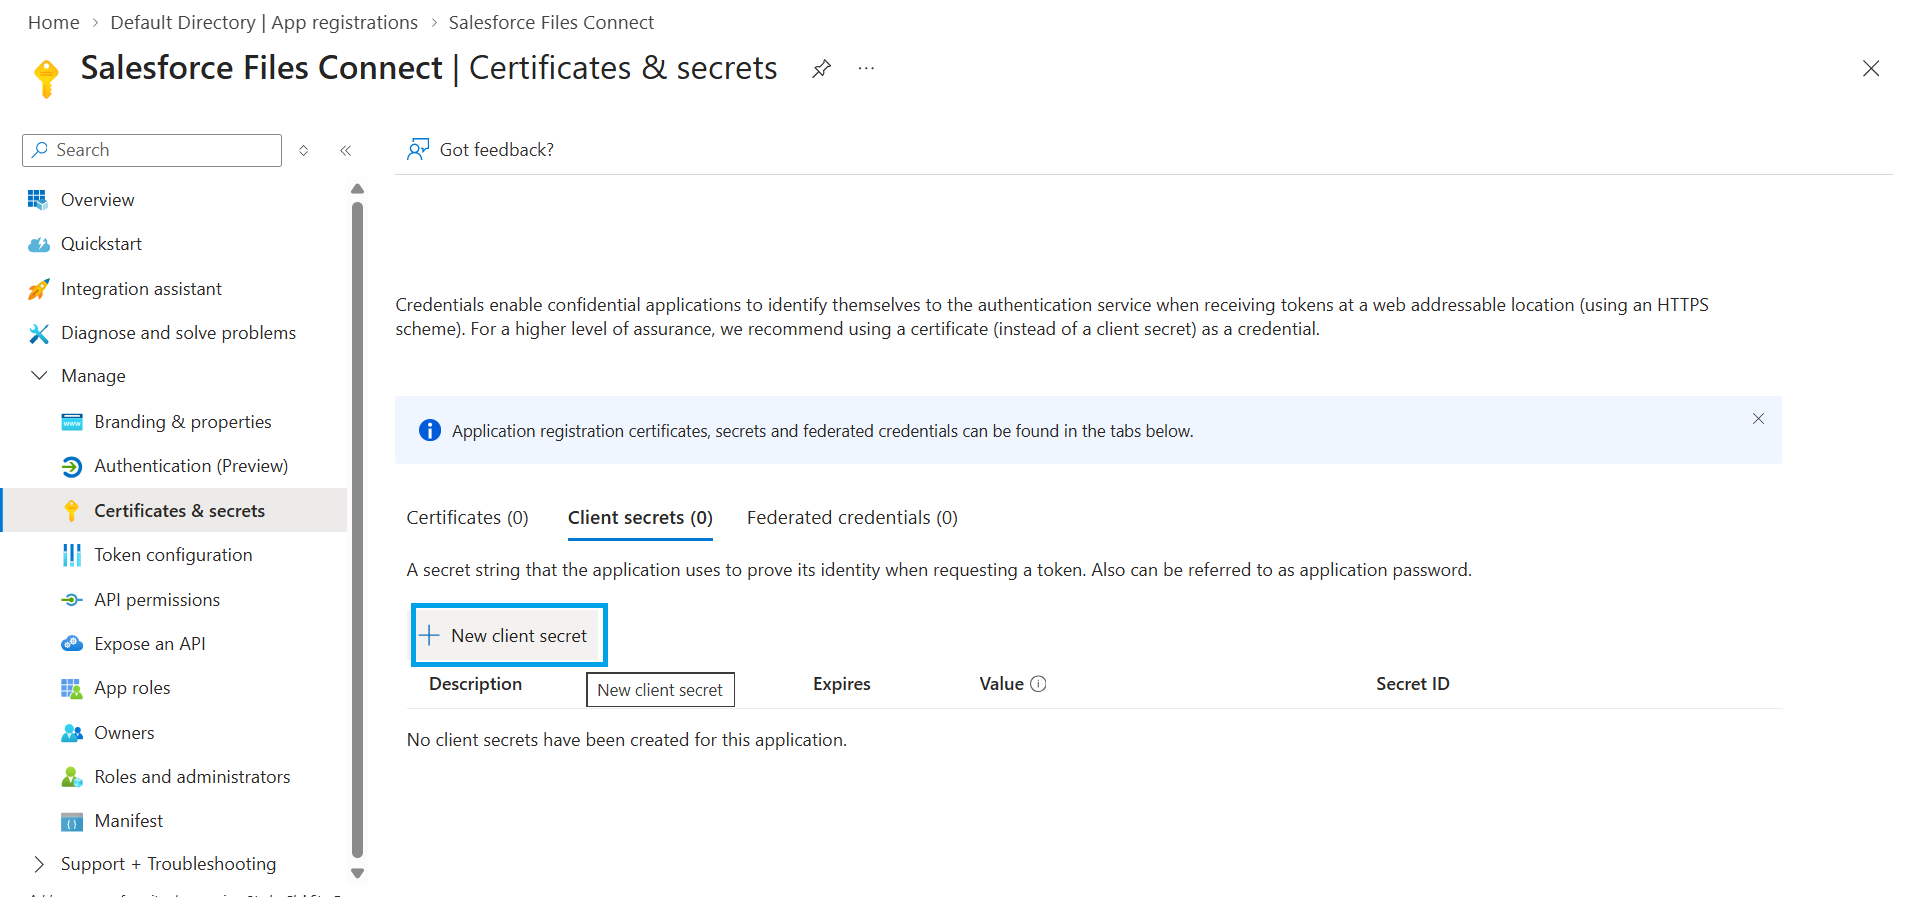
Open Certificates & secrets, click New client secret, enter a description, and select an expiration period.
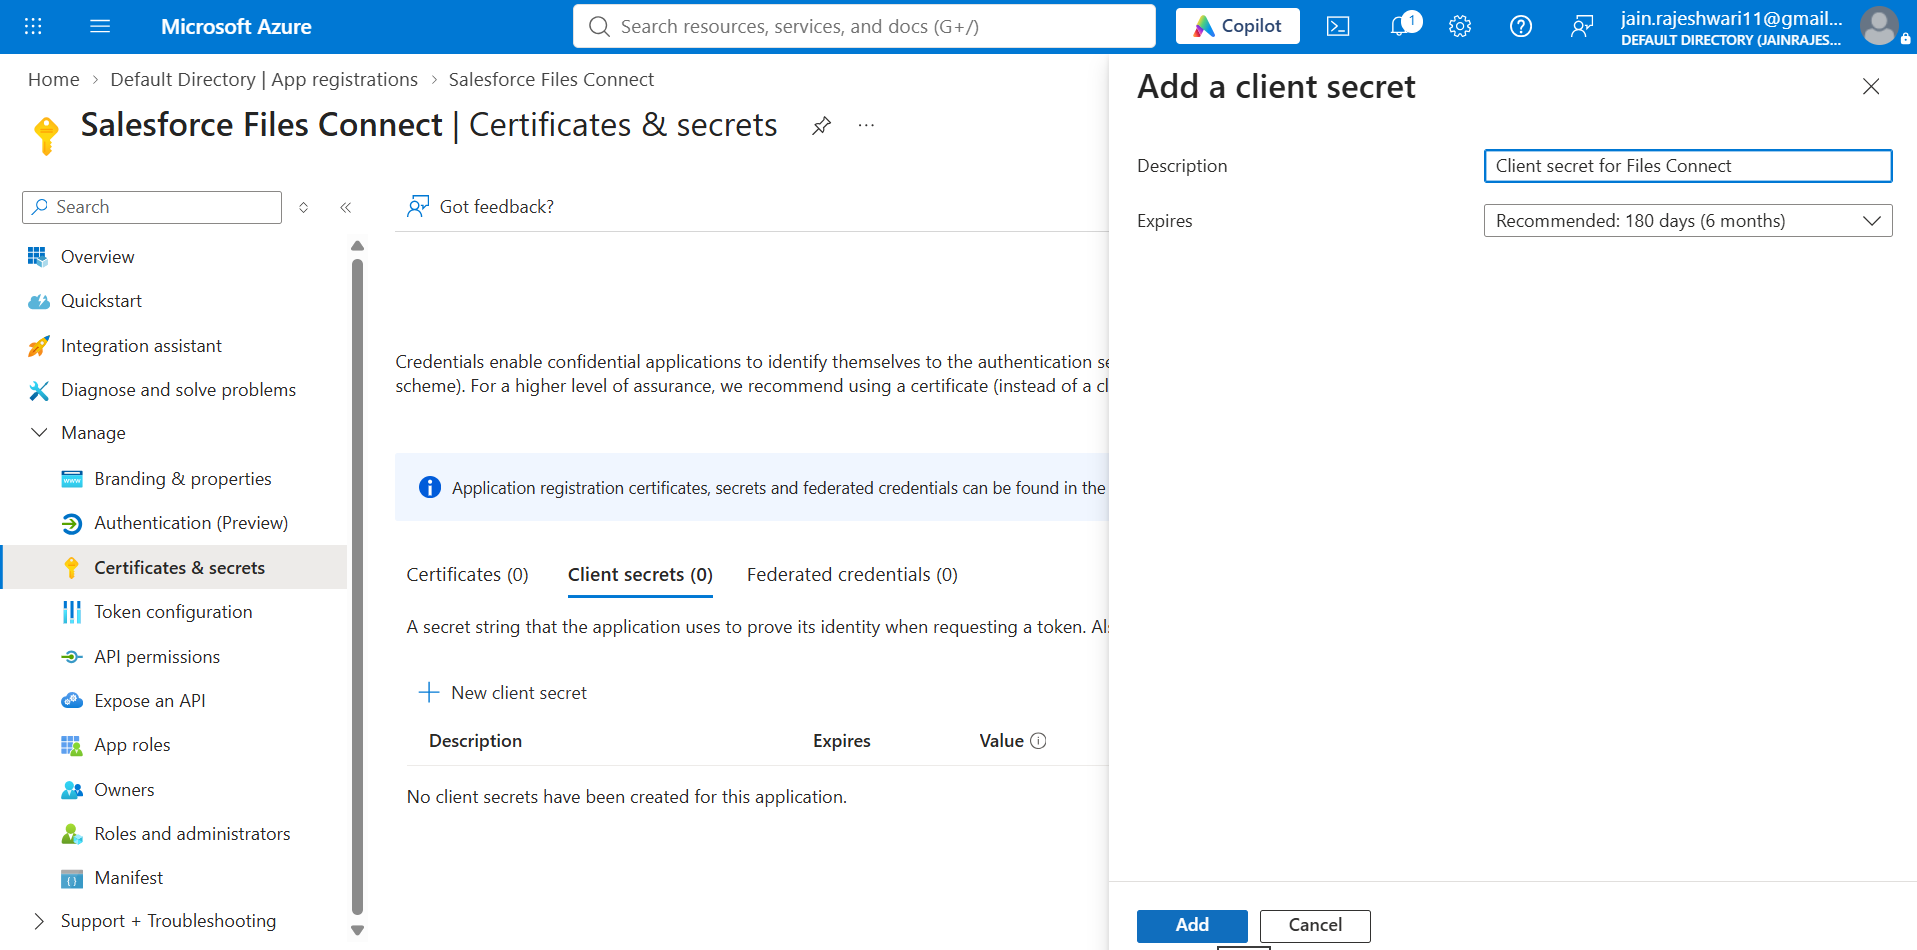
Click Add and copy the secret’s Value immediately. Azure displays it only once.
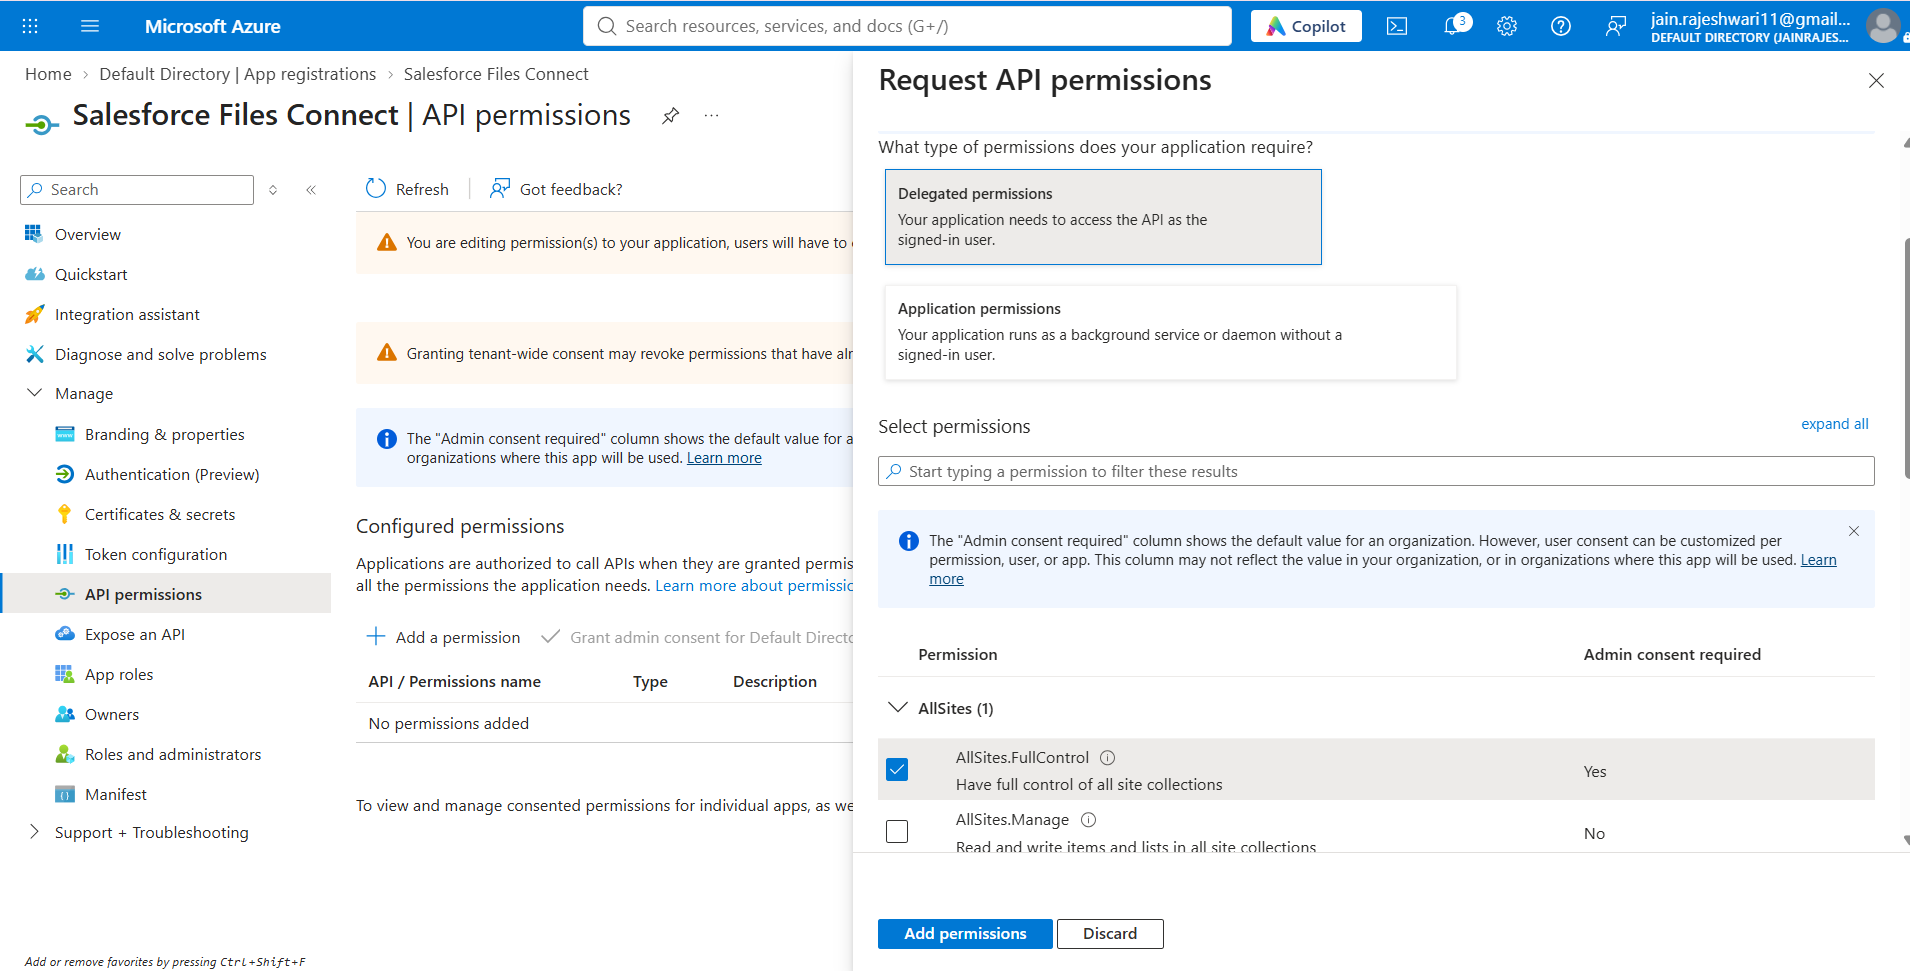
Open API permissions, click Add a permission, and select SharePoint. Add the permissions required by your integration. Avoid broad permissions such as AllSites.FullControl unless necessary.
Update the Authentication Provider in Salesforce
Return to Salesforce Setup and open Auth. Providers. Click Edit beside your SharePoint provider and replace the placeholders.
| Field | Value |
|---|---|
| Consumer Key | Application (client) ID from Azure |
| Consumer Secret | Client secret value from Azure |
| Authorize Endpoint URL | https://login.microsoftonline.com/common/oauth2/authorize?resource=https%3A%2F%2F[TENANT].sharepoint.com&prompt=login |
| Token Endpoint URL | https://login.microsoftonline.com/common/oauth2/token |
Replace [TENANT] with your SharePoint tenant name. Verify that the endpoints match the authentication configuration supported by your Salesforce and Microsoft setup.
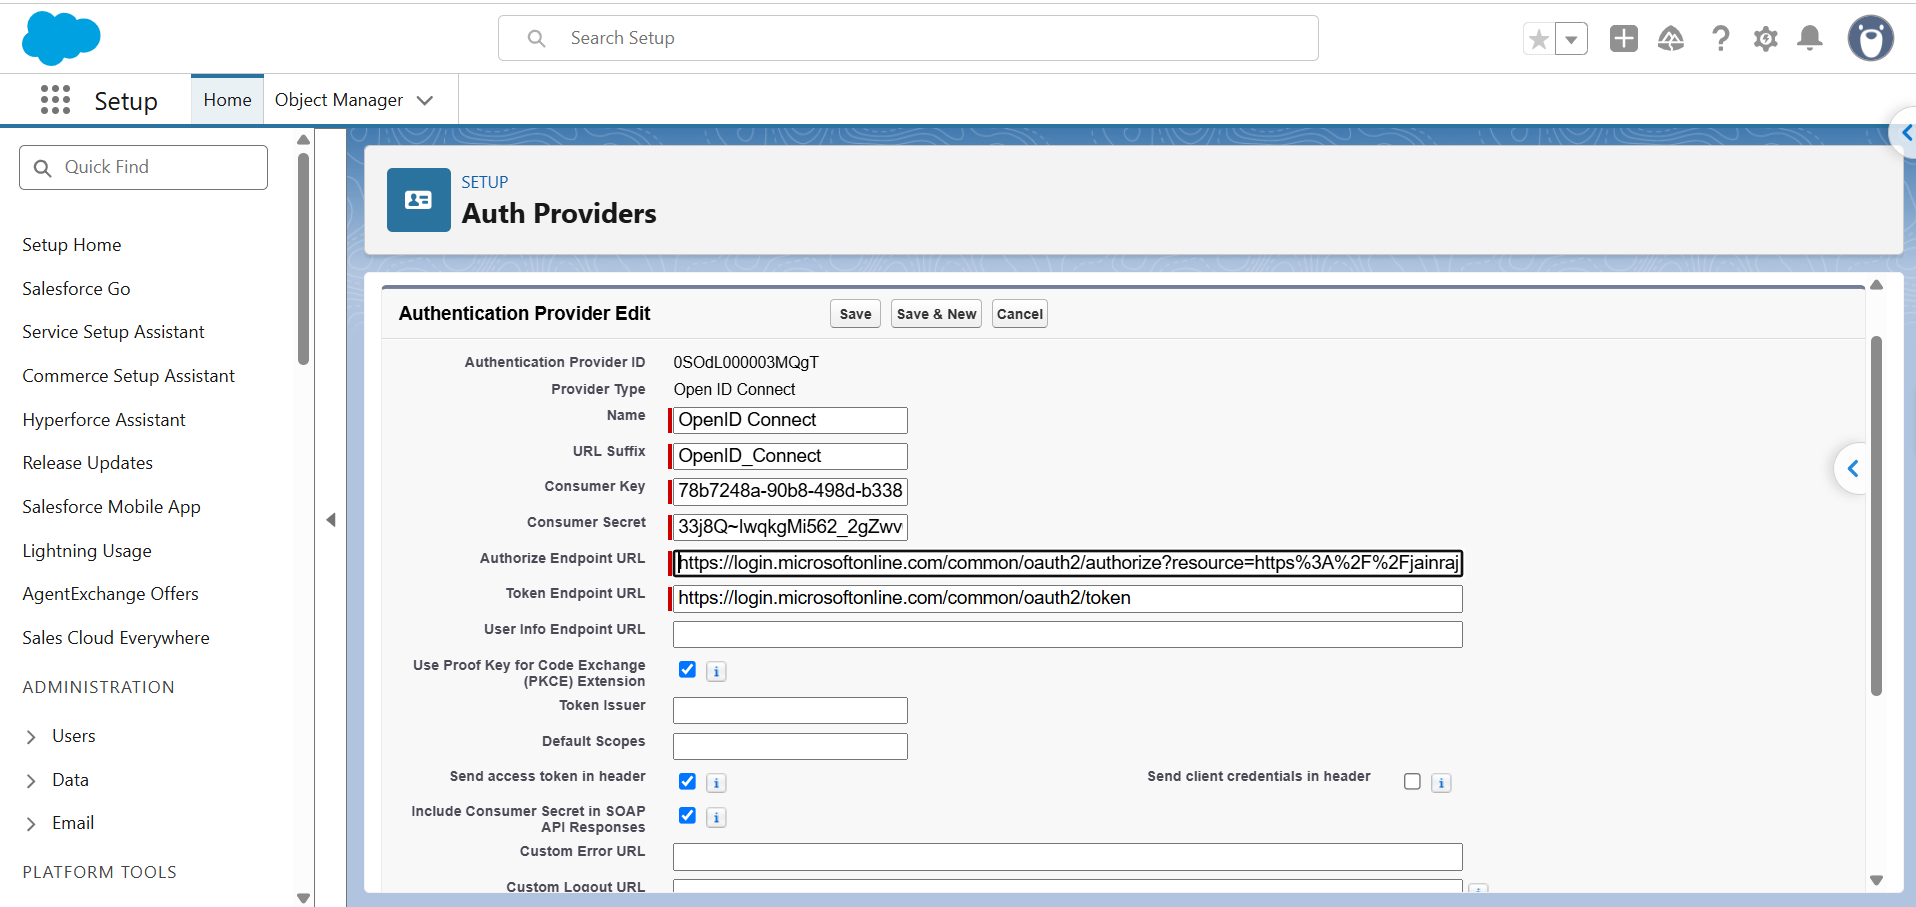
Click Save.
Configure SharePoint as an External Data Source
In Salesforce Setup, search for External Data Sources and create a new data source. You need the Customize Application permission.
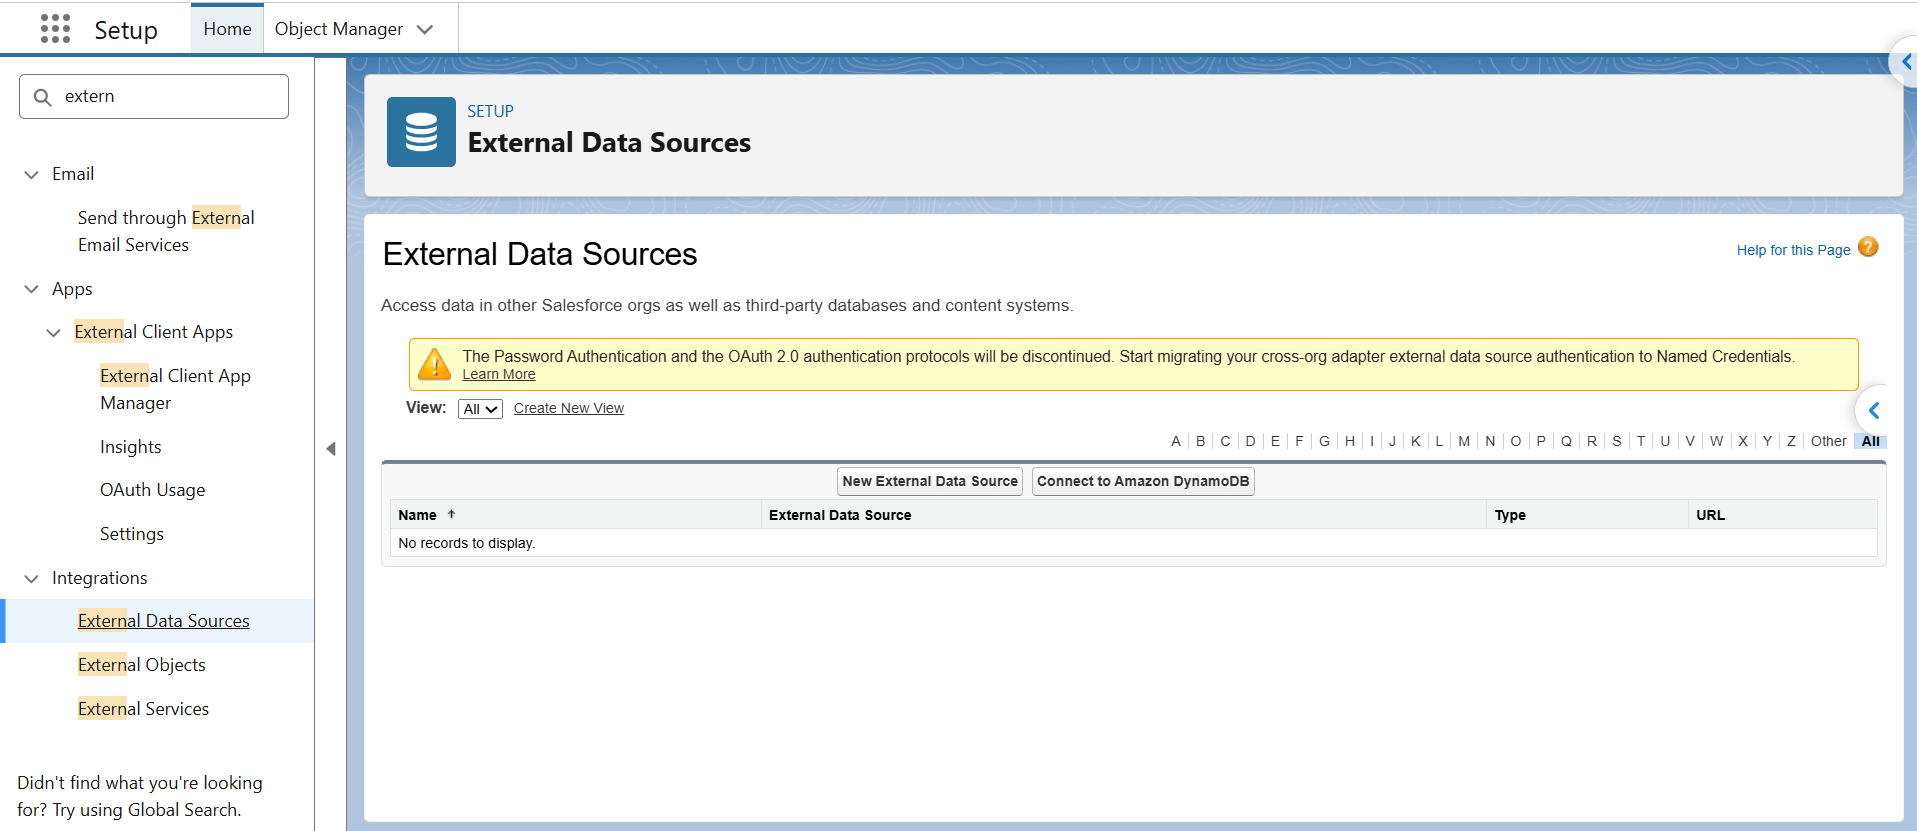
In Salesforce Setup, open External Data Sources under Integrations. Click New External Data Source.
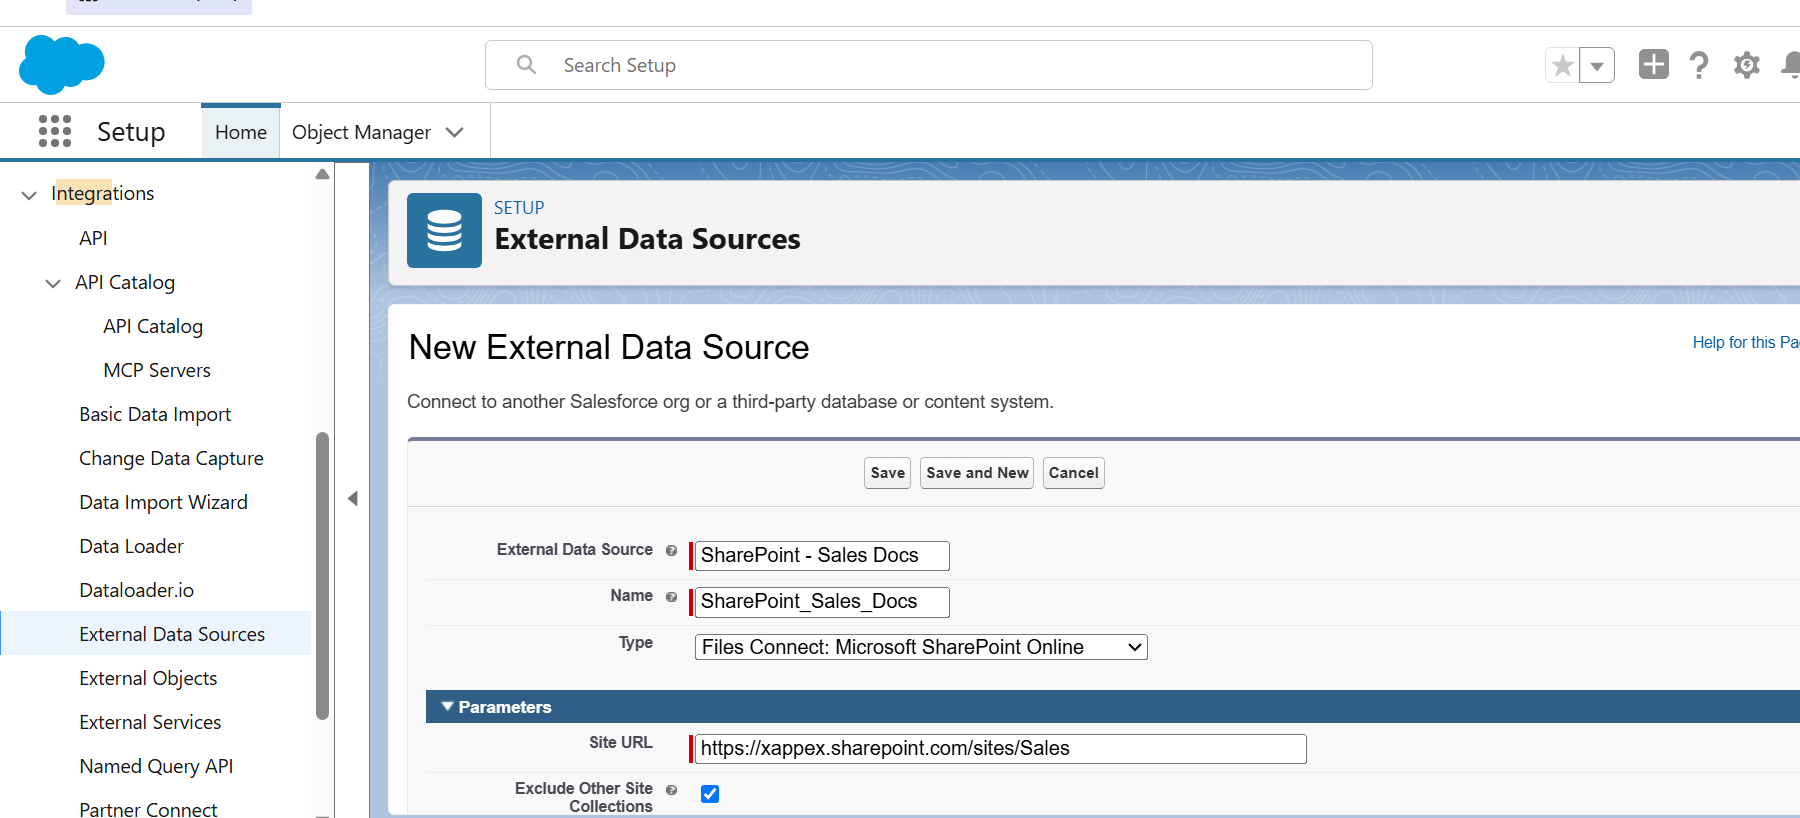
Configure the external data source with a label, a unique name, and Files Connect: Microsoft SharePoint Online as the type. Enter your HTTPS SharePoint site URL. Set Identity Type to:
- Per User: Each user signs in with their own Microsoft credentials.
- Named Principal: All users access the source through the same credentials.
Set the authentication protocol to OAuth 2.0. Leave Scope blank if no value is required, and enable Exclude Other Site Collections if you want to restrict access to the specified site collection.
Select Start Authentication Flow on Save and click Save. Review the requested permissions and click Accept. If prompted, click Confirm.
Tip
Enable Exclude Other Site Collections if any users can access the root site collection. This restricts the data source to the site collection specified in the URL.
Validate and Sync SharePoint Files
-
1
On the external data source detail page, click Validate and Sync.
-
2
Select the external object generated for SharePoint files.
-
3
Click Sync. For large libraries, use Sync in the background if available.
After synchronization, SharePoint should appear under Connected Sources in the Salesforce Files tab. Users can access documents according to the configured permissions.
Administrator Best Practices
-
Track secret expiration. Renew the client secret before it expires.
-
Apply least privilege. Grant only the SharePoint permissions the integration requires.
-
Choose the identity type carefully. Per User authentication respects individual SharePoint access controls. Named Principal uses shared credentials, so restrict Salesforce access accordingly.
-
Protect credentials. Store secrets securely and delete temporary files when they are no longer needed.
Files Connect Limits
Files Connect lets Salesforce users access files stored in SharePoint Online and OneDrive for Business. However, it has several limitations.
-
1
Identity types. With Per User, each user signs in with their own Microsoft account and can access files permitted by that account. With Named Principal, all users share the credentials configured for the external data source.
-
2
Preview and custom columns. Files from SharePoint Online and OneDrive for Business can’t be previewed in Salesforce’s file preview player. SharePoint custom column names must not contain spaces.
-
3
File management. Users can open, download, and share external files through Files Connect. Folders containing special characters such as # or % may appear in Salesforce, but users can’t access their contents.
-
4
Existing Salesforce files. Files Connect doesn’t automatically migrate files stored in Salesforce to SharePoint. They remain in Salesforce unless a separate process moves them. External files can be shared as copies or references. A copy is stored in Salesforce and doesn’t reflect changes to the original. A reference points to the external file’s latest version, but users need access to the external system to download it.
Common Setup Errors
“Not granted” for your organization.
The Microsoft app registration requires admin consent for one or more permissions. In the Microsoft Entra admin center, open App registrations, select the app, go to API permissions, and click Grant admin consent for [your organization] if you have the required administrator role.
“Can't access external source. External data source is unavailable because of an error.”
This can indicate an incorrect SharePoint Site URL or a permissions issue. In Salesforce Setup, open External Data Sources and check the Site URL, then verify the user’s access to the external data source and the Microsoft app’s permissions.
Tip
After correcting the configuration, return to Setup → External Data Sources, select the SharePoint data source, and click Validate and Sync if available. Test the connection again.
Access feels too broad.
Microsoft’s Sites.Selected permission restricts an app to explicitly authorized SharePoint sites, but Salesforce compatibility depends on the Files Connect configuration. Confirm that Salesforce supports this permission for your setup before replacing the documented permissions.
AppExchange Apps
AppExchange apps extend Salesforce file management with features such as uploading files from records, creating SharePoint folders through Flow, mapping Salesforce fields to SharePoint columns, displaying documents in Experience Cloud, and moving Salesforce files to external storage. Check each app’s listing for supported features.
Experience Cloud provides a customer-facing portal, while SharePoint stores and manages documents. Integration apps can connect the two, allowing customers to access SharePoint files through an Experience Cloud site.
Salesforce file-management apps
| App | Connects to | Folders via Flow | Notable feature |
|---|---|---|---|
| 24Files | SharePoint Online only | Yes. Flow actions for generating folder structures, creating SharePoint folders, uploading files, and renaming folders, plus Apex methods. Folders are created when the component first loads on a record page. | Bidirectional file, folder, and metadata sync. Experience Cloud support, mainly via a shared anonymous-access account with limited folder access. |
| CloudFiles | SharePoint, OneDrive, Google Drive, AWS S3, Azure Blob, Box, Dropbox | Yes. Record-triggered and scheduled Flows, plus an uploader widget for screen flows. | Document generation (DOCX/XLSX/PPTX/PDF from templates), sharing analytics, Experience Cloud file sharing, and Flow-based document workflows |
| Egnyte | Egnyte cloud storage | Yes, since Egnyte for Salesforce v3.8 (May 2025). A Mapped Folder Creation action works in record-triggered flows. | Embedded file access on record pages, sharing (including with non-Salesforce users), and folder templates |
| Share Connect | SharePoint and OneDrive | Yes, on the Pro plan only. Record-triggered Flows (Automate Share action) create, link, rename and move folders and upload files. | File linking and upload on all tiers. Folder linking and Flow automation on Pro. |
| sFiles | SharePoint Online | Yes. Flow-enabled Apex actions create, copy, rename and delete folders and items. Most require the Enterprise license. | SharePoint file management and folder structures. Experience Cloud (upload/download only), multi-site support, and the Apex API require the Enterprise Add-On. |
| XFilesPro | SharePoint, OneDrive, Google Drive, AWS S3 | Folders are created automatically on record creation through declarative configuration. | External file storage, template-based folder automation, and document generation (via the separate DocuPrime product) |
Rollout Checklist
-
Define requirements. Decide whether users need to view files, upload documents, automate file management, or reduce Salesforce storage usage.
-
Plan folders and naming. Agree on the folder structure and naming conventions before connecting SharePoint.
-
Assign ownership. Decide who will manage files, metadata, and integration settings.
-
Choose a primary location. Keep SharePoint as the main document repository where appropriate to avoid duplicate files in Salesforce.
-
Check permissions. Verify that users have the required access in Salesforce and SharePoint.
-
Test workflows. Check file access and required actions using real records and regular user accounts before rollout.
Tip
Test with a regular user account, not an admin account, and use real records to identify access issues
Conclusion
Use Files Connect to access SharePoint files from Salesforce. Choose an AppExchange app or custom integration for uploads, folder management, automation, or moving files out of Salesforce to free storage. If you need to work with Salesforce data in Excel, follow the approach described in the first section.
FAQ
Is Files Connect included with Salesforce?
Files Connect is available in Professional, Enterprise, Performance, Unlimited, and Developer editions. You also need SharePoint Online or OneDrive for Business and the required Microsoft authentication setup.
Can I upload files to SharePoint from a Salesforce record?
Files Connect lets users access SharePoint files from Salesforce but does not provide direct uploads to SharePoint. An AppExchange app or custom integration can add upload functionality.
How do I stop running out of Salesforce file storage?
Files Connect does not move existing Salesforce files to SharePoint. To free storage, use an app or custom process to migrate files, verify the migrated copies, and remove the Salesforce originals when appropriate.
Do SharePoint permissions apply inside Salesforce?
With Per User authentication, each user accesses files based on their own Microsoft account permissions. With Named Principal authentication, users access files through a shared account, so SharePoint’s per-user permissions do not apply and access is controlled on the Salesforce side.
Does Files Connect work with SharePoint on-premises?
Files Connect support for SharePoint Online and OneDrive for Business, not SharePoint on-premises. You need another integration approach to connect an on-premises SharePoint environment.

Rajeshwari Jain
Content Manager
Rajeshwari Jain is a Technical Support Specialist and Content Writer at Xappex. She applies her practical experience to assist customers and create articles on how Xappex tools work with Salesforce to improve data management and increase efficiency.
She began her IT career in 2022 as a Quality Assurance professional before transitioning into Salesforce administration and technical writing in 2023. With Salesforce Certified Administrator and Associate certifications, Rajeshwari writes blogs on Salesforce flows, admin tools, and updates to expand her skills outside of work.
In her free time, she enjoys reading tech blogs and experimenting with new tools.
Feel free to reach out to Rajeshwari for collaborations or to check out her Salesforce-focused content.