List Views let you filter records quickly without building a report. They’re ideal for day to day work, segmenting records for fast access, avoiding creating one time use reports. The steps to create them differ slightly in Lightning and Classic. Below you’ll find a simple, step-by-step guide for both, plus tips to avoid common mistakes and faster options for admins.
How to create List Views in Salesforce Lightning
Step 1: Navigate to an Object
Select the object in the dropdown (console) or select the object in the tabs.

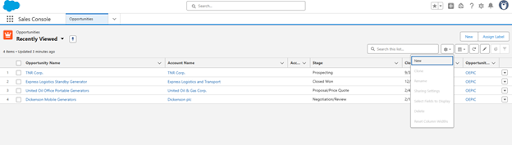
Step 2: Open List View control
Click on the List View controls menu next to the search box and select New.
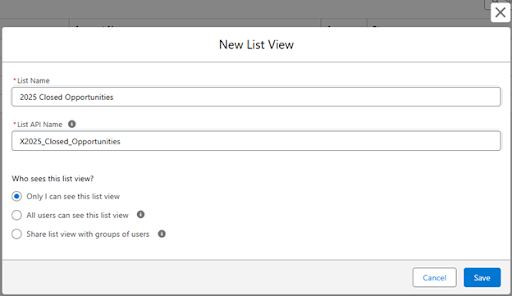
Step 3: Name and Set Visibility
Give the List View a descriptive name, then choose who can see this list. The sharing setting can be changed later.
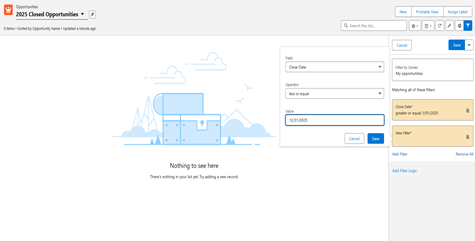
Step 4: Add filters and save
Use the Filters panel to define conditions (field, operator and value) then Save.
You can also add/remove columns via Select Fields to Display by clicking the gear besides the search bar.
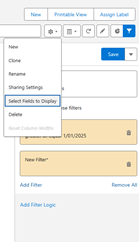
Salesforce Lightning List View controls menu open next to the search bar, showing the “Select Fields to Display” option highlighted.
Additional Features in Lightning
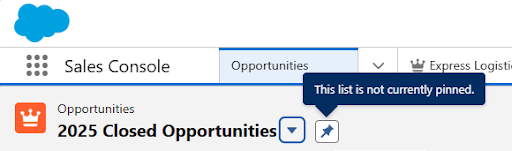
Pinning: Set a default List View by opening the view and clicking the pin icon next to its name. To change it later, open another view and pin that one. Pins are per user and per object. This way your go-to view loads automatically, so you don’t have to switch views each time.
- Public vs Private: When you create a list view, choose its visibility:
- Only I can see this view – Personal, keeps your workspace clean.
- All users can see this view – This includes Guest, Partner and Customer Portal users
- Share with groups – Pick specific Public Groups, Roles, or Roles and Subordinates do the right people can use

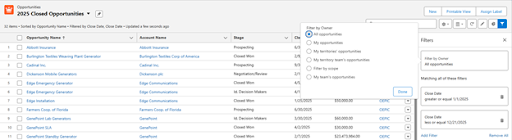
- Team or Department Views: In the Filters panel, open Filter By Owner and choose My team’s opportunities. “My team” means you and the users below you in the Role Hierarchy. To filter by Territory, your org must enable and configure Sales Territories. Then, in Filter by Owner, pick My territories’ accounts/opportunities or My territory team’s accounts opportunities. These Filters are available on Accounts and Opportunities List Views.
- Dynamic User Views: You can set a dynamic user List View with a formula that detects the current user. Create a simple formula checkbox that returns True when the record is assigned to the viewer.
For example: OwnerId = $User.Id.
Then filter the List View by that Checkbox. Everyone opens the same view but only sees their own records, no cloning dozens of List Views.
How to create a List View in Salesforce Classic
Step 1: Navigate to an Object
Step 2: Click Create New View

Step 3: Name, add filters, choose columns set visibility and Save
Enter View Name

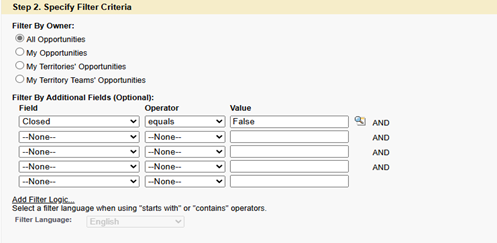
Add filter Criteria
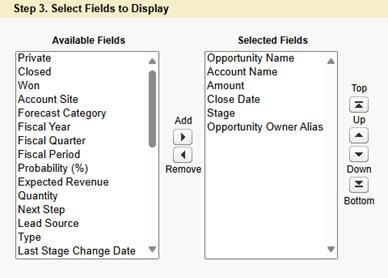
Select Fields to display
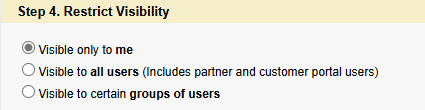
Restrict Visibility
Key Differences from Lightning
Classic uses an older UI but the logic is the same: Name, filters, columns (fields to display) and visibility. In Classic sharing groups/Roles and Public vs Private are controlled by permissions, not a quick toggle like in Lightning.
Common Pitfalls
- Field Restrictions: Some fields don’t appear in List View filters/columns (like Long Text Area Fields) and certain standard fields are excluded on some objects. Clone the view, pick different fields, or create helper fields if needed.
- Percent Fields: When filtering a Percent field, use whole numbers, for example type 50 for 50%, not 0.5.
- Too many Public List Views: Limit permissions to manage Public List Views to a few trained users while others can create personal views, this keeps the list clean for everyone.
How to Create a List View with XL-Connector (Optional for Admins)
Prefer to create or edit many list views in one pass right from Excel? XL-Connector can do that.
Step 1: Download List Views
Open Excel and log in. Click on Power tools option in the Toolbar and select Manage List views:
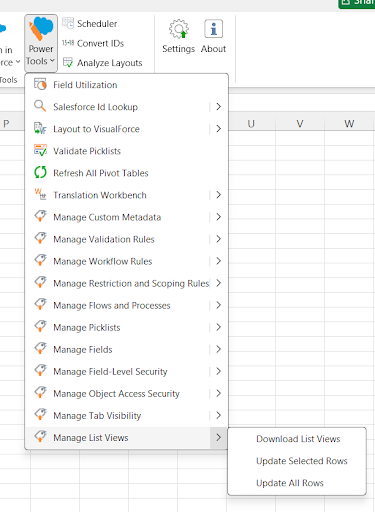
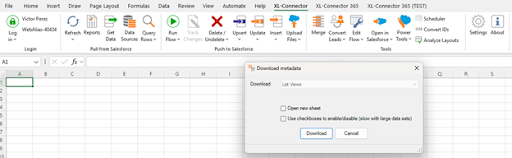
Then select Download on the prompt to pull all existing views into a new or existing worksheet.
Step 2: Add new List View Details
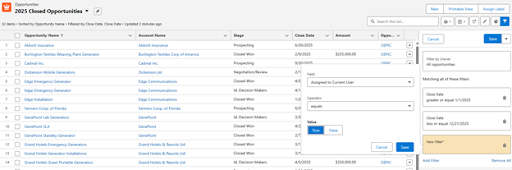
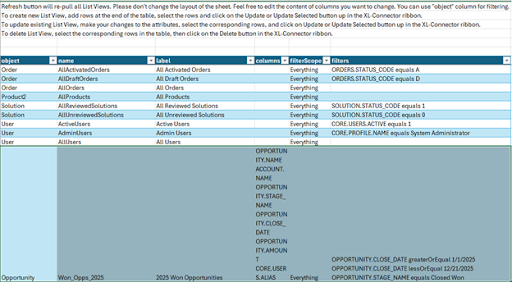
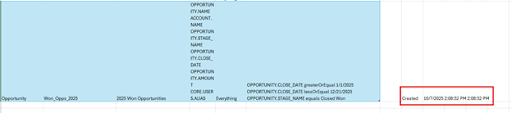
Scroll down to a new row at the bottom of the table and enter the details. For example, here’s how it looks in the screenshot below:
- Object: Opportunity
- Name: Won_Opps_2025
- Label: 2025 Won Opportunities
- Columns: OPPORTUNITY.NAME ACCOUNT.NAME OPPORTUNITY.STAGE_NAME OPPORTUNITY.CLOSE_DATE OPPORTUNITY.AMOUNT CORE.USERS.ALIAS
- FilterScope: Everything
Filters: OPPORTUNITY.CLOSE_DATE greaterOrEqual 1/1/2025 OPPORTUNITY.CLOSE_DATE lessOrEqual 12/21/2025 OPPORTUNITY.STAGE_NAME equals Closed Won
Step 3: Update List View
Highlight the new row, then click the Update button on the XL-Connector ribbon.
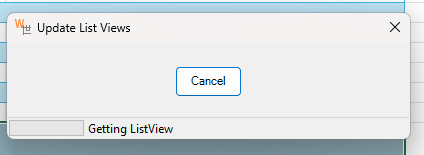
Wait for the prompt to complete and check the result log in the column.
This method is faster and more convenient than creating each list view in Salesforce. Admins can create or edit list views in bulk and update them directly from Excel with one Click. For more information, see our Knowledge Base article about managing Salesforce List Views with XL-Connector.
Conclusion
Now that you know how to create and customize List Views in Salesforce — whether in Lightning, Classic, or with XL-Connector — you can organize data in a way that truly supports how your team works.
Keep your views focused, pin the ones you use most often, and turn Salesforce into a workspace built around your daily workflow.
Perez Victor
Content Manager
Victor Perez is a Salesforce Administrator and Technical Support Specialist at Xappex with experience in administration and consultancy. Driven by a passion for enhancing operational efficiency and business effectiveness, Victor leverages his deep understanding of Salesforce and Xappex tools to develop solutions and resources that empower users across various industries.
Initially starting his career in law, Victor transitioned into the Salesforce ecosystem and quickly advanced to become the Lead Administrator for a prominent B2B company in Mexico, where he significantly improved workflow efficiency and data management. His unique blend of analytical thinking and technical experience allows him to identify and address business challenges effectively.
In his personal time, Victor enjoys golfing and exploring insights from diverse industries, continually seeking innovative approaches to problem-solving and adding value both professionally and personally.