Get Started Free


Salesforce data cleansing means looking for and correcting records that are duplicate, incomplete, inconsistent, outdated, or invalid. It includes auditing records, merging or removing duplicate records, standardizing formats, and correcting values. Validation rules, duplicate rules and matching rules help prevent recurring errors. Teams can clean data in Salesforce or use spreadsheets and other data management tools.
What Is Data Cleansing in Salesforce?
Salesforce data cleansing means finding and correcting inaccurate, incomplete, duplicate, inconsistent, or outdated records. It helps teams maintain reliable data for sales, reporting, customer management, and automation.
Common problems include duplicate accounts and contacts, missing email addresses, inconsistent phone numbers, invalid field values, and outdated customer details. Cleansing addresses these issues by correcting values, merging duplicates, and removing records the business no longer needs.
Data cleansing differs from related terms:
| Term | Meaning |
|---|---|
| Data cleansing | Finding and correcting errors in existing records. |
| Data enrichment | Adding missing information from external sources. |
| Data hygiene | Maintaining clean data through regular checks and processes. |
| Data quality | The accuracy, completeness, consistency, and reliability of data. |
Salesforce admins often manage data cleansing because they understand the org’s configuration, validation rules, duplicate rules, and data structure. Revenue operations (RevOps) and sales operations teams help define data standards, identify reporting issues, and decide which records to retain.
Data cleansing should be a regular process, not a one-time task. Teams need to correct existing errors and prevent new ones from entering Salesforce.
Why Salesforce Data Gets Dirty (and What It Costs)
There are several reasons why Salesforce data can become unreliable:
-
Manual entry and typos: Sometimes users enter the wrong names, misspell email addresses, or leave some fields blank.
-
Imports and integrations: When data comes in from other systems or bulk imports, it can bring in invalid or inconsistent values if validation rules or data checks miss them.
-
Web forms and lead imports: Using several forms or import files can create duplicate leads and contacts if matching and duplicate rules do not catch them.
-
Different formats across teams and regions: Teams might use different date formats, phone number styles, or address formats, which makes it harder to match and maintain data.
-
Outdated records: Contacts may change jobs, customers might move, or account ownership can change, but these updates are not always made in Salesforce right away.
Poor data quality can impact routing, reporting, and forecasting. For example, if opportunities are linked to duplicate account records, reports that group or filter by account might show the pipeline split across different records instead of giving a full view of the customer. Missing or wrong values can also stop lead assignment rules from working properly.
These errors can lead to duplicate outreach, inaccurate reports, and poor business decisions. Flows can fail if they rely on missing or incorrect field values.
Before merging or deleting a suspected duplicate, make sure you define what counts as a duplicate for each object. For example, two accounts with the same company name could actually be different offices or legal entities.
How to Audit Your Salesforce Data Before You Clean It
Measure data quality before cleaning Salesforce records. Record the results to compare them with post-cleanup results.
Six measures of Salesforce data quality
Six common data quality dimensions are completeness, uniqueness, timeliness, validity, accuracy, and consistency.
| Measure | What it means | How to check |
|---|---|---|
| Completeness | Important fields contain values. | Find blank values in fields such as Phone, Industry, and Lead Source using reports or spreadsheets. |
| Uniqueness | Records do not represent the same person or company more than once. | Compare email addresses, phone numbers, and company names. Use Salesforce Duplicate Management to identify potential matches. |
| Timeliness | Records reflect current business activity. | Review outdated records, open opportunities past their close dates, and overdue open tasks. |
| Validity | Values meet defined formats and business rules. | Check phone numbers, email addresses, dates, number ranges, and picklist values. |
| Accuracy | Values match real-world information. | Compare records with trusted sources or confirm details with record owners. |
| Consistency | Information follows consistent formats across records and systems. | Check country, industry, and status values for inconsistent labels. Compare corresponding records across connected systems. |
Five Checks to Establish Your Baseline
Make sure to record the results of these checks before you change any data.
-
1
Missing fields: Find out what percentage of Leads, Contacts, and Accounts are missing important fields like email, country, and industry, if those fields are available. Pay special attention to the fields your business processes need.
-
2
Potential duplicates: Count records that have the same value or combination of values, like an email address for Contacts or a company name and phone number for Accounts. Consider these as possible duplicates until you check and confirm them.
-
3
Outdated records: Look for records that have not been updated in the last 12 months, and review their status and business activity. Check for open Opportunities that are old or past their close dates, overdue Tasks that are still open, and Contacts whose job information might be out of date. Remember, just having an old Last Modified Date does not always mean a record is outdated.
-
4
Invalid emails: Find email addresses that are not formatted correctly and, if you have delivery data, those that have bounced. Keep in mind that even if an email looks correct, it might not exist or be able to receive messages.
-
5
Inconsistent values: Group similar free-text values to spot differences, like United States, USA, U.S., US, and United States of America. Make sure you know the correct value before you standardize them.
Check Field Utilization
To find the fill rate for each key field, divide the number of records that have a value by the total number of records, then multiply by 100. Put the results in a spreadsheet and highlight any fields with low fill rates.
Before deciding a field is unused or not well maintained, look at its purpose and how long it has existed. If a field was just added, it might have a low fill rate simply because users have not had time to fill it in. Some fields, like an expedite checkbox, are only used in special cases and are expected to be empty most of the time.
Want to know which Salesforce fields people actually fill in? Here’s how to check in Excel.
Choose an Audit Method
-
Salesforce report: To keep things simple, review one object at a time, or choose a report type that covers related objects if needed. Add the fields you need and filter for blank values, old records, or certain statuses. Double-check the report type and filters so you know exactly which records are included. Save or export your results to set your baseline.
-
Spreadsheet: Review several quality checks at once. Filter out blank values, group records to spot spelling differences, and use formulas or match keys to find possible duplicates. Always check suspected duplicates before merging or deleting them.
Begin with Leads, Contacts, and Accounts. Focus first on fields that impact routing, ownership, segmentation, and reporting. Once you find the main data quality problems, move on to audit other objects.
Find and clean Salesforce duplicates in Excel
Cleaning Salesforce data often means exporting records, correcting them in a spreadsheet, and uploading the changes again. XL-Connector connects Salesforce to Excel, where you can identify duplicates and update or delete records in bulk without a separate export-and-upload cycle. Record merging is available in XL-Connector Enterprise Admin.
Salesforce Data Cleansing Tools
Salesforce provides tools to prevent duplicates, validate data, identify inconsistencies, and update records in bulk. For large cleanup tasks, admins can also export records to a spreadsheet, standardize values, and import the corrected data.
Native Salesforce Tools
Salesforce includes tools for preventing data errors and cleaning existing records. The right option depends on the type and volume of data you need to fix.
| Native feature | What it does | When to use it |
|---|---|---|
| Matching Rules and Duplicate Rules | Matching rules define how Salesforce identifies potential duplicates. Duplicate rules determine whether Salesforce allows, warns about, or blocks matching records. | Prevent duplicate Leads, Contacts, and Accounts during record creation or updates. |
| Duplicate Jobs and Duplicate Record Sets | Duplicate Jobs scan existing records for potential duplicates and store the results in Duplicate Record Sets. Availability depends on your Salesforce edition. | Identify existing duplicate records for review. |
| Validation Rules and Required Fields | Enforce required values and reject records that fail specified conditions. | Prevent missing or invalid values, such as a required phone number or an incorrectly formatted field value. |
| Data Import Wizard and Data Loader | Import new records and update existing records in bulk. The Data Import Wizard supports up to 50,000 records per import for supported objects. Data Loader supports larger data operations. | Correct existing records or load cleaned data in bulk. |
| Reports | Filter, group, and summarize records to reveal missing values, repeated entries, and inconsistent spellings. | Audit data quality before making changes. |
Salesforce allows users to merge up to three records of the same object at a time. Large duplicate groups may therefore require multiple merges. Review the applicable duplicate rules before importing cleaned data because rules configured to block duplicates can prevent records from saving.
For more details, see the Xappex guide to Salesforce duplicate management.
When Native Tools Are Not Enough
For large or recurring cleanup tasks, spreadsheets and third-party tools can reduce manual work. Choose an approach based on your data volume, cleanup requirements, and available resources.
| Approach | Best for | Limitations |
|---|---|---|
| Native Salesforce features | Preventing duplicates, enforcing data-quality rules, and reviewing records. | Some tasks require manual review, and feature availability varies by edition. |
| Spreadsheet connectors for Excel or Google Sheets | Reviewing, standardizing, updating, and deleting records in bulk. | Matching and reviewing records may require manual work. Large datasets can also affect performance. |
| Dedicated data quality apps. | Duplicate detection, fuzzy matching, and automated cleanup where supported. | Costs, setup requirements, and features vary by product and plan. |
Choose a tool based on whether you need to prevent bad data at entry, identify existing duplicates, standardize values, or automate recurring cleanup. Fuzzy matching can identify records with similar values, but review suggested matches before merging them to avoid combining unrelated records.
How to Cleanse Salesforce Data in Excel or Google Sheets
Excel and Google Sheets help you standardize values, find duplicates, and correct Salesforce records in bulk. You can update the cleaned data using Data Loader, the Data Import Wizard, or a spreadsheet connector. Data Loader is the most dependable choice for ID-based updates, because the Data Import Wizard can update existing records only for certain objects.
The process has six steps: export Salesforce data, standardize values, find duplicates, fill missing data, validate changes, and update records in Salesforce.
Step 1. Pull the data with the Record ID
Always include the Salesforce record ID in every export when you update existing records.
Salesforce has two types of IDs: 15-character and 18-character. The 15-character IDs are case-sensitive, but the 18-character IDs are not. Reports often show 15-character IDs, while tools like Data Loader use the 18-character version.
Excel and many spreadsheet lookup functions do not consider letter casing, so two 15-character IDs that only differ by uppercase or lowercase letters might look the same. To avoid this, use 18-character IDs.
To get an 18-character ID in a Salesforce report, create a formula field on the object with CASESAFEID(Id), and then add that field to your report.
Import your data as text to avoid unwanted changes. Excel can turn long numbers into scientific notation, remove leading zeros from postal codes, or change phone numbers. If you import columns as Text, you keep their original values. Changing the format after Excel has already changed the data might not bring back lost digits or zeros.
In Excel, go to Data, choose From Text/CSV, then click Transform Data. Set the columns you need to Text before you load the data.
In Google Sheets, import your file with the option to convert text to numbers, dates, and formulas turned off.
Keep an original copy of your export in a Before tab. Try updating a small batch in a sandbox first before you update your main records.
Step 2. Standardize formats with formulas
Differences in spacing, capitalization, abbreviations, and spelling can hide duplicate records. Standardize values before comparing records in spreadsheets or using Salesforce matching rules.
Use helper columns to clean values without changing the original data.
| Formula | Purpose | Example |
|---|---|---|
| =TRIM(A2) | Removes leading and trailing spaces and reduces repeated spaces between words to one space. | " Acme Inc. " becomes "Acme Inc." |
| =PROPER(A2) | Capitalizes the first letter of each word. | john smith becomes John Smith |
| =SUBSTITUTE(A2,"Incorporated","Inc.") | Replaces every exact occurrence of specified text. | Acme Incorporated becomes Acme Inc. |

Note
Excel’s PROPER function capitalizes the first letter of each word and lowercases the rest. It can change names like McDonald to Mcdonald, LLC to Llc, and don’t to Don’T. Review the results before pasting them as values.
Standardize countries, states, and industries
Start by making a two-column lookup table with the original values and their accepted equivalents. Use XLOOKUP to match inconsistent values to the standard ones. If you don’t have XLOOKUP, you can use INDEX/MATCH or VLOOKUP instead. XLOOKUP works in Excel 2021 and later, Microsoft 365, and Google Sheets.
Check any values that didn’t match, make sure the mappings are correct, and then paste the results as values into the final import columns.
Standardizing your data makes it easier to compare spreadsheets and helps Salesforce matching rules find possible duplicates.
Use State and Country/Territory Picklists
Salesforce’s State and Country/Territory Picklists let users select standardized country and state or province values instead of entering free text. Follow Salesforce’s configuration guide to prepare your data and set up the feature.
Before enabling picklists, check for:
-
Invalid address values: Correct entries such as cities in state fields or states assigned to the wrong country. Use Salesforce’s data and customization scanning guide to identify values and dependencies that need attention.
-
Integrations and imports: Verify how API integrations and Data Loader jobs handle the configured picklist values.
-
Flows and Apex: Check for hardcoded values and logic that depends on existing field values.
-
Validation rules, reports, and list views: Confirm that standardized values work with existing rules and filters.
Test these dependencies in a sandbox before enabling picklists in production. Follow Salesforce’s instructions for enabling State and Country/Territory Picklists when ready.
Step 3. Find duplicates before you remove them
Pick a match key for each Salesforce object. For Leads and Contacts, use email addresses. For Accounts, compare company names or website domains, and check phone numbers to spot possible matches.
You can export your records with Salesforce Data Export or Data Loader.
How to find duplicates in Excel
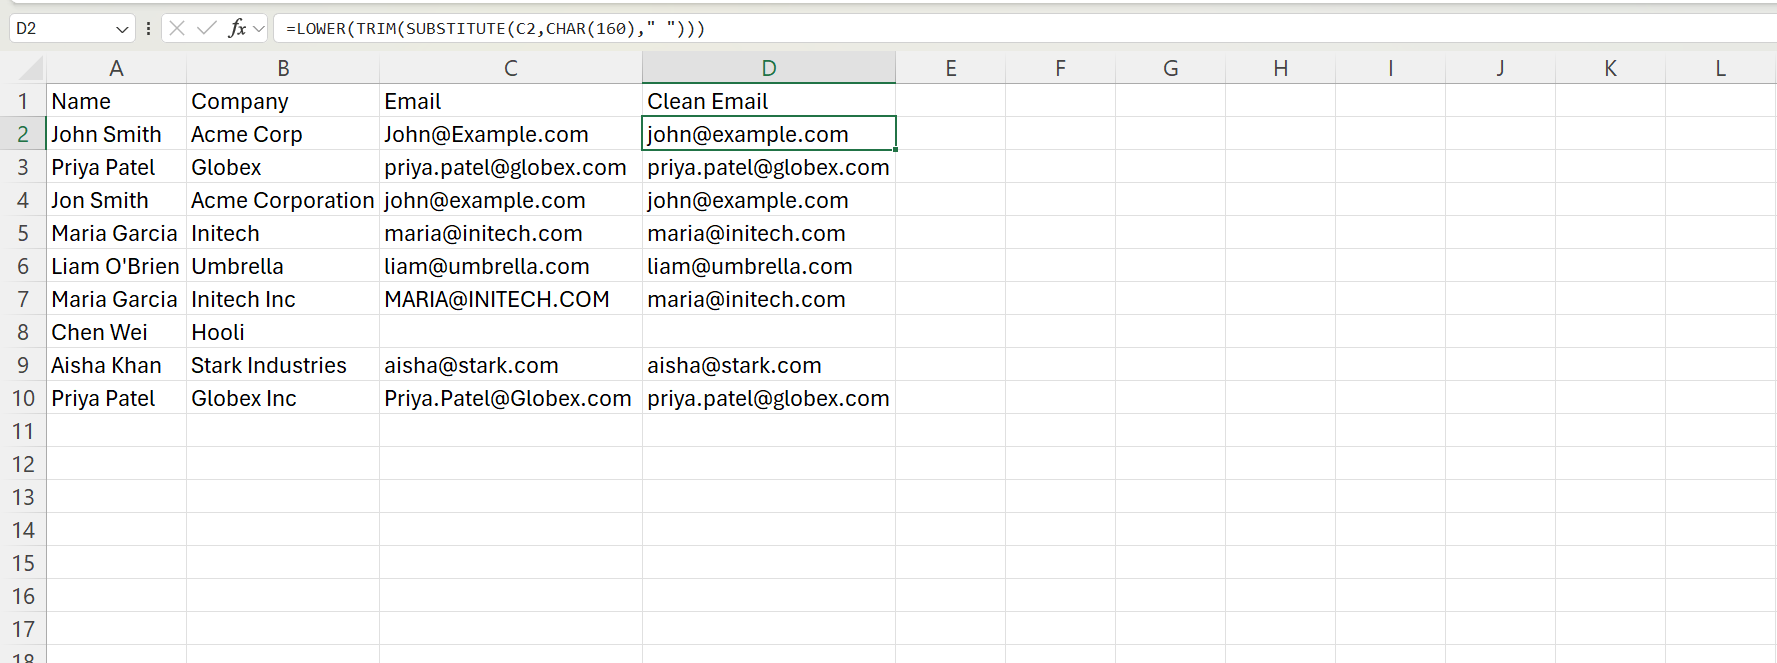
Clean up the match-key values before you check for duplicates. For example, Excel might see John@example.com and john@example.com as different values.
-
1
If your emails are in column C, type =LOWER(TRIM(SUBSTITUTE(C2,CHAR(160),” “))) in column D. This formula changes the text to lowercase and removes extra spaces, including nonbreaking spaces.

-
2
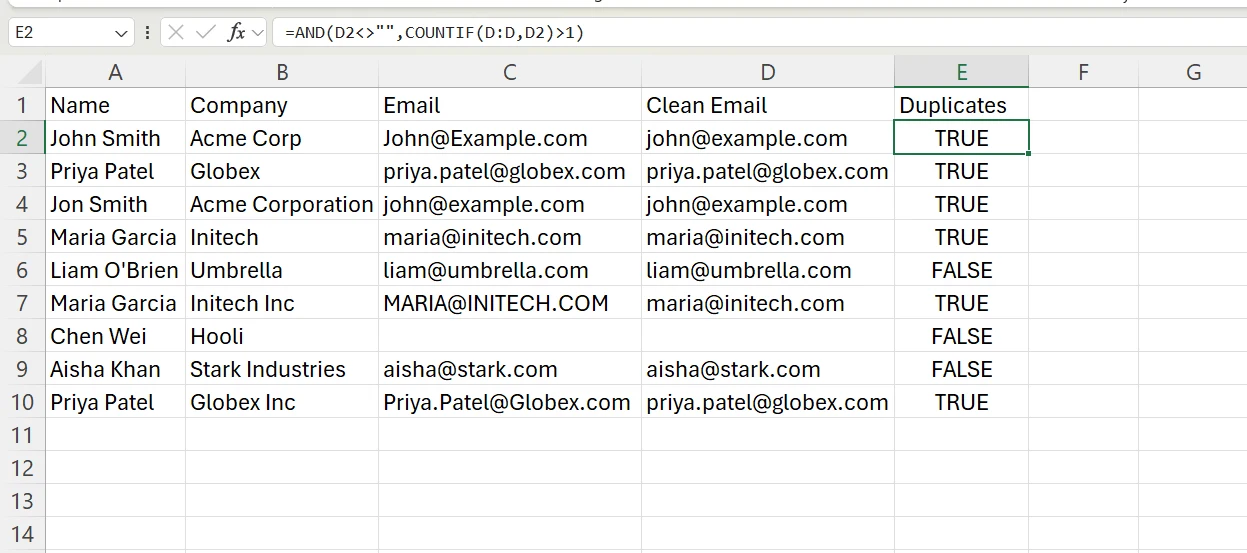
In column E, use =AND(D2<>””,COUNTIF(D:D,D2)>1) to flag values that are repeated and not blank. Filter column E for TRUE, then look over the flagged rows yourself.
-
3
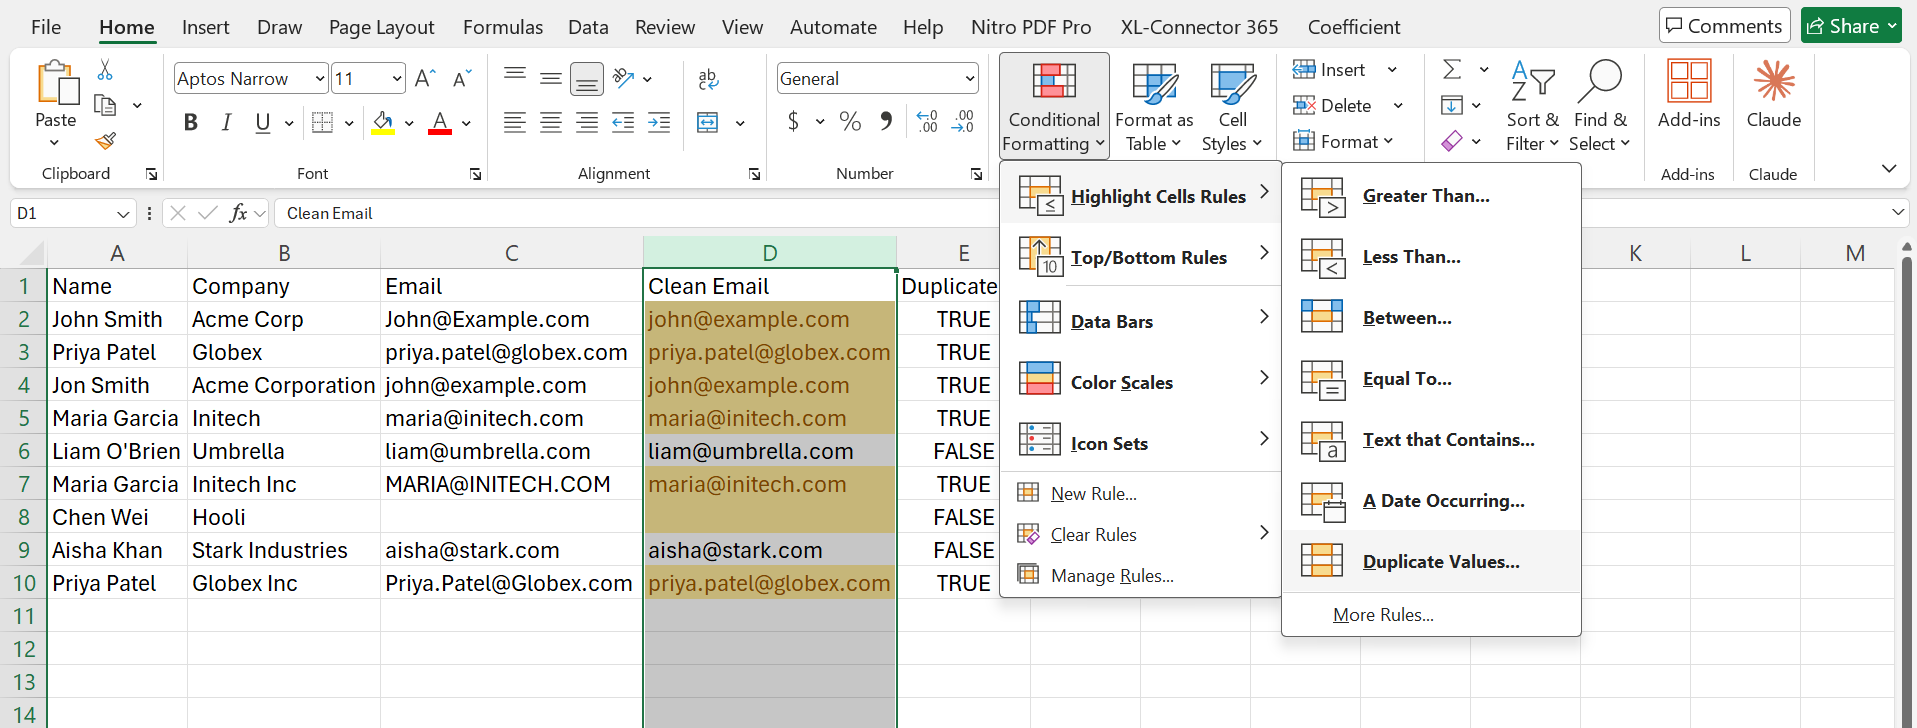
You can also highlight duplicates by going to Home, then Conditional Formatting, then Highlight Cells Rules, and choosing Duplicate Values.
Excel’s Remove Duplicates feature will permanently delete matching rows from the range you select. It checks the columns you pick and keeps only the first match. Before you remove duplicates, copy your original data to another worksheet or workbook, and review the flagged rows first.
Excel only changes your spreadsheet, not your Salesforce data. Use Excel to find possible duplicates, then review and handle those records in Salesforce.
How to find duplicates in Salesforce
Salesforce uses Matching Rules to spot possible duplicates. Duplicate Rules decide if users can save duplicate records, get a warning, or are blocked from saving them.
To find duplicates across your organization, use Duplicate Jobs. You’ll need the Customize Application and View All Data permissions to run a job. For more details, check Salesforce’s guide to managing duplicate records.
How to merge duplicate records
Before you merge, pick the main record and choose which field values you want to keep. Think about data completeness, recent activity, and open opportunities when deciding which record to keep.
In Lightning Experience, Salesforce lets you merge up to three records of the same object at once. The merge combines the selected records into the main record and deletes the others. How related records are handled depends on the object and Salesforce’s merge rules. If you delete a record separately, its field values won’t be merged into another record.
For more tips on finding, preventing, and handling duplicates, check out Xappex’s Salesforce duplicate management guide.
Step 4. Fill the gaps with a lookup
Match an enrichment file, billing export, or event list to Salesforce using email, domain, or record ID. Use XLOOKUP, VLOOKUP, or INDEX/MATCH to retrieve missing values.
XLOOKUP works in Excel for Microsoft 365, Excel 2021 and later, Excel for the web, and Google Sheets. Excel 2016 and 2019 require VLOOKUP or INDEX/MATCH.
Before matching:
- Trim extra spaces and standardize email addresses and domains in both files.
- Use Salesforce’s 18-character record ID because Excel lookups are case-insensitive.
- Check for duplicate keys in the source file.
To fill blanks without overwriting existing values, add a helper column. If A2 contains the key and B2 the existing value, enter this formula in C2:
=IF(B2<>"",B2,IF(XLOOKUP(A2,Source!A:A,Source!B:B,"")="","",XLOOKUP(A2,Source!A:A,Source!B:B,"")))The formula keeps existing values, retrieves matching values for blanks, and returns a blank if no match exists or the source cell is empty.
For Excel 2016 and 2019, use:
=IF(B2<>"",B2,IFERROR(INDEX(Source!B:B,MATCH(A2,Source!A:A,0))&"",""))This formula returns text. Use a suitable formula for number and date fields. After checking the results, copy the helper column and paste it as values into the original column. Do not enter the formula in B2, as this creates a circular reference.
Only store data your organization has permission and a legitimate reason to retain.
Step 5. Validate before you load
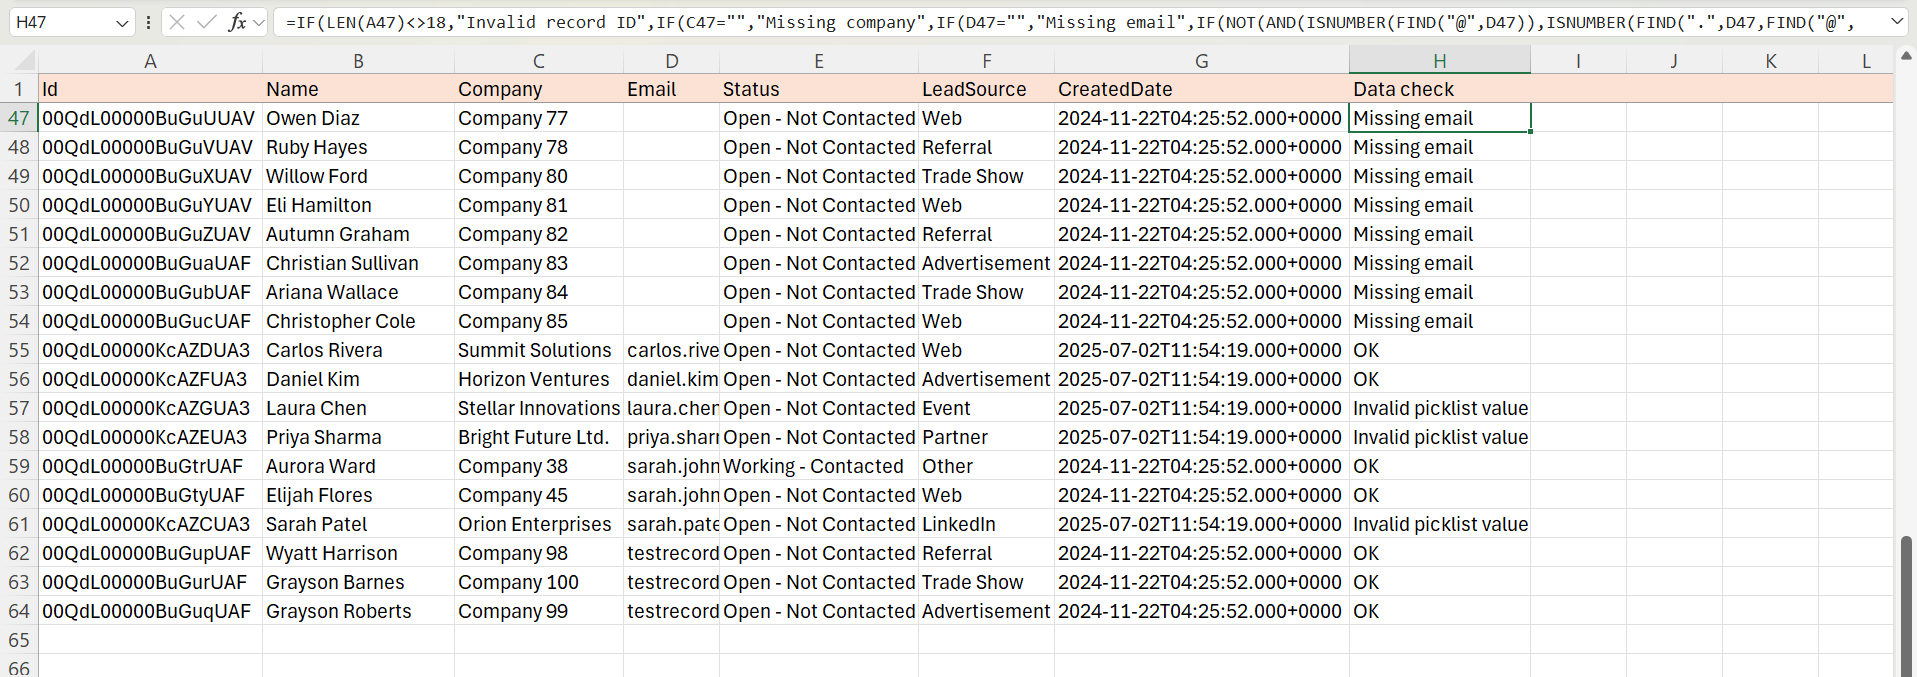
Check the data in your sheet first. Add a Data Check column that tests required fields, email format, picklist values, text length, date format, and whether lookup IDs exist. It returns “OK” or the first problem it finds, such as “Missing email” or “Invalid picklist value”. Example:
=IF(C2="","Missing company",IF(D2="","Missing email",IF(NOT(AND(ISNUMBER(FIND("@",D2)),ISNUMBER(FIND(".",D2,FIND("@",D2))))),"Invalid email",IF(ISNA(MATCH(E2,{"Open - Not Contacted","Working - Contacted"},0)),"Invalid picklist value","OK"))))Filter out “OK”, fix the remaining rows.
Next, check Salesforce. Review the active validation and duplicate rules before you update or delete records in bulk. Validation rules can reject updates. Duplicate rules can warn users or block records.
If a validation rule blocks a legitimate cleanup, ask your Salesforce admin to set up a controlled bypass. One option is to use a custom permission in the validation rule formula. Assign the permission to the user running the load, test it in a sandbox, and remove it when the cleanup is complete.
Keep the load file focused. Include the Salesforce record ID and only the fields you want to change. Formula fields are read-only and do not need to be included. Salesforce recalculates them based on the updated data.
Step 6. Push the changes back safely
Use Update with Salesforce record IDs to modify existing records. Insert creates new records and can introduce duplicates.
If you do not have record IDs, use Upsert with a field set as an External ID. Salesforce will update records that match or add new ones. Make sure each external ID matches only one record, and check for duplicates before you import.
You can use Data Loader, Workbench, or compatible Excel connectors for these tasks. The Data Import Wizard does not let you upsert with a custom external ID field.
Start by testing a small batch and fix any errors before importing everything else. Keep your original data in a Before tab and your cleaned data in an After tab. Write down the changes you make.
Merge duplicates you have confirmed when needed. Salesforce lets you merge up to three records at a time for accounts, contacts, leads, and cases. You cannot use standard merging for opportunities or most custom objects.
Only delete records after you check their relationships and back up your data. Deleted records usually stay in the Recycle Bin for up to 15 days unless you delete them permanently or remove them sooner. If you delete an account, related contacts and opportunities might also be deleted, depending on configuration.
When a spreadsheet is not the right tool
Excel supports up to 1,048,576 rows per worksheet. Google Sheets supports up to 10 million cells per spreadsheet. Large datasets may still cause performance issues within these limits.
Spreadsheets are also unsuitable for matching names with typos or preventing invalid data during entry. For large data volumes, fuzzy matching, or ongoing data quality checks, use the Salesforce data cleansing tools discussed above.
Salesforce Data Cleansing Best Practices
One-time cleanup is not enough. Prevent new errors with these practices.
-
Prevent errors at entry. Use validation rules, required fields, picklists, and duplicate rules to improve data quality. Require fields when users have the necessary information. Field-level requirements apply to imports and API updates; page-layout requirements apply only through the Salesforce UI.
-
Assign ownership and define standards. Assign a data owner for each object. Document standards for phone numbers, country names, account names, and website URLs.
-
Set a review schedule. Check duplicates and missing fields monthly, then perform a deeper quarterly review. Adjust the schedule to your data volume and business needs.
-
Track data quality metrics. Measure duplicate rates, key-field completeness, and records not updated in the past 12 months. Compare results with your initial audit to track progress.
-
Automate data formatting. Use before-save record-triggered flows to standardize fields on records being created or updated. Test transformations before applying them to existing data. Handle phone numbers according to your organization’s formatting rules.
-
Enforce naming conventions. Use flows to generate consistent names from record fields. For example, a renewal opportunity could follow this pattern: Renewal – Company Name – Contract Date.
-
Choose the right field type. Use a checkbox for a true-or-false value. Use a picklist when users must explicitly select Yes or No but should be able to leave the field unanswered.
-
Monitor data quality with reports. Create reports to find records with missing websites, employee counts, or other key fields. Group results by record owner to assign responsibility. Subscribe to reports to receive notifications when conditions are met, such as a record count greater than zero.
Automate the routine
Schedule recurring data quality checks and report refreshes where supported. Use saved update procedures to standardize records or fill verified gaps. Notify the responsible team when a check fails.
Salesforce data cleansing checklist
-
Run the baseline data quality audit.
-
Back up records before making changes.
-
Standardize names, phone numbers, and website formats.
-
Flag potential duplicates using defined match keys.
-
Review duplicates and select the surviving records.
-
Fill missing fields with verified information.
-
Validate records against your data standards.
-
Test changes on a small batch.
-
Log updates and review errors.
-
Set prevention rules and schedule the next review.
Conclusion
Clean Salesforce data in this order: audit records, standardize values, find duplicates, fill verified gaps, validate changes, and test a small batch before updating the full dataset. Use native Salesforce tools to prevent and flag errors, spreadsheets for bulk corrections, and specialist apps for large datasets or complex duplicate matching.
Check data quality monthly, perform a deeper cleanup quarterly, and use validation and duplicate rules to prevent recurring errors.
Start this week by checking one Salesforce object for completeness, accuracy, consistency, duplicates, and validity. Record the results to track improvement.
FAQ
How often should I cleanse Salesforce data?
Check data quality monthly and run a deeper cleanup quarterly. Adjust the schedule based on data volume, record changes, imports, and integrations. Use validation rules and duplicate rules to prevent recurring errors.
What is the difference between data cleansing and data enrichment?
Data cleansing corrects inaccurate, inconsistent, or incomplete data. Data enrichment adds information from external sources. Correcting a misspelled company name is cleansing; adding its industry or employee count from an external database is enrichment.
Does Salesforce have built-in data cleansing tools?
Yes. Salesforce provides matching rules, duplicate rules, validation rules, picklists, the Data Import Wizard, Data Loader, and reports to help identify, prevent, and correct data issues.
How do I clean up messy Salesforce data in Excel before syncing it back?
Export records with their Salesforce IDs, correct the data in Excel, and update the existing records using those IDs.
1. Export: Include record IDs and the fields you need to clean.
2. Standardize: Correct dates, capitalization, phone numbers, and picklist values.
3. Find duplicates: Review potential matches before merging or deleting records in Salesforce.
4. Fill gaps: Add verified values.
5. Validate: Check required fields, permitted values, and formats.
6. Update by ID: Test a small batch before updating the remaining records.
Data Loader ignores blank field values by default during updates. To clear an existing field value:
- SOAP API: Enable Insert null values in Data Loader settings.
- Bulk API: Enter #N/A in the corresponding CSV field.
Do I need to clean my data before migrating to Salesforce?
Yes. Audit the source data, standardize values, resolve duplicates, and check field mappings and record relationships. Test a small batch in a sandbox or test environment before migrating the remaining records.

Rajeshwari Jain
Content Manager
Rajeshwari Jain is a Technical Support Specialist and Content Writer at Xappex. She applies her practical experience to assist customers and create articles on how Xappex tools work with Salesforce to improve data management and increase efficiency.
She began her IT career in 2022 as a Quality Assurance professional before transitioning into Salesforce administration and technical writing in 2023. With Salesforce Certified Administrator and Associate certifications, Rajeshwari writes blogs on Salesforce flows, admin tools, and updates to expand her skills outside of work.
In her free time, she enjoys reading tech blogs and experimenting with new tools.
Feel free to reach out to Rajeshwari for collaborations or to check out her Salesforce-focused content.