Managing duplicate records is essential if you use Salesforce—as an administrator, salesperson, or IT team member. Duplicate data creates confusion, slows workflows, and undermines trust in your CRM.
Most duplicates stem from manual errors, flawed integrations, or team restructuring. Left unresolved, they waste time and complicate processes.
This guide explains how to find, merge, and prevent duplicates in Salesforce and provides tools to keep your data organized.
Salesforce Duplicate Management Tools
Salesforce Duplicate Management Tools help keep your data clean by automatically detecting and resolving duplicate records. They use matching rules to compare key fields such as email addresses, phone numbers, and company names across contacts, accounts, and custom objects. Duplicate jobs run during data entry, imports, or API updates to check new records against existing ones.
We can adjust these rules to fit changing business needs by setting criteria for finding duplicates and choosing what happens when one is found. In short, Salesforce’s duplicate management system reduces manual checks and improves data management efficiency.
Matching Rules in Salesforce
Matching Rules define how Salesforce identifies duplicates by comparing fields such as email addresses, phone numbers, or company names. These rules are applied to standard and custom objects during data entry, imports, or API updates.
For example, a rule might flag two contacts as duplicates if their emails match precisely. Administrators can customize rules to specify comparison fields (e.g., phone number + last name) and configure actions like issuing alerts or blocking duplicates.
These rules initiate duplicate jobs to scan new records against existing data when triggered. Regular updates to matching rules are critical to adapt to evolving business needs and ensure long-term data accuracy.
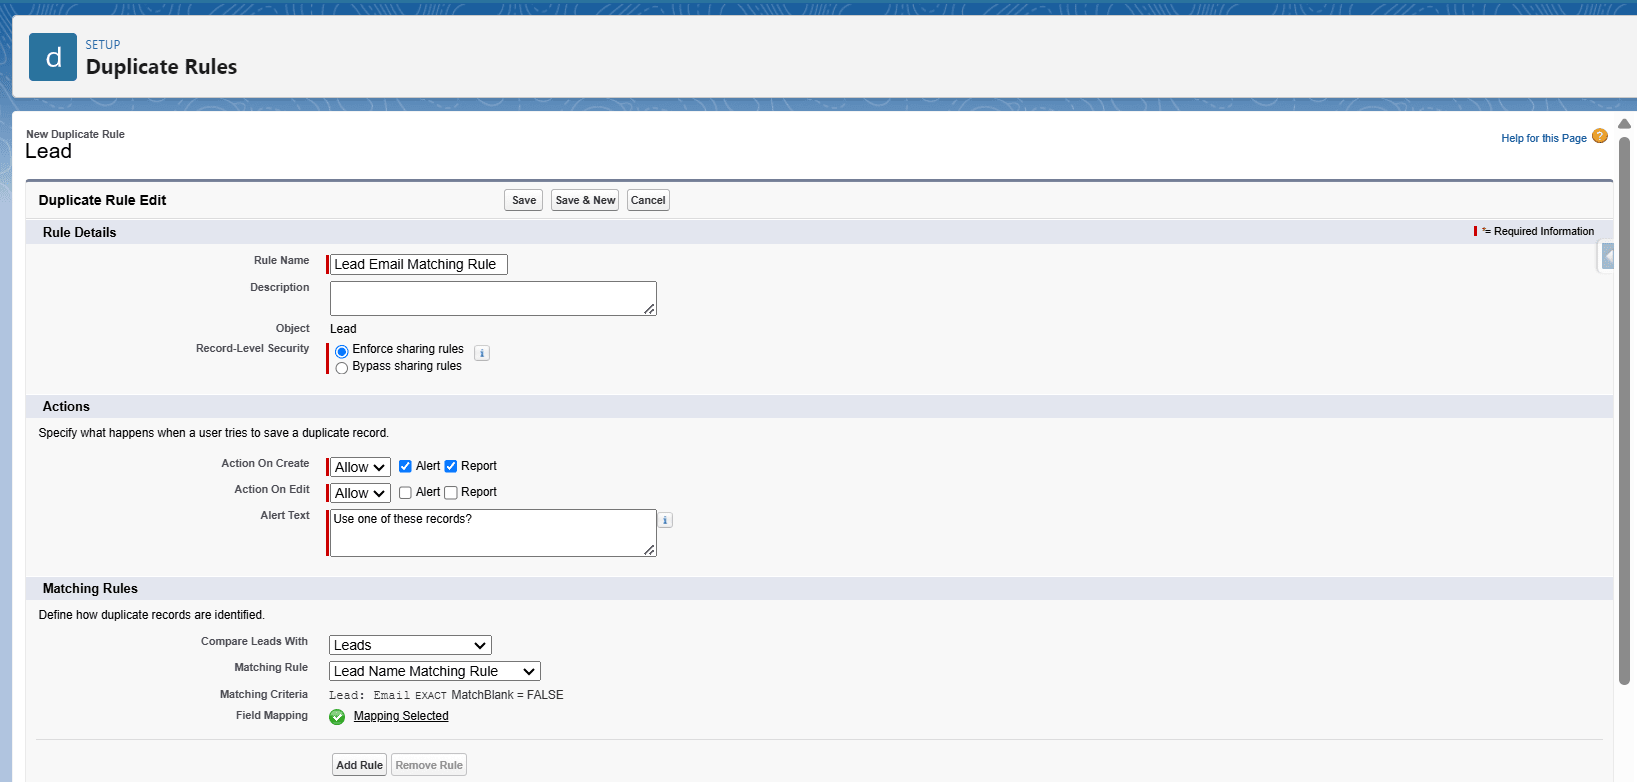
Duplicate Rules in Salesforce
Duplicate Rules define what happens when a Matching Rule detects a duplicate. These rules provide control over how Salesforce handles duplicates, allowing admins to:
-
Block or allow duplicate records.
-
Display alerts to users when duplicates are found.
-
Enable tracking of duplicates through reports.
A critical setting in Duplicate Rules is the ‘Report’ option, which should be enabled for record creation and editing. It allows Salesforce to generate Duplicate Reports, providing visibility into detected duplicates and helping with manual review and cleanup.
Matching Rules vs. Duplicate Rules
- Matching Rules: Define how duplicates are identified based on field comparisons.
- Duplicate Rules: Dictate actions when a duplicate is found, such as blocking, allowing, or reporting it.
Duplicate Reports in Salesforce
Duplicate Reports in Salesforce help find duplicate records and keep your CRM data accurate. They use Salesforce matching rules to compare fields like email addresses, names, or phone numbers and then flag records that appear to be the same for manual review.
They assist with manual record deduplication by:
- Identifying Duplicates: Displaying records that match set criteria so that duplicates are easily spotted.
- Easing Review: Allowing users to quickly decide which records to merge, update, or remove.
- Maintaining Data Quality: Helping monitor duplicate entries to keep data correct.
- Guiding Adjustments: Providing information that can be used to update matching rules and improve data entry practices.
Duplicate Jobs in Salesforce
Duplicate Jobs are automated processes triggered by Salesforce’s Duplicate Management feature to identify and manage duplicate records within the platform.
When a duplicate rule is configured and activated, Salesforce runs a duplicate job to compare newly created or updated records against existing ones, using predefined matching criteria. However, this functionality is limited to the Performance and Unlimited Editions of Salesforce.
How to Find Duplicates in Salesforce
Manual Search for Duplicates in Salesforce
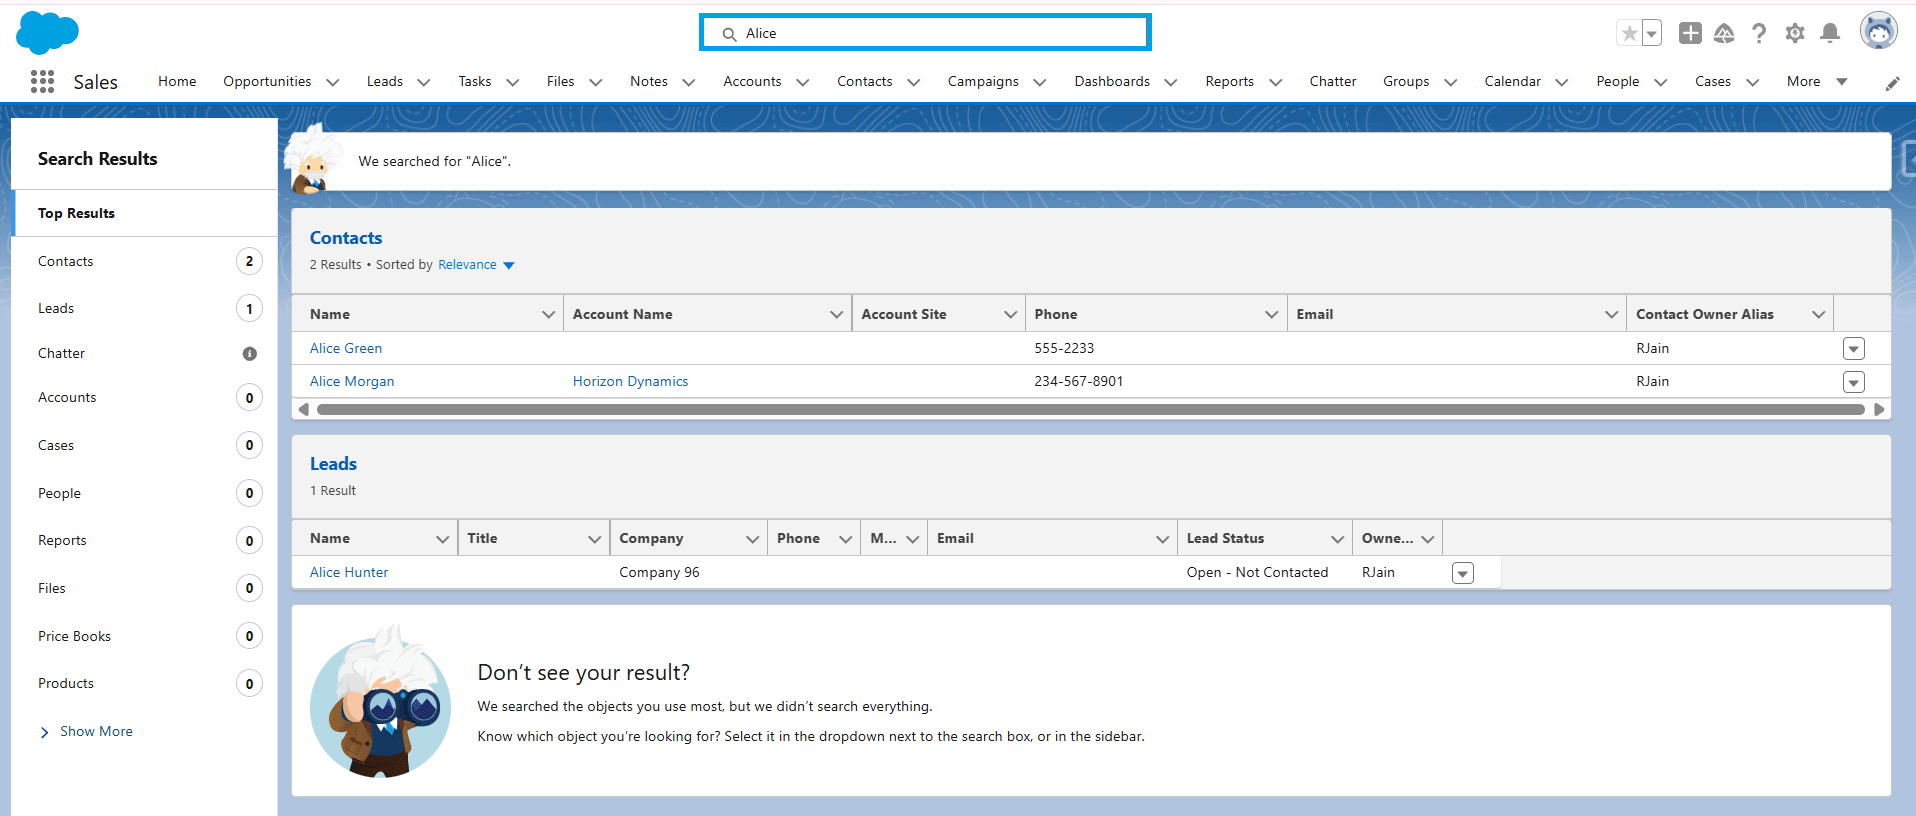
Manually checking duplicates works well for smaller datasets or quick checks. Salesforce’s search bar and filters make it easy to spot repeats without needing complex tools.
How to Search Manually:
-
Use the Search Bar: Type a name, email, or phone number into the global search bar at the top of Salesforce. For example, searching for “Alice” will show all records with matching details.

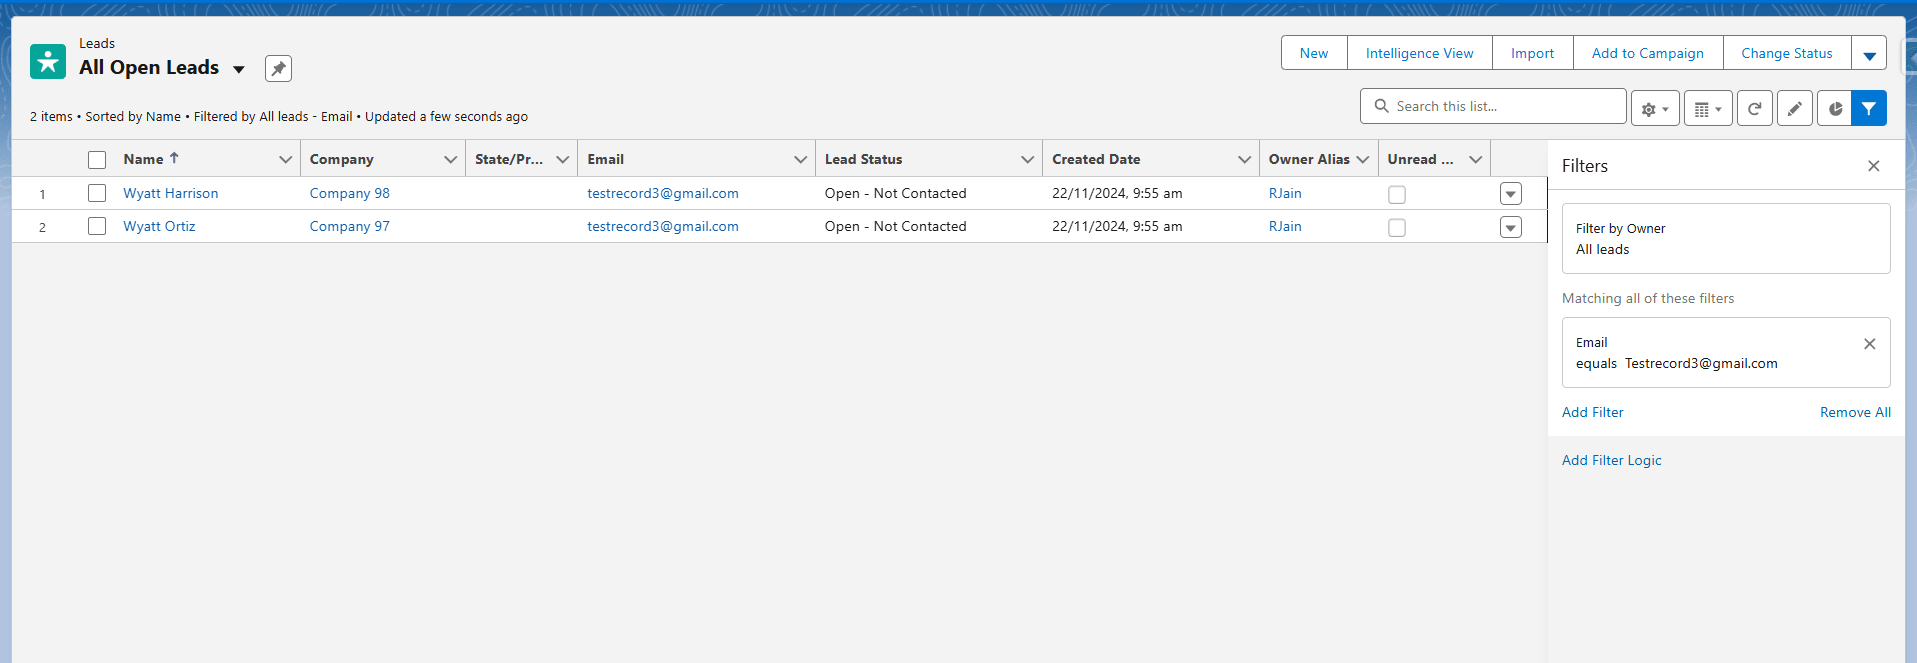
-
Filter List Views: Go to the tab for Leads, Contacts, or Accounts. Open a list view and add filters like “Email” or “Phone” to group similar entries.
Using Salesforce Duplicate Reports
Salesforce includes pre-built reports to find duplicates in Leads, Accounts, and Contacts. To flag repeats, these reports compare fields like names, emails, or addresses.
How to Build a Duplicate Report:
-
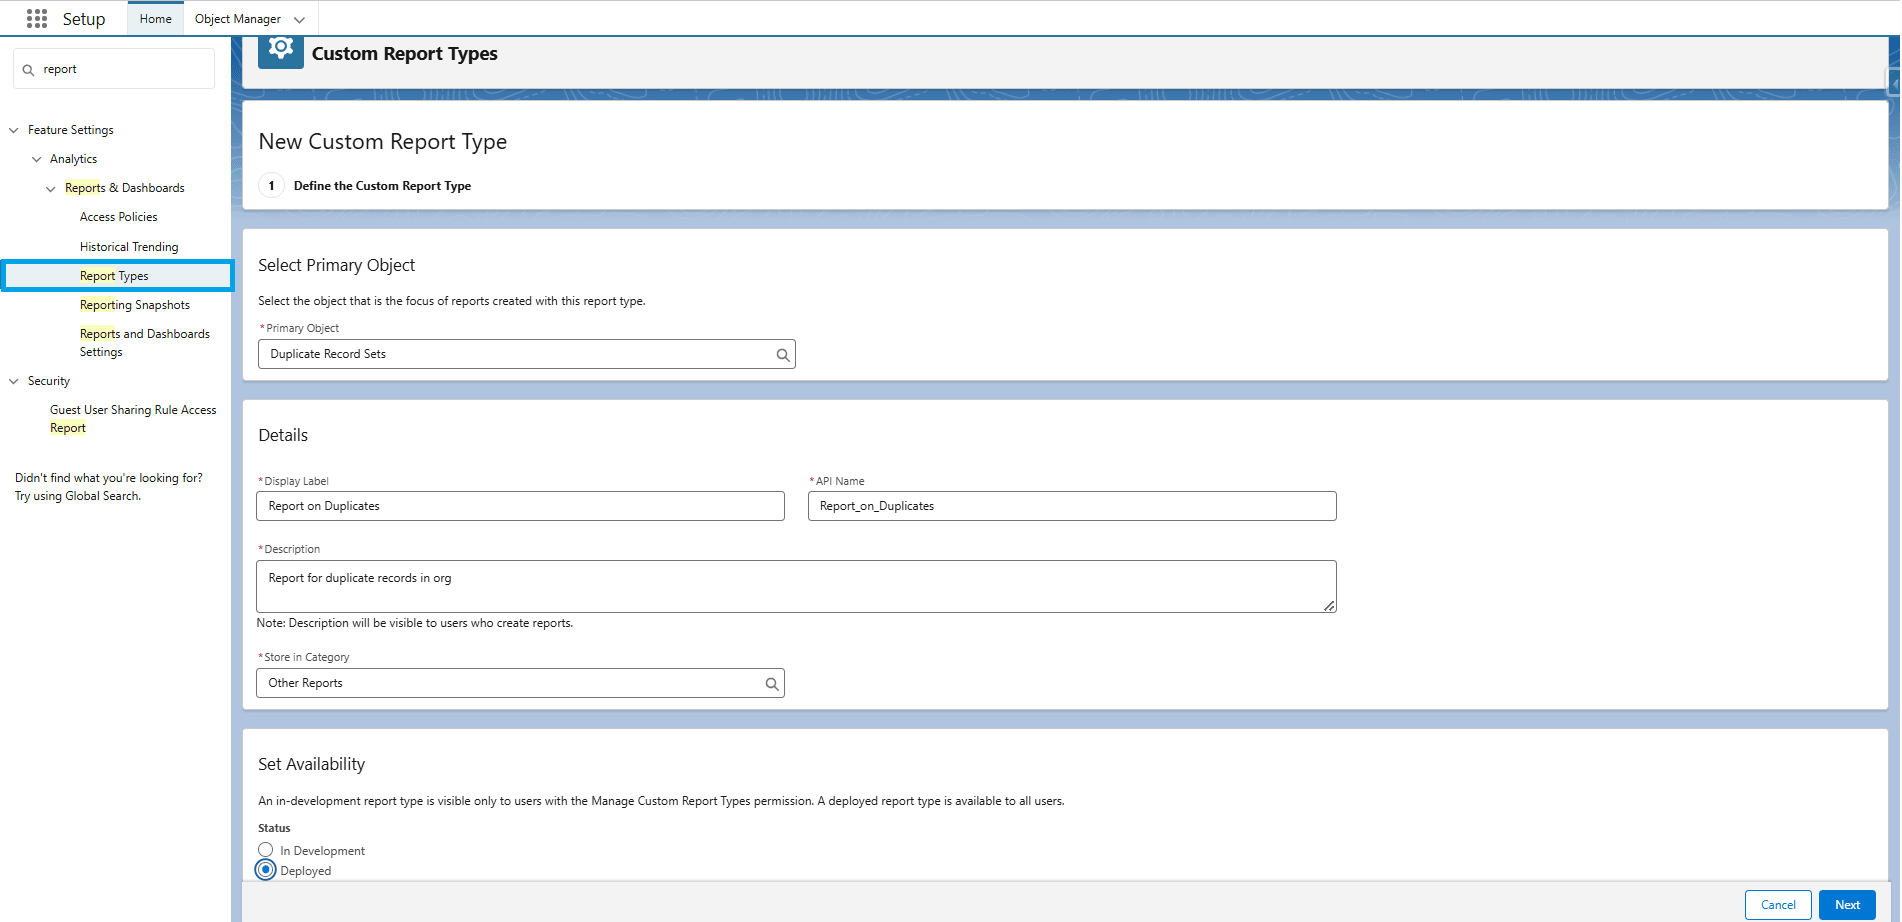
1
Within the setup, navigate to the Quick Find box and search for “Report Types.” Create a report type by designating the primary object as Account, Contact, Lead, or Duplicate Record Set. Click the Next button to proceed.
-
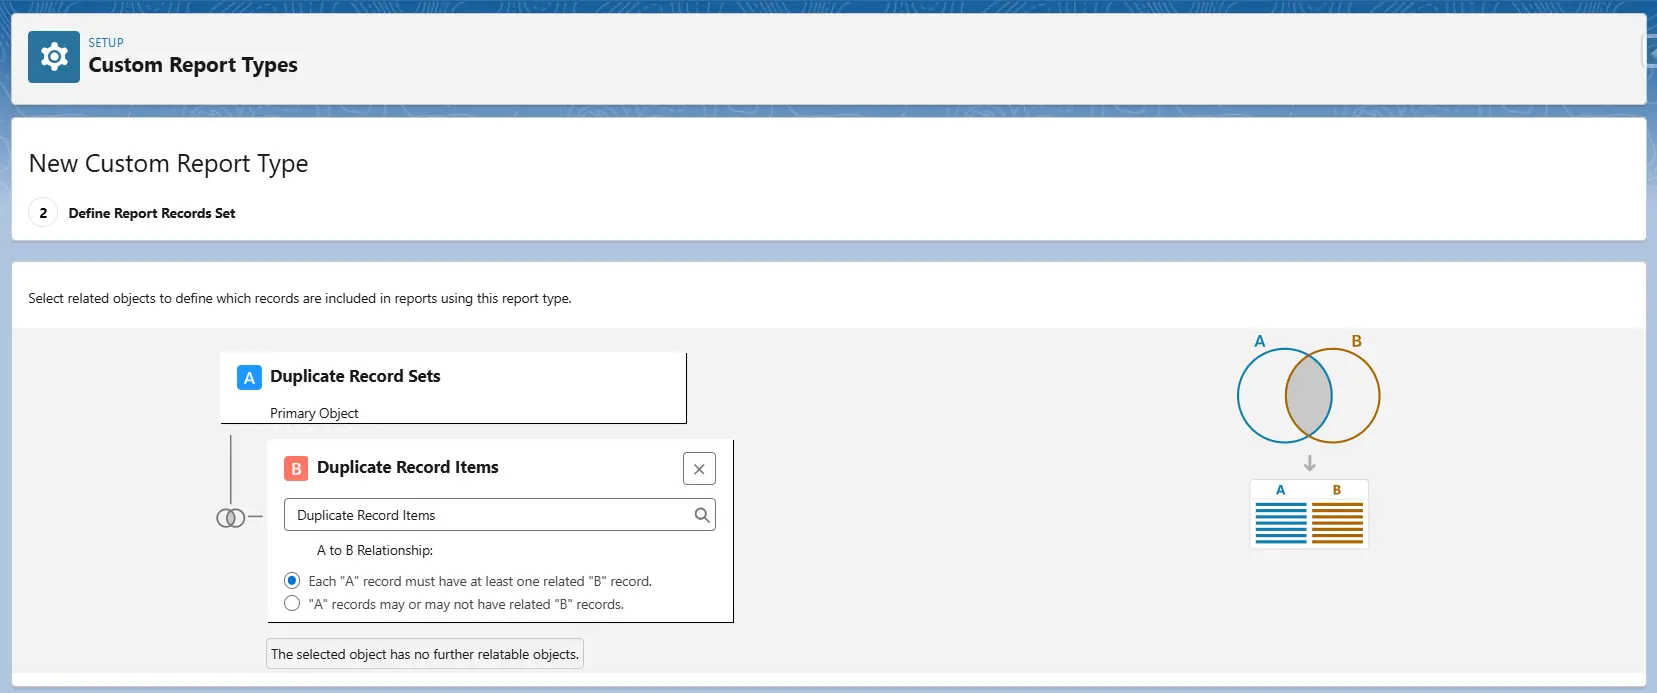
2
To craft a Salesforce duplicate report, establish a relationship between the Duplicate Record Items option and the selected primary object.
-
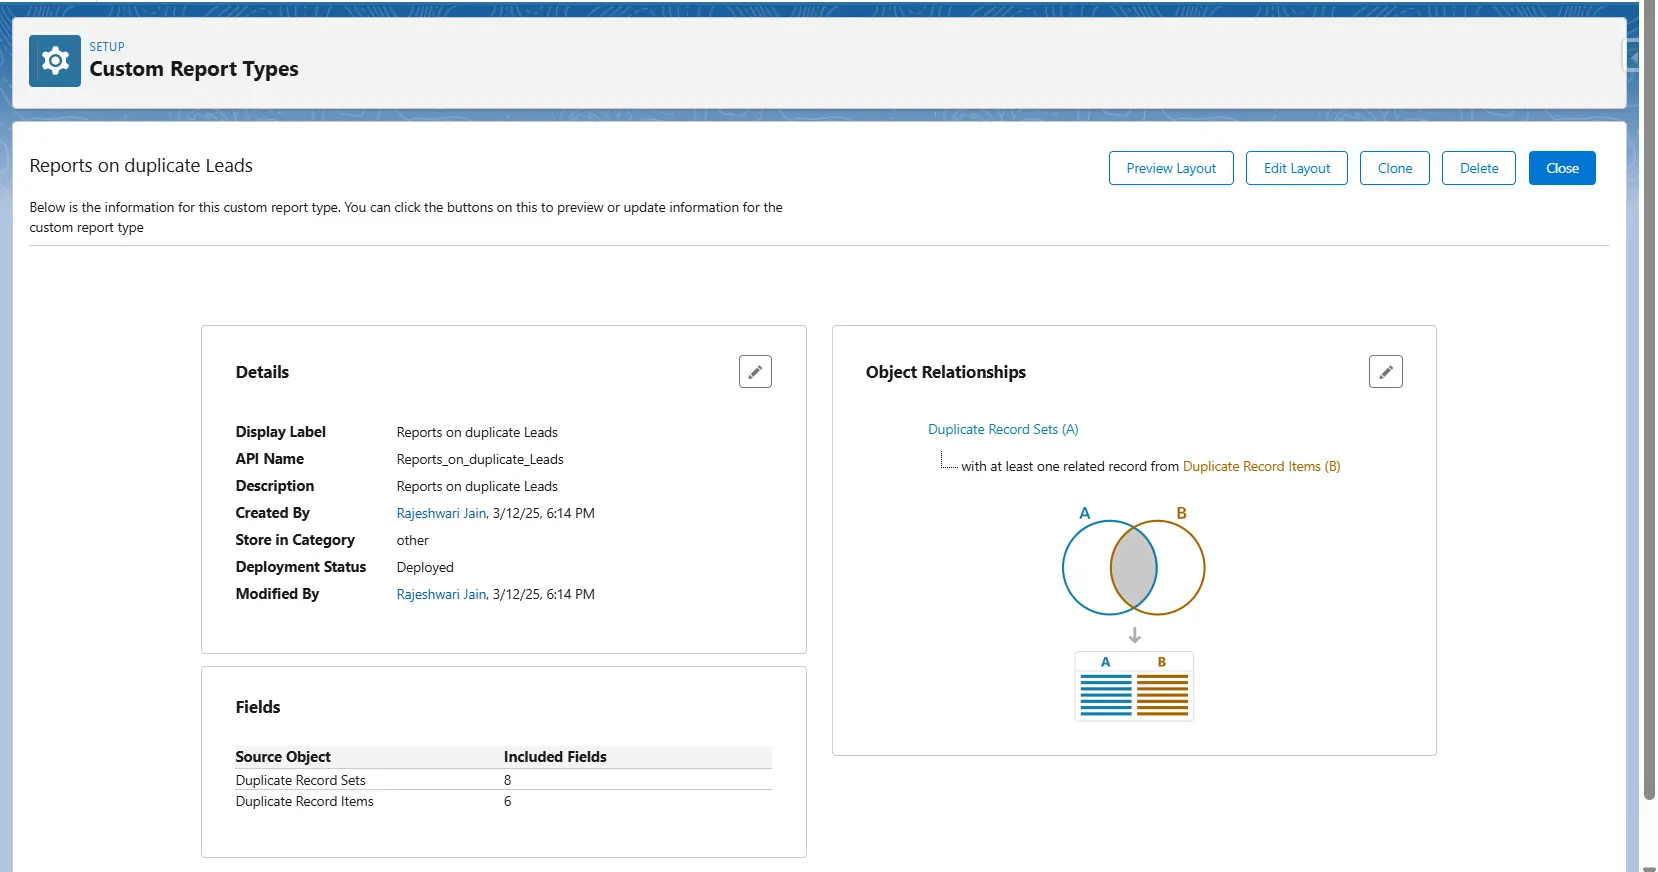
3
Finally, save the report type.
-
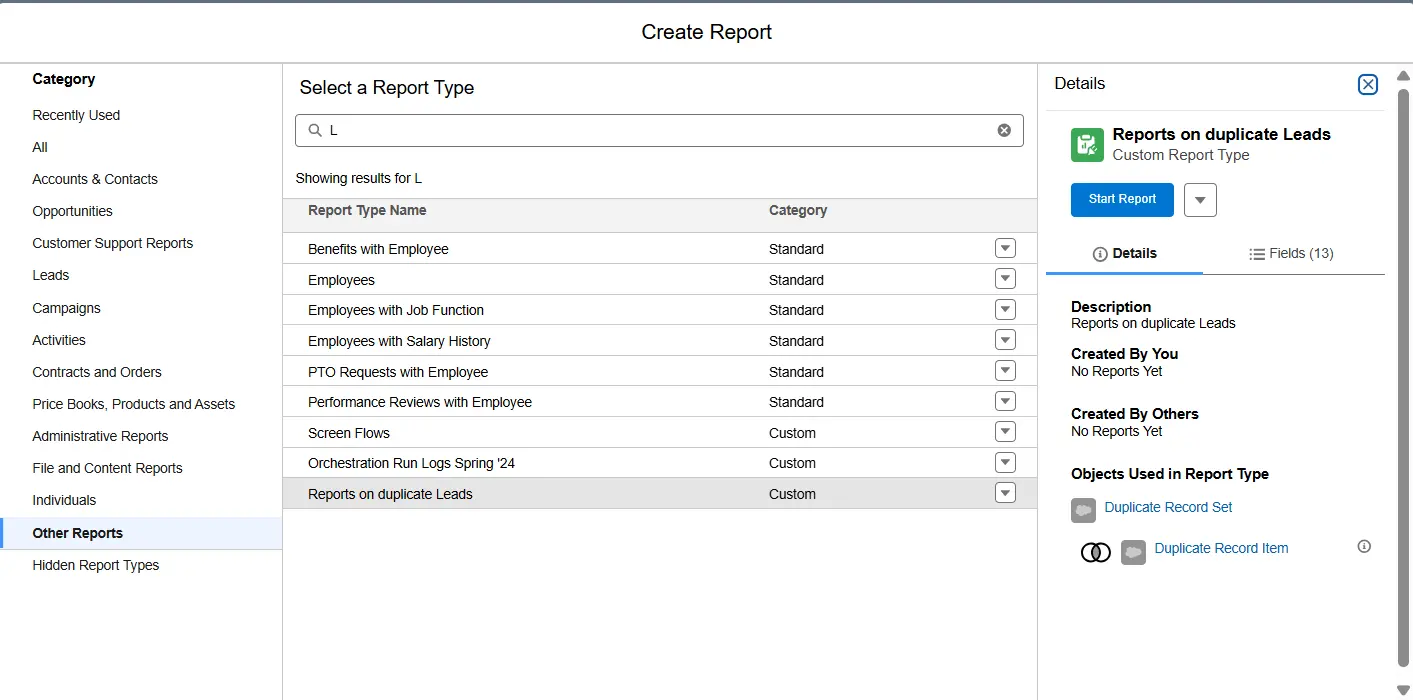
4
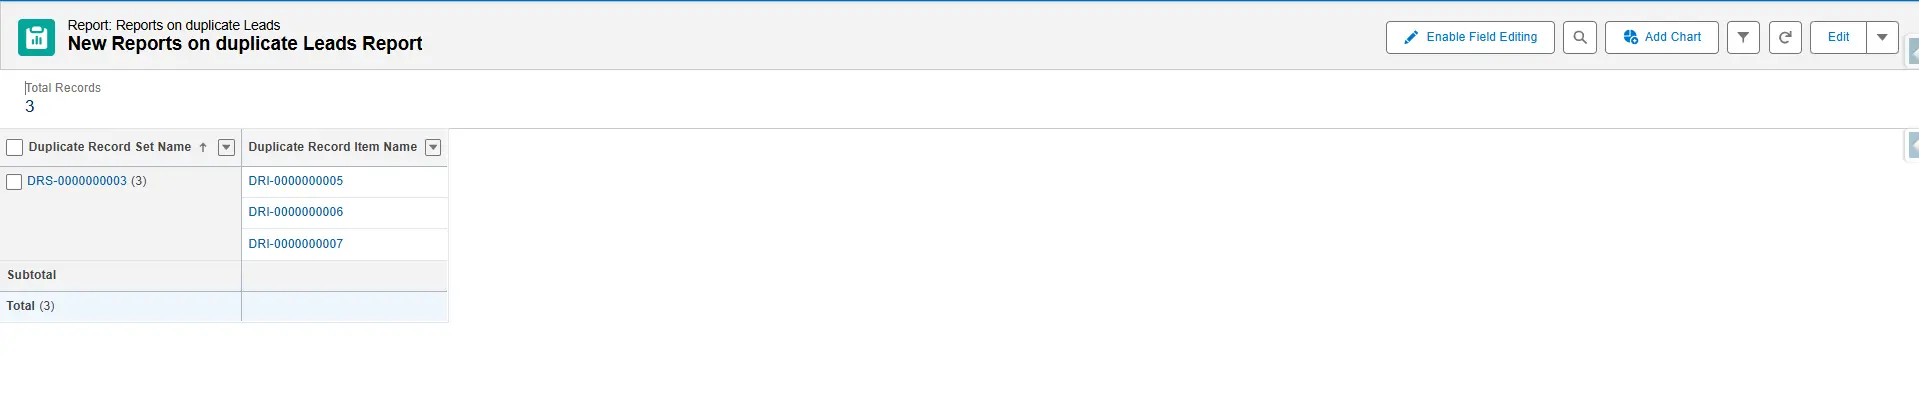
Go to the Reports tab, create a new report, and select the report type you created.
-
5
Group rows by Duplicate Record Set Name, then click Run.
-
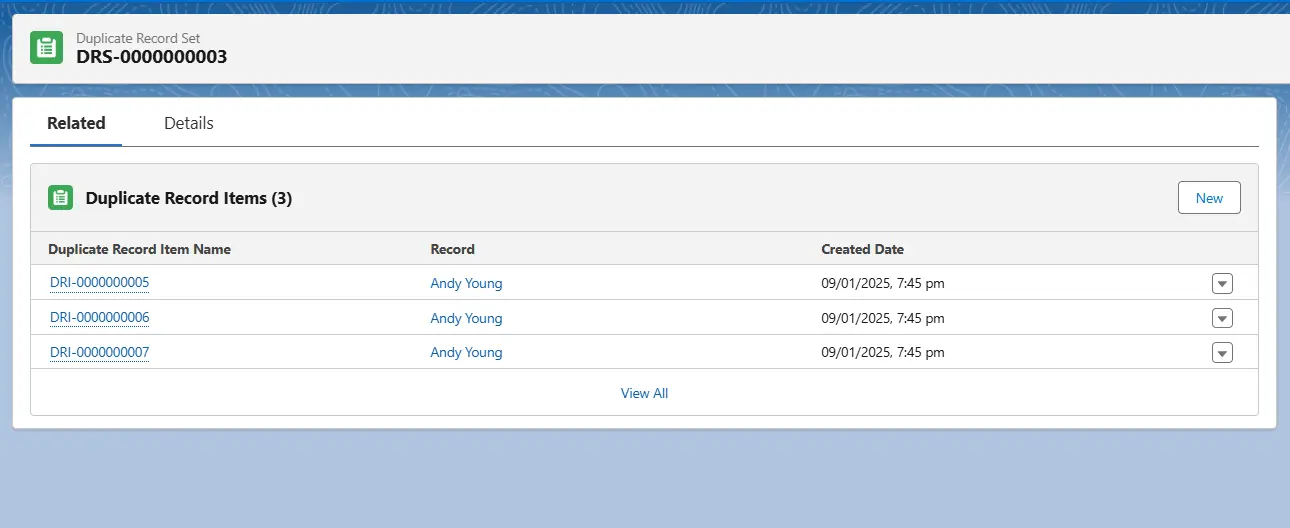
6
Click on a Duplicate Record Set Name to view all related records under Record Items.
Using Excel & Google Sheets for Duplicate Management
Keeping your Salesforce data accurate is important, but duplicate records can cause issues. You can merge duplicates directly in Excel or Google Sheets using a manual or an automated method.
Exporting your Salesforce data allows you to search for and remove duplicate records manually. This method works well for custom duplicate searches, though it can be time-consuming with large datasets.
How to Manually Merge Duplicate Records in Spreadsheets
Export Salesforce Data: In Salesforce, go to Export Data and download your records as a CSV or XLSX file. This file provides the data you need for the next steps.
Identify Duplicate CRM Data: You can use Excel’s feature: Home > Conditional Formatting > Highlight Cells Rules > Duplicate Values or Google Sheets’ Conditional formatting using the custom formula =COUNTIF (A:A, A1)>1)

Clean and Re-import Data: After finding and correcting duplicate entries, re-import the cleaned data back into Salesforce. This helps keep your CRM data accurate.
Automating Duplicate Management with Xappex XL-Connector
Xappex’s XL-Connector and XL-Connector 365 offer an automated option that works directly from your spreadsheet, reducing the time spent on duplicate removal.
Pull Your Data: Import the necessary Salesforce records into Excel using XL-Connector.
Create a Master ID Column and merge:
-
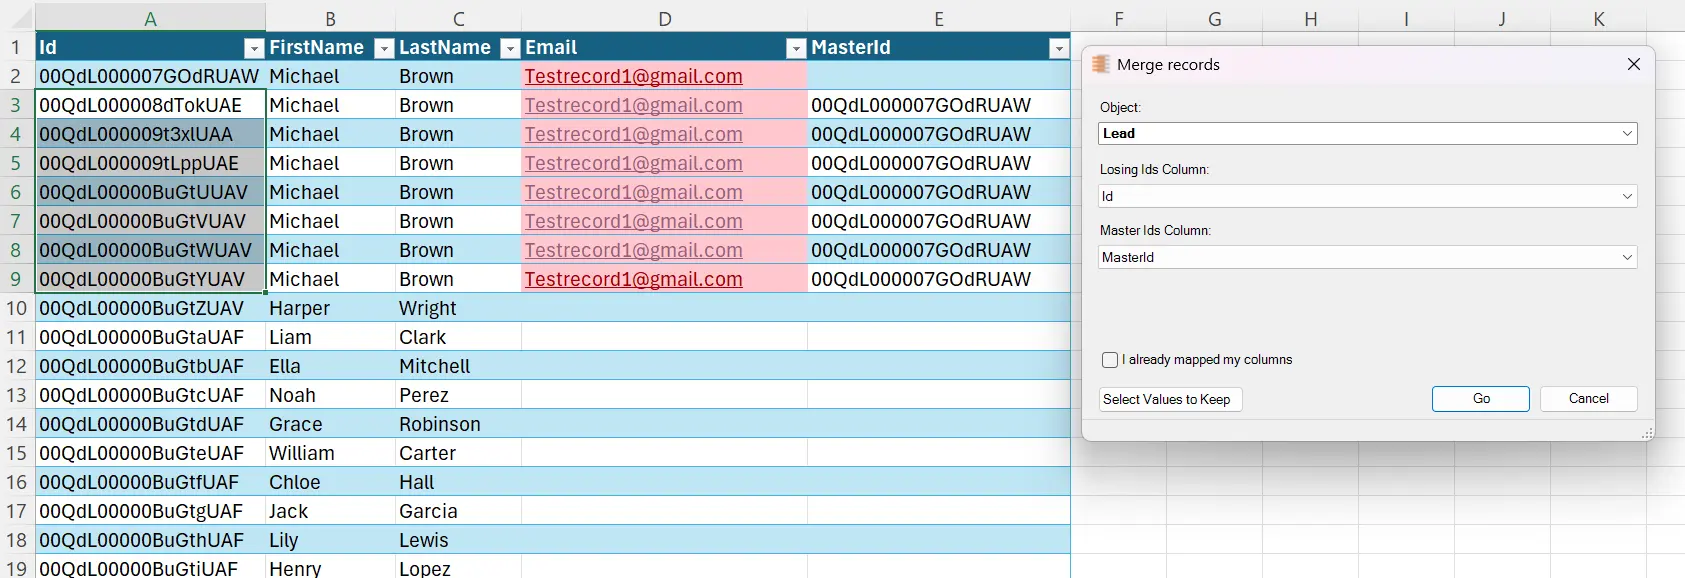
1
Add a new column called “Master Id” to your data. Copy the ID from the record you want to keep into this column for every row involved in the merge. This marks the master record
-
2
Select the rows you want to process and click on Merge Records on the XL-Connector ribbon.
-
3
In the dialog box, choose the object type, the Master IDs column, and the Victim IDs column.
-
4
See results.


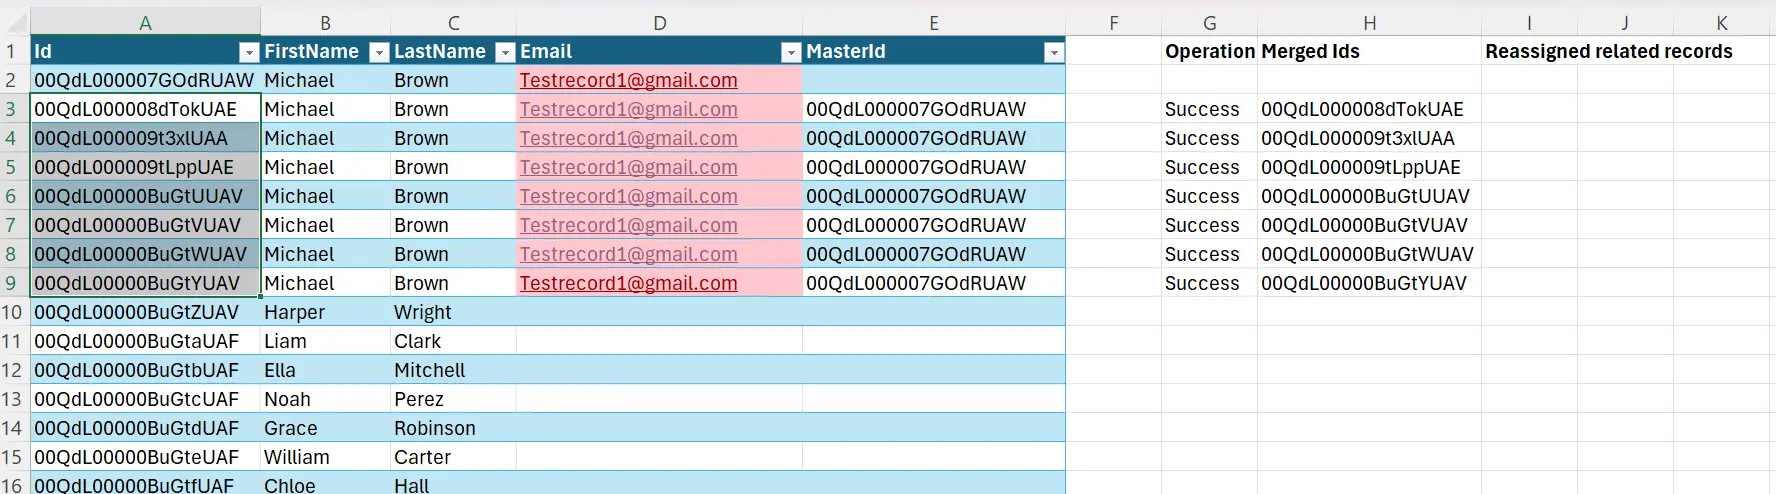
Operation Details:
-
Delete all records marked as “victim.”
-
Move any child records from the deleted entries to the master record. If you have field mappings set up, values from the mapped columns will overwrite those in the master record.
-
When merging multiple victim records into one master, the value from the last row with an entry in the mapped column takes precedence.
Automate the Process
Save the merge settings and field mappings as a reusable Flow Step. This allows you to repeatedly run the same bulk duplicate removal process from the Flows tab in XL-Connector.
How to Merge Duplicate Records in Salesforce
Salesforce has a built-in merge tool that lets you combine duplicate records. It works well for small groups of records but can struggle when you have many duplicates. In those cases, third-party tools can help merge records in bulk.
Standard Salesforce Merge Options
Salesforce’s native merge tool lets you merge duplicate Accounts, Contacts, and Leads. This tool is useful when you need to merge duplicate records manually. Here’s how it works:
-
1
Access the Merge Tool: Navigate to the record’s detail page and open the merge function (click “Find Duplicates” for Leads or “Merge” for Accounts/Contacts).
-
2
Select Duplicates and Master Record: You can choose up to three duplicate records and designate one as the Master Record to serve as the primary entry.
-
3
Finalize the Merge: Manually select the field values to retain from each record and confirm the merge.
One example is the Xappex XL-Connector, which works directly with Salesforce data to merge records quickly. For more details, see our Mass Merge Guide
How to Prevent Duplicate Records in Salesforce
Duplicate records in Salesforce impact CRM performance by creating inconsistent data and interfering with sales and marketing activities. Companies can resolve this issue using Salesforce’s built-in duplicate prevention tools and following structured data entry practices.
When set up correctly, these tools block duplicate records and keep the data accurate. In addition, using data validation rules and consistent entry methods reduces mistakes so that each record stays unique and reliable.
Setting Up Custom Duplicate Rules in Salesforce
Salesforce provides tools to prevent duplicate records through Duplicate Rules and Matching Rules. When you set up these rules correctly, you can block duplicates or alert users before adding a duplicate record.
Steps to Set Up:
-
1
Access Setup:
- Open the Salesforce Setup menu and go to Duplicate Rules.
- Select the object (Accounts, Contacts, or Leads) where you want to manage duplicates.
-
2
Define Matching Rules:
- Exact Matching: Finds duplicates when fields are the same, such as matching an email address or phone number.
- Fuzzy Matching: Spots possible duplicates by comparing similar but not identical values. This rule catches minor differences like spelling variations or formatting changes.
- Example: “John Smith” compared to “John Smith” is an exact match, while “John Smith” versus “Jon Smith” indicates a possible duplicate.
-
3
Choose an Action:
- Decide to block the creation of duplicate records or allow them while showing an alert. Save and activate the rule.
These Duplicate and Matching Rules work together to improve duplicate detection by catching both exact and near-duplicate records.
Creating data Entry Rules to Prevent Duplicates
Manual data entry mistakes often lead to duplicate records: typos, different formats, and missing key information cause repeated entries that weaken the CRM. Using clear data entry rules can help reduce these problems.
Reasons for Duplicates:
- Typos and Inconsistent Entry: Differences in how phone numbers or names are entered can result in duplicates.
- Missing Unique Identifiers: Incomplete details, like missing email addresses or phone numbers, make it hard to tell records apart.
- Variations in Company Names: For example, “Acme Inc.” and “Acme Corporation” might represent the same company but appear as different records.
How to Prevent Duplicates:
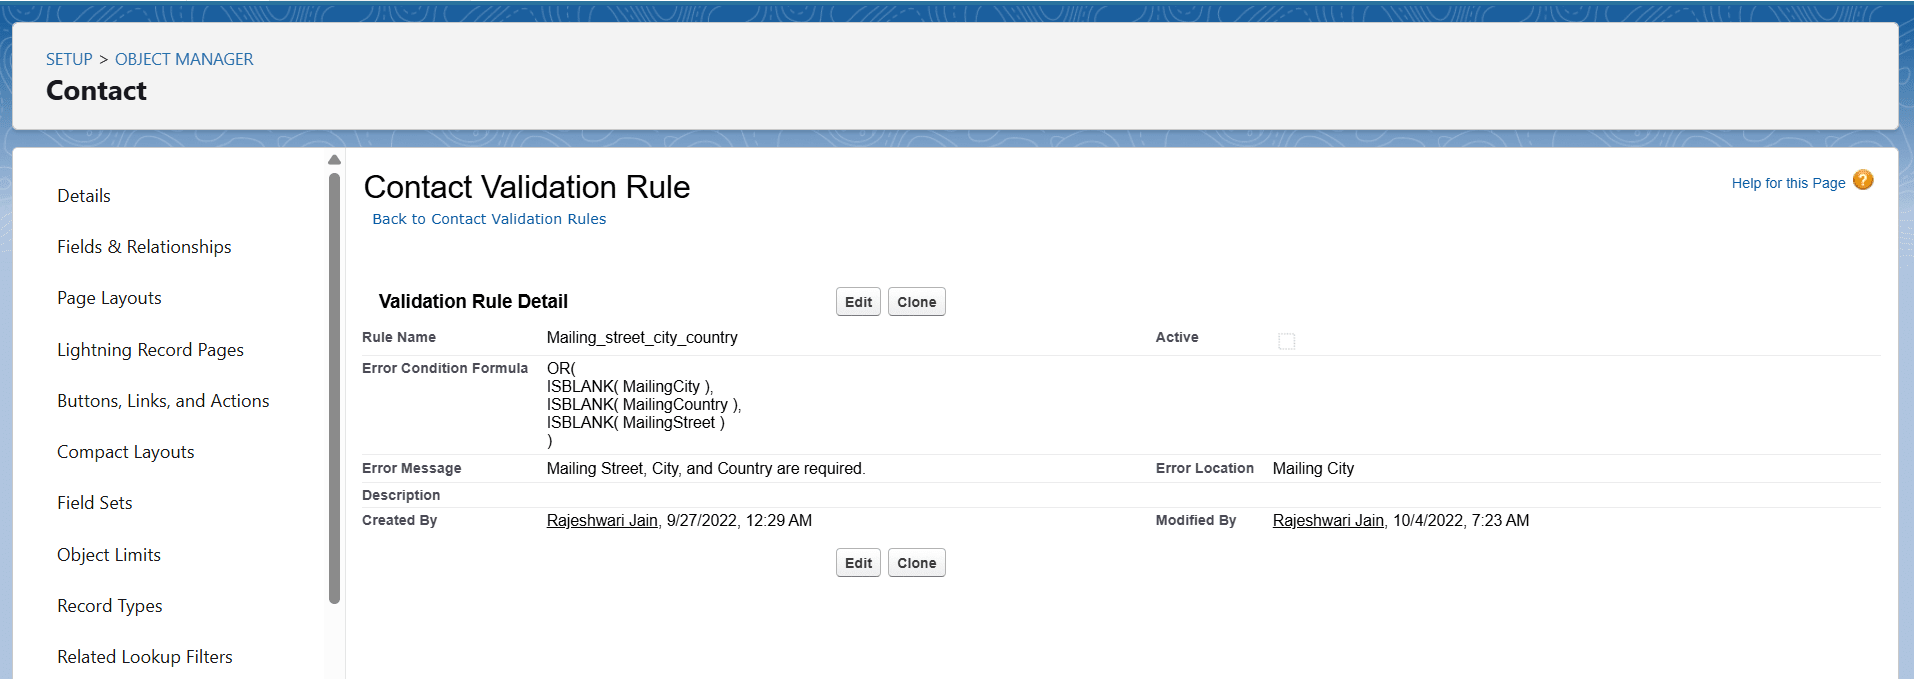
Field Validation Rules:
- Set standard formats for fields like phone numbers. Make email addresses unique for Contacts and Leads.
- Use consistent naming rules for Accounts.
Use Picklists and Required Fields:
- Limit free-text entries to reduce variations. Mark key fields as mandatory to get complete information.
Employee Training:
- Hold regular training on proper data entry. Remind staff to follow the set procedures to reduce mistakes.
Limitations of Native Duplicate Management in Salesforce
Salesforce includes duplicate management features, but these tools have limitations that impact data handling.
Restrictions on Merging Duplicates
Salesforce allows merging up to three duplicate records at a time, and the process must be done manually through the user interface. Organizations with many duplicate entries face delays since no bulk merging option exists. Many turn to third-party solutions like Xappex, which can merge more than three records simultaneously.
No native Duplicate Prevention for Custom Objects
While standard objects benefit from these rules, custom objects remain unchecked, increasing the risk of duplicates. Businesses often use custom Apex triggers or third-party tools to manage this.
Duplicates Ignored During Data Import
Salesforce does not check for duplicate records during bulk data imports, which can result in duplicate entries being added to the system. Cleaning and verifying CSV files before import can help reduce this issue.
Additional Limitations and Challenges
- Manual Process. Duplicate identification and merging are performed on a record-by-record basis. Features such as “Find Duplicates” and “Merge Contacts” require individual review, and even Duplicate Jobs only generate groups of duplicates that must be merged manually.
- Limited Matching Algorithms. The system relies on a small set of fields—such as name, email, phone, and company name—for matching. Although users can create custom matching rules, the available options remain limited when detecting less apparent duplicates.
- Master Record Selection. During the merging process, Salesforce automatically selects the oldest record as the master. Although users can change the master record manually, comparing fields such as updated phone numbers may require additional review.
- Not Suitable for Large Organizations. Manual deduplication is time-consuming and may require significant resources for companies managing extensive records.
By recognizing these limitations, organizations can improve their approach to managing duplicate records by supplementing native features with custom solutions or third-party applications like Xappex.
Salesforce Duplicate Management Best Practices
Managing duplicate records in Salesforce is vital for keeping data accurate. Although Salesforce’s matching and duplicate rules help, they sometimes struggle with large volumes or complex data. In such cases, additional deduplication methods are needed.
Metadata Tagging for Duplicate Identification
Using metadata tagging helps mark and review records that might be duplicates. Custom metadata fields can be added to track potential duplicates.
How it works
- Custom Fields — Create fields like “Duplicate Status,” “Merge Candidate,” or “Similarity Score” to mark records.
- Similarity Scores — Give records a percentage score based on how closely they match. For example, two contacts with nearly identical phone numbers (e.g., 555-1234 vs. 555-1235) might score 90%
- Fuzzy Matching — This catches near-matches, like abbreviations (“Ave” vs. “Avenue”) or minor typos, instead of requiring perfect matches.
- Categorization — These tags help assess the likelihood of duplicates, focusing on records requiring further review or merging.
- Reporting — Build Salesforce reports to track duplicates tagged with these fields. This helps with spot patterns, like duplicates from a specific import or user.
Example: A “Duplicate Status” field with options like Review Needed or Duplicate – Resolved lets teams prioritize which records to action first.
Bulk merging and Automation
Automation reduces manual work and speeds up the process:
-
1
Salesforce Flows: Set up automated checks when records are created or edited. For example, a Flow can flag a lead if its email matches an existing contact.
-
2
Bulk Merging: Use tools like Salesforce Data Loader or apps like Xappex XL-Connector to merge hundreds of records simultaneously, skipping the three-record limit.
-
3
External Tools: Connect Salesforce to platforms like Zapier to check for duplicates across systems (e.g., between Salesforce and a marketing database).
Example: Automatically tagging accounts with a “Similarity Score” based on company name and address variations helps admins focus on the most likely duplicates.
Using Third-Party Deduplication Tools
For large or complex deduplication tasks, third-party tools offer extra features beyond Salesforce’s native options.
Additional features include:
-
Merging More Records: While native tools may merge up to three records at a time, third-party solutions can handle larger groups.
-
Improved Matching Algorithms: These tools often use better fuzzy matching and assign different weights to specific fields.
-
Cross-Object Detection: Some tools can match duplicates across different objects, such as leads and contacts.
Example: Xappex’s XL-Connector adds advanced deduplication functions along with Excel integration. It supports bulk operations, metadata management, and enhanced reporting for large datasets.
Each method contributes to improved Salesforce data management. Combining metadata tagging, automation, and third-party tools allows businesses to handle duplicates effectively and maintain accurate CRM data over time.
Conclusion
Controlling duplicates is necessary for reliable Salesforce data. While Salesforce’s Matching Rules identify duplicates, they lack scalability and flexibility. Manual cleanup is tedious, and default tools can’t adapt to specific business needs.
Tools like Xappex XL-Connector automate deduplication, minimizing manual work. Integrating these with Salesforce cuts errors saves time, and helps teams focus on maximizing CRM value.
Managing duplicates isn’t just cleaning up, it ensures your CRM works efficiently. The right tools and habits keep data accurate and aligned with your team’s objectives.

Florencia Mouriz
Florencia Mouriz is a professional with over two years of experience at Xappex, where she has performed as a Technical Support Agent and Coordinator, and Technical Writer. In this role, Florencia provides support to customers while creating educational content and tutorials that guide users through the implementation of Xappex tools with Salesforce. Her contributions seek to enhance customer understanding and optimize the use of these tools.
Before joining Xappex, Florencia gained valuable experience participating in diverse projects for other companies, where she worked as a Salesforce Administrator and implemented Vlocity solutions. She has an extensive background in Salesforce ecosystems and is determined to deliver impactful results for our company.
Based in Tandil, Bs As, Argentina
To learn more about Florencia’s experience and connect with her, visit her LinkedIn profile