-
XL-Connector
-
- Upload Multiple Related Records in Salesforce at once
- Dynamically Adjust UI Elements for XL-Connector Users
- Mass manage Salesforce Custom Object Fields
- Mass update Field Level Security in Salesforce
- Accounting Seed Financial Cube Formula (ASFC) for Salesforce
- Mass convert Leads in Salesforce
- Automate Salesforce Data Loads in Excel with XL-Connector Flows
- XL-Connector: Your Custom Metadata Management tool for Salesforce
- How to export and import Flows and Flow Steps from/to Salesforce
- Using Custom Formulas to Dynamically Pull Data From Salesforce
- Edit Report Filters
- Run Any Data Load Scenario with a Single Click
- Bring Picklist Values to your Salesforce Report
- Scheduling Automated Data Refreshes in XL-Connector
- Getting rid of duplicate Accounts, Contacts, and Leads in your Salesforce org
- Generating VisualForce pages from Page Layouts
- Determining Field Utilization
- Figuring Out Field Utilization Across Layouts
- VBA Interface
- Uploading Files to Salesforce
- Validating Dependent Picklists
- Show Remaining Articles ( 6 ) Collapse Articles
-
- Importing Data from Salesforce.com using SOQL
- Creating New Records in Salesforce
- Updating Existing Records in Salesforce
- Figuring Out the Upsert Operation
- Using Text Fields Instead of Ids in ID and Lookup Fields
- Mass Import/Export of images stored in Rich Text Area fields in Salesforce
- Filling Gaps in your Data
- Mass-downloading Documents from Salesforce.com
- Mass-uploading Attachments to Salesforce.com
- Bulk Deleting Records from Salesforce.com
- Pulling Data From Multiple Related Objects
- Importing Data from Salesforce.com reports
- Logging in to Salesforce.com
- Deploying XL-Connector via MSI Package
- XL-Connector Download
-
- What is the difference between XL-Connector and XL-Connector 365?
- My reports stopped working after enabling MFA
- My reports stopped working after enabling MFA
- How do I add users to my XL-Connector subscription?
- How do I update fields with Null values?
- I'm getting a 'Failed to Create Browser' error when trying to use Web and SSO Login
- How do I transfer my existing XL-Connector license to a new user?
- What is the maximum amount of Salesforce records I can work with?
- I'm having proxy issues
- What if my data is filtered in the spreadsheet?
- What Do I need to select when inserting/updating/deleting records?
- Where do I find Security Token?
- My Get Data (or Update/Insert/Upsert) Dialog Box Is Visible in Windows Toolbar, but I Can't Bring It Forward
- I downgraded/reinstalled Microsoft Office and XL-Connector stopped working
- I'm getting 'Access Denied' error when logging in to Salesforce
- Why do I need to provide my permission to send email on my behalf?
- I can only see the the Help item on the addon menu
- I used to have the XL-Connector tab in my Excel ribbon, but now it's gone
- Show Remaining Articles ( 3 ) Collapse Articles
-
- Articles coming soon
-
-
XL-Connector 365
- Installing XL-Connector 365
- Automating Salesforce Data Operations with Flows
- Run Flows in your Connected Spreadsheet Directly from Salesforce
- Slack Integration
- Mass Merge Accounts, Contacts, and Leads
- Mass Converting Leads in Salesforce
- Logging in to Salesforce
- Owner Change Settings
- Mapping Fields to Constant Values
- Use Any Text field to Identify Record References in ID, Master-detail, and Lookup Fields
- Convenient Editing of all Salesforce Field Types
- Using Upsert to Update or Create Records in Salesforce
- Updating Existing Records in Salesforce
- Creating New Records in Salesforce
- Integration with Accounting Seed
- Installing XL-Connector 365 for users in your Office 365 account (for Admins)
- XL-Connector 365 Privacy Policy
- Refreshing your Spreadsheets Automatically Offline
- Refreshing Data Pulled from Salesforce
- Importing Data from Salesforce.com Reports
- Importing Data from Salesforce.com using SOQL (Salesforce Object Query Language)
- Pulling Data From Multiple Related Objects
- Show Remaining Articles ( 7 ) Collapse Articles
-
Excel Merge
- Configuring a button to run XL-Connector 365 Flows in Excel Online
- Run Flows in your Connected Spreadsheet Directly from Salesforce
- Configuring a button to download object-specific XL-Connector templates on Salesforce Lightning
- Configuring a button to download object-specific XL-Connector templates on Salesforce Classic
- Configuring Mail Merge component on a Lightning page
- Configuring Mail Merge component on a Classic page layout
- Configuring the Mail Merge
- Uploading an XL-Connector template to Salesforce
- Creating an XL-Connector template for upload
- Installing XL-Connector Managed Package
- Placing XL-Connector Lightning component on any Lightning page
- Adding XL-Connector component to Salesforce Classic page layouts
- Excel Merge Managed Package
-
G-Connector
-
- Deleting Records from Salesforce using G-Connector
- Upserting Records in Salesforce from Google Sheets
- Updating Existing Records in Salesforce from Google Sheets
- Creating New Records in Salesforce Using G-Connector
- Scheduling Automatic Data Operations
- Slack Integration
- Scheduling Automatic Notifications in G-Connector for Salesforce
- Using Record Names Instead of Ids in ID and Lookup Fields
- Scheduling Automatic Data Snapshots in G-Connector for Salesforce
- Integration with AccountingSeed
- Using Custom Formulas to Dynamically Pull Data From Salesforce
-
- Articles coming soon
-
G-Connector for Zoho CRM
- Scheduling Automatic Data Snapshots in G-Connector for Zoho CRM
- Scheduling Automatic Data Alerts in G-Connector for Zoho CRM
- Scheduling Automatic Notifications in G-Connector for Zoho CRM
- Scheduling Automatic Data Pushes to Zoho CRM
- Setting Up Push Templates in G-Connector for Zoho CRM
- Updating Existing Records in Zoho CRM from Google Sheets
- Creating New Records in Zoho CRM Using G-Connector
- Deleting Records from Zoho CRM using G-Connector
- Scheduling Automatic Data Refresh from Zoho CRM
- Manually Refreshing your Zoho CRM Data
- Retrieving Module Data from Zoho CRM
- Logging in to Zoho CRM
- G-Connector for Zoho CRM terms of service
- I'm getting 'Access Denied' error when logging in to Salesforce
-
Looker Studio Connector
-
Customer Portal
- Dynamically Adjust UI Elements for XL-Connector Users
- Dynamically Adjust UI Elements for G-Connector Users via Customer Portal
- Delegate your subscription user management to a co-worker
- How do I add users to my XL-Connector subscription?
- Customer Portal
- How do I add users to my G-Connector subscription?
- How do I transfer my G-Connector license to a different user?
- How do I transfer my existing XL-Connector license to a new user?
-
Legal
-
Videos
- Easy Mass Downloading and Uploading of Images Stored in Rich Text Area Fields in Salesforce
- Mass-converting Leads to a specific Contact Record Type
- Short How To Videos
- Filling Gaps in your Data
- Looking up Salesforce Ids based on an arbitrary field
- Updating Existing Records in Salesforce
- Creating New Records in Salesforce
- XL-Connector Personal Edition Video
- Refreshing Multiple Tables in XL-Connector Video
- Importing Data Using SOQL in XL-Connector Video
- Logging In XL-Connector Video
- Installing XL-Connector video
-
Links
Installing G-Connector Google Sheets
Follow this link to install G-Connector: https://workspace.google.com/marketplace/app/gconnector_for_salesforce/971770431958
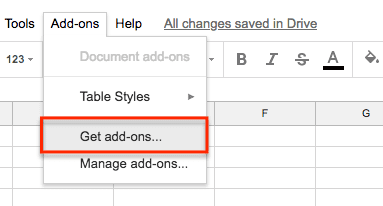
To install the G-Connector add-on from your Google Sheets environment, open any spreadsheet or create a new one at https://docs.google.com/spreadsheets, then click Get Add-ons under the Add-ons menu:
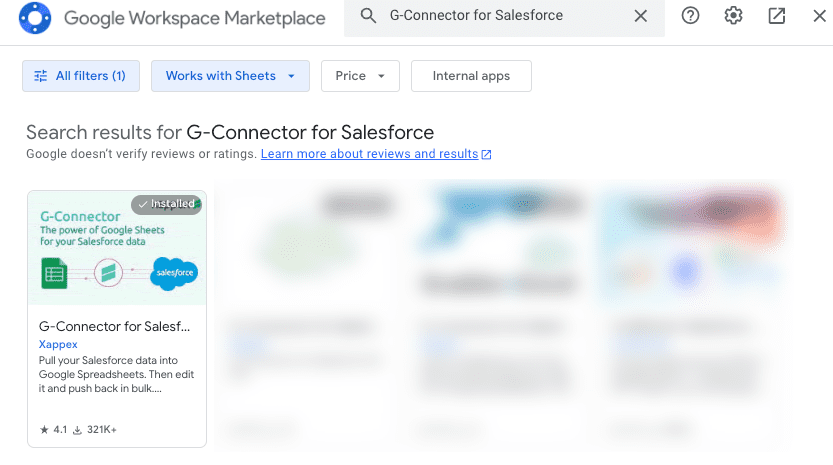
In the subsequent dialog search for “G-Connector for Salesforce”, and click on it:
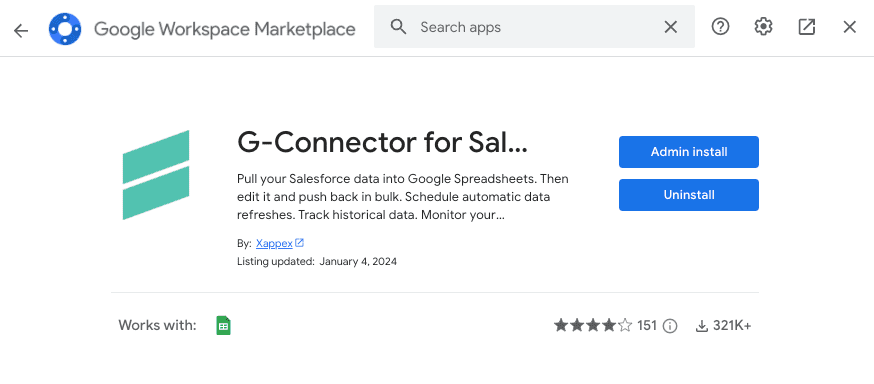
Then click the blue “Install” button on the right from G-Connector for Salesforce:
You will need to give certain permissions to the app in order to get it installed:
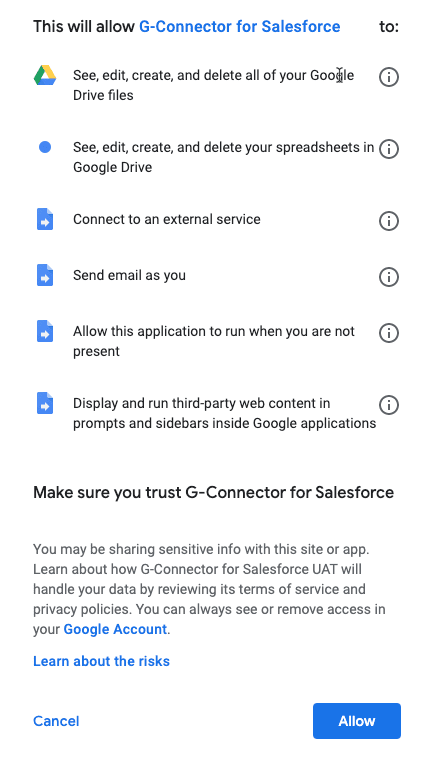
In order to be able to save your snapshots as files to Google Drive, we’ll need the permission Edit, Create, and Delete your Google Drive files. This permission will not be used for anything else. WE SHALL NEVER ACCESS ANY FILES THAT ARE NOT RELATED TO G-CONNECTOR ADD-IN.
We need to be able to send email as you to send success/failure notification emails to you when your scheduled data auto-refresh succeeds/fails. Knowing your email helps with this too. In order to be able to put Salesforce data into your spreadsheets we need to be able to view and manage your spreadsheets, and to get that data we need to be able to connect to an external service (Salesforce API).
After you give the requested permissions, the add-on will be installed and ready to use.
We will automatically create a free 30-day trial for any new Google account that installs the software. During the 30-day trail, G-Connector will run in the Premium Full mode. When the trial expires – it will revert to the Free mode with some functions inaccessible without a license.
By creating a free trial in any of our apps you consent to receive marketing communications from Xappex. You can unsubscribed from marketing communications at any time by clicking on the Unsubscribe link in any of them