Upsert Records in Salesforce from Google Sheets
Users often ignore a very powerful feature when dealing with data in Salesforce.com: the Upsert operation.
This word always gets underlined by the spell checker because it doesn’t exist, upsert is a combination of two words: Update and Insert. And that’s essentially what it does – it figures out whether to insert a new record or update an existing one on the fly. Knowing how to upsert records in Salesforce can save admins tons of time and bring about productivity savings, specially if you can do this directly from a spreadsheet.
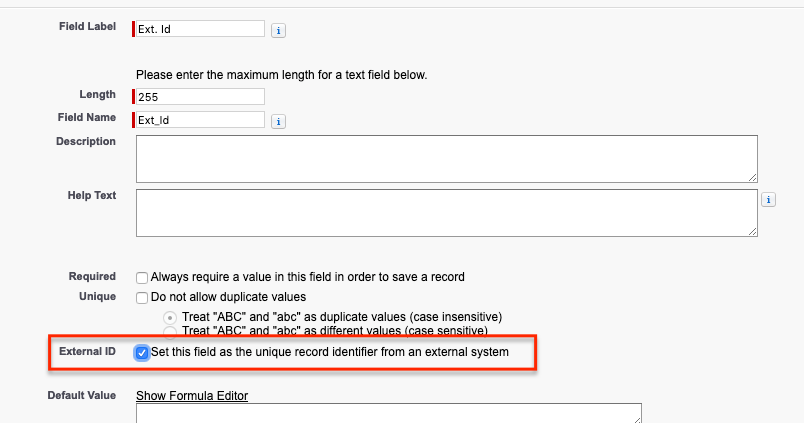
This operation differs from other DML operations in that it needs a special data column to operate: an External Id column. This column must be mapped to either an External Id or indexed field on the Salesforce object you’re working with. In Salesforce.com you can set up any Text, Number, or Email field as an External Id during field creation or by clicking Edit:
So the way an Upsert operation works during a data load, is for each record Salesforce looks at the value loaded in the External Id column, and if the system already contains a record with the same External Id – it updates that record, otherwise – it creates a new one.
With G-Connector you can easily upsert records in Salesforce from Google Sheets by following very simple steps. This will save you tons of time that would otherwise be spent manually updating records or performing separate Update/Insert operations.
Upserting Opportunity records from Salesforce in Google Sheets
In our demo scenario, Opportunities need to be synchronized with an external system, and therefore the Opportunity object has a field named Ext. Id:
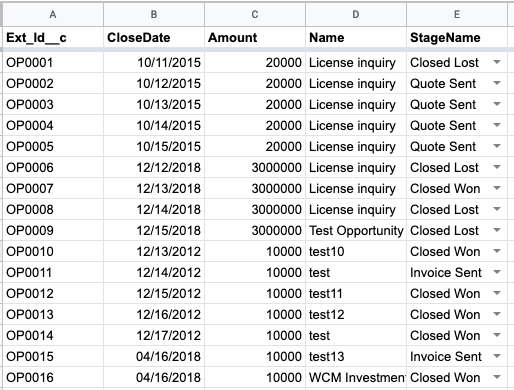
When we receive our opportunities from an external system, the file also has a column of External Ids:
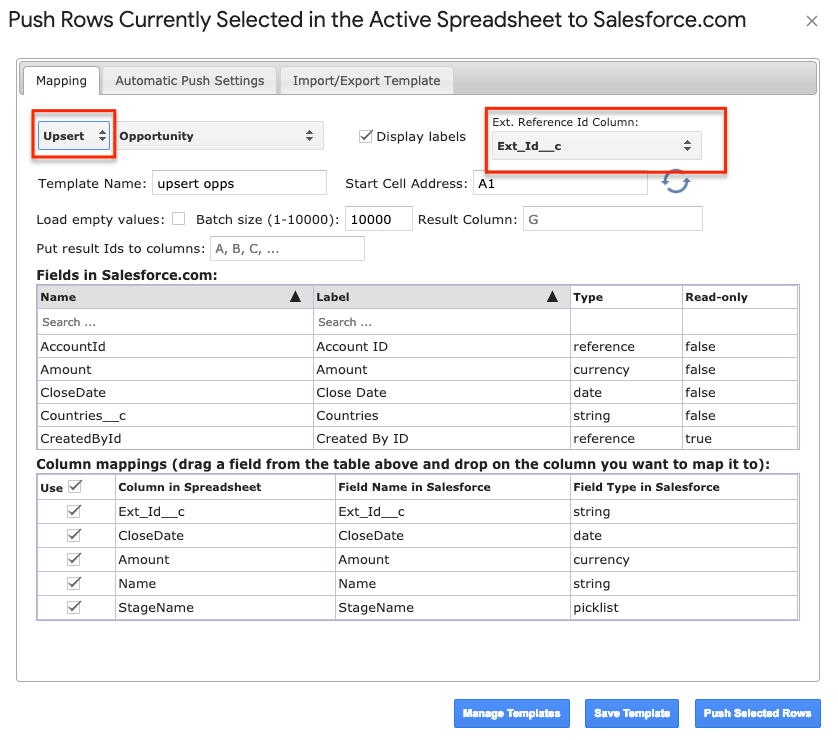
Now to do an upsert we need to select the records we want to push into Salesforce (any columns may be selected as long as the selection spans across the rows we want to upsert), and click Update/Insert/Upsert up in the G-Connector for Salesforce add-on menu or from the Create/Modify/Delete section of the side panel. In the subsequent dialog, make sure to select Upsert from the list of operations, and the correct spreadsheet column that holds your external ids, in our case it is Ext_Id__c:
Mapping spreadsheet columns to fields in Salesforce from Google Sheets.
G-Connector will try to automatically map your spreadsheet columns to the corresponding fields in Salesforce, and because we pulled data using SOQL – in this case it will map all columns correctly. However, please verify the mappings each time before proceeding with an update and re-map if necessary. Incorrect mappings may lead to unrecoverable data loss!
The top table in the mapping dialog lists all available fields from the selected object. You can map your spreadsheet columns to fields in Salesforce by dragging fields from the top table and dropping them on the column names in the bottom table.
You can save the column mappings and other settings in this dialog box for future reuse by clicking the Save Template button.
Click Push Selected Rows to perform the Upsert operation.
After the Upsert operation has been completed, you’ll see the operation results on the very right from your data, one column over after the last data column:
Inserting records in Salesforce as children of records identified by an External Id
Now let’s consider another use case of the Upsert function: creating new records under records identified by an External Id.
We’ll create new contacts as children of Accounts identified by their External Id field.
Our Contact table may or may not have an External Id column. If there’s no External Id column, the Upsert will work solely to create new records.
For the purpose of this demo the Contact does not have an external Id column. We’ll create a spreadsheet with new contacts as follows:
Please note, that we’ve created an empty Id column. It will be used as the external id column in the Upsert operation. We’ll later map it to the Contact’s Id field, which can also work as an external Id field. We’ll also populate that column with the Ids of the newly created records.
Then we select the five contacts to be inserted as shown in the picture above and click Upsert. A Map Column dialog box will be displayed.
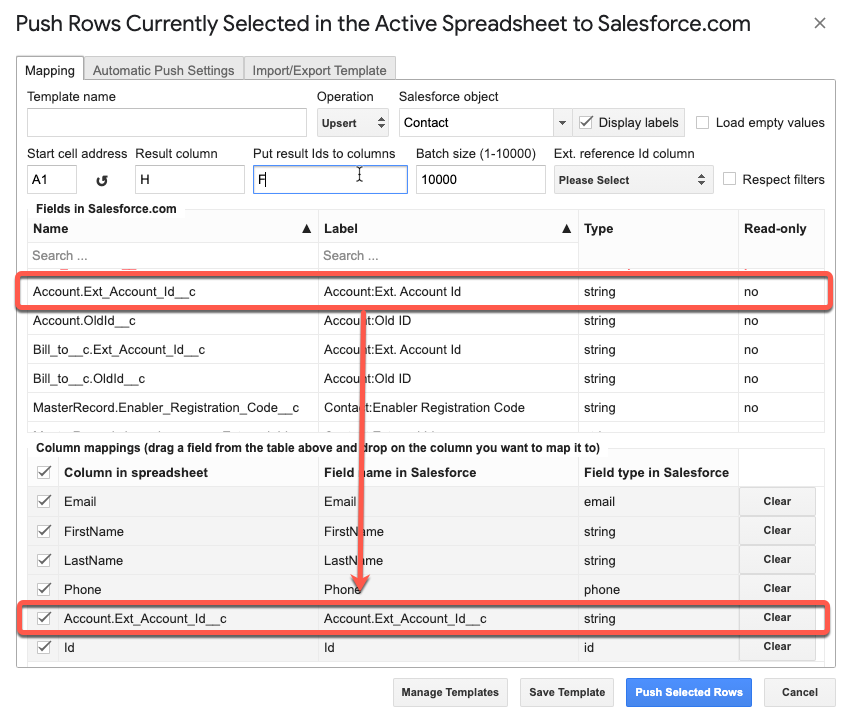
As shown in the picture below, you have to select the object (table) you’re inserting records into. Also the Ext. ID Column selection is mandatory. Since in this specific case we are inserting new records, you need to select the dummy Id column in this drop-down. Make sure to later map this column to the Id field on the Contact object. We’ll also populate that column with the Salesforce Ids of the newly created records by specifying the column index (F) in the Put Ids to column(s) setting.
The Account External Id column by which Salesforce will identify under which account each contact needs to be placed, has to be mapped to the Ext. Account Id field on the Account object. Map Columns dialog that is generated for the Upsert operation differs from the same dialog used with the Insert and Update operations in that it not only lists all fields of the object you’re working with in the top table, but also contains External Id fields of all objects related to the object you work with via a Lookup or Master-detail relationship. In other words, if the object you’re working with is a child, whose parent has fields marked as External Id, these fields will be also listed at the very end of the top table for all object parents. Map the required Ext. Id field to the column containing external account ids as shown below.
After you click Upsert Selected Rows in the dialog box above, the new contacts will get created and linked to the accounts identified by the corresponding external id. The Salesforce Ids of the newly created records will be also populated in the Id column.


