Need to automate repetitive Salesforce tasks in Excel? XL-Connector Flows make it easy.
In this article, we’ll show you how to create and run an XL-Connector Flow to automate practically any Salesforce data operations. Whether you’re refreshing reports, updating records, or running recurring processes, XL-Connector Flows can help you save time and eliminate manual work.
XL-Connector flows: Your path to Salesforce data automation in Excel
In XL-Connector, a Flow is a sequence of automated operations tied to a specific Excel worksheet
Each Flow is made up of Flow Steps. When you click Run Flow, XL-Connector executes every active step in that worksheet, in order, automatically.
You can have one Flow per Excel worksheet (tab). By running a Flow, you basically kick off the execution of every Flow Step in the currently active worksheet in the order they appear in the Flow Editor.
You can program the following XL-Connector operations in each of the Flow Steps:
- Refresh data pulled with a SOQL query
- Create new records in Salesforce (Insert)
- Update existing records in Salesforce (Update)
- Update existing or insert new records in Salesforce based on an external id field (Upsert)
- Delete records in Salesforce
- Run a VBA macro
- Run Anonymous Apex code in Salesforce
You can also run your whole flow or separate flow steps from your VBA code.
By combining these different operations and setting up the order of execution, you can achieve pretty much any complex data loading scenario that you can think of.
Creating Flow Steps in XL-Connector
First of all, a new Flow Step will be created for you when you manually do one of the following operations:
- Pull a report
- Pull data based on a SOQL query
- Run a Insert/Update/Upsert/Delete operation
So if you want to save some time creating a flow step, just run a quick SOQL query on the fields you are planning to work with. This will create a new Flow Step, as well as set up all the mappings automatically.
You can also create a new Flow Step manually as follows:
- Click on the Edit Flow button in the XL-Connector ribbon.
- In the Flow Editor, go to the Flow Steps tab and click on the Add flow step icon. The following dialog box will appear:
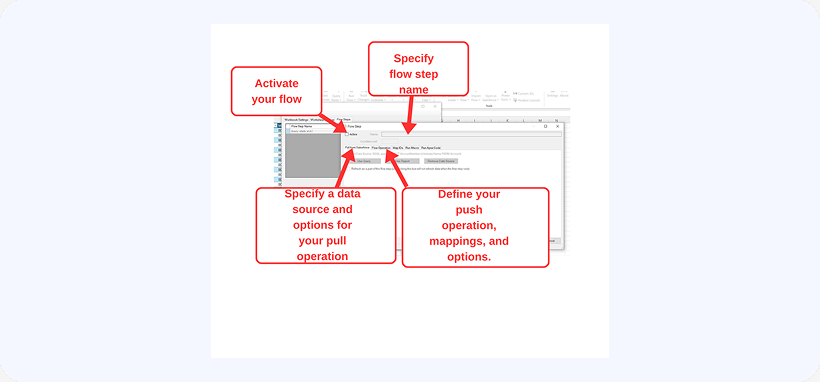
- You can choose to run a Flow Step on the condition that one of the cells in the worksheet is not empty. To set this up, simply specify the address of that cell in the Condition Cell box. If the address is not specified, the flow step will always run.
Export Salesforce data into Excel
The Pull from Salesforce tab in XL-Connector plugin identifies the data source and some settings for refreshing your data. You can have either a Salesforce report or a SOQL query as your data source. The data will get refreshed from that data source as soon as the user clicks on the Refresh button in the XL-Connector ribbon. Please note, that Refresh operation will always work, regardless of whether the Active and Use in Flow flags are set in the Flow Step settings. If you want the data to be refreshed when the user clicks on the Run Flow button in the ribbon – you’ll need to make sure that both Active and Use in Flow boxes are checked in the dialog box above.
Here’s a short description of all settings in the Pull from Salesforce tab of the Flow Step editor:
- Has column headers – this identifies whether column headers will be shown on the spreadsheet.
- Enforce Picklists – this will create drop-downs with picklist values in the columns mapped to fields of Picklist type. It will also enable multi-select boxes on double-click into a column mapped to fields of Multiselect Picklist type. All the mappings are done under Push to Salesforce tab, Column Mappings button.
- Pull Ids automatically to the first column and hide it – this setting automatically includes the Id column in any SOQL query that you run as the first column and hides it.
- Create Data Table around pulled data – if this box is checked, XL-Connector will create an Excel Data Table around the data that is retrieved during data refresh.
- Use in Flow – if this box is checked, the data will be refreshed from the specified data source as part of the flow (when the user clicks on the Run Flow button in the ribbon).
PLEASE NOTE: Only SOQL Queries will be refreshed as a part of the flow. Refreshing of Salesforce reports cannot be initiated by the Run Flow button. - Delete/Insert cells on refresh – when this box is checked, if the amount of rows coming from the data source is different from what’s already in the worksheet, XL-Connector will delete or insert cells to accommodate such change. If this box is not checked, XL-Connector will simply overlay the existing data with new data and clean up any data rows below the pulled data. We recommend that this box is NOT checked in most of cases. The only scenario when you want it checked is when you have some formulas BELOW your data and don’t want them overwritten during the refresh.
Import data from Excel to Salesforce
Pushing data back to Salesforce with XL-Connector can be set up as one of the Flow Steps in your Flow for each worksheet. Such push requires some settings to be set up. Below, we’ll discuss what you can control in this regard.
The Push side of the data manipulation using Flows in XL-Connector is controlled by Flow Operation tab in the Flow Step editor:
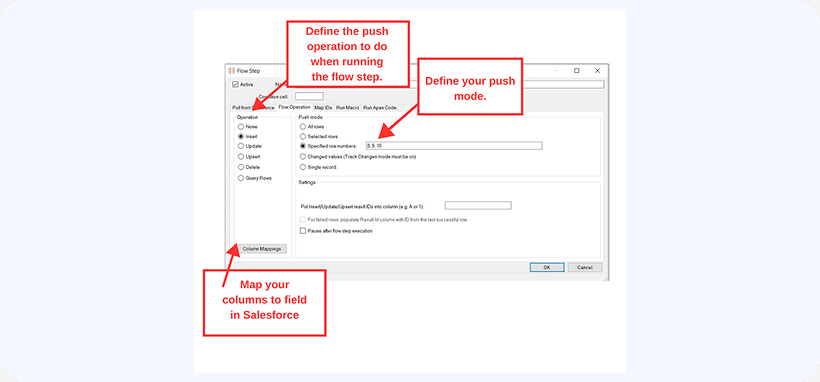
Optionally, you can define the column to which the push operation result Id will be written. This is helpful when you are creating a sequence of flow steps where one step will create parent records, and the second step – create child records linked to these parent records by passing the corresponding Ids to the Lookup or Master-Detail relationship fields. This can be done by specifying the Lookup or Master-Detail column in the Put Insert/Update/Upsert result IDs into column box.
The next option (For failed rows, populate Result Id column with ID from the last successful row) is to populate such IDs not only for rows that succeeded, but also for all subsequent rows even if the operation fails for them. This will let you create child records with data in the same rows as the parent records. The trick is to force some of the records to fail on updating/inserting the parent record, but still to be able to use the Id of the last successful operation to correctly link the child records. For example, with this checkbox checked, the following data will insert one account and 4 opportunities linked to it:
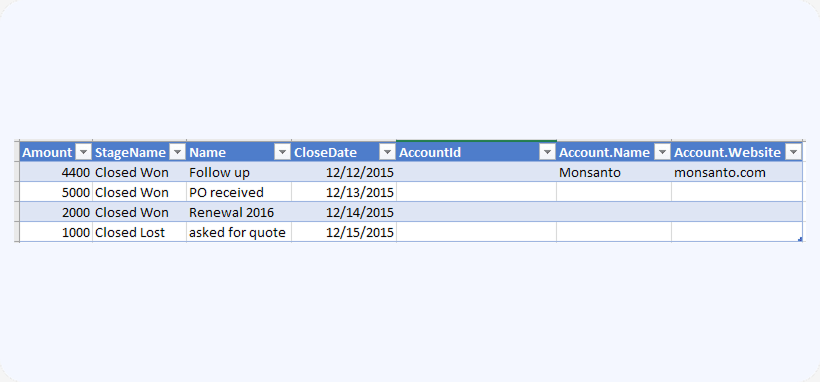
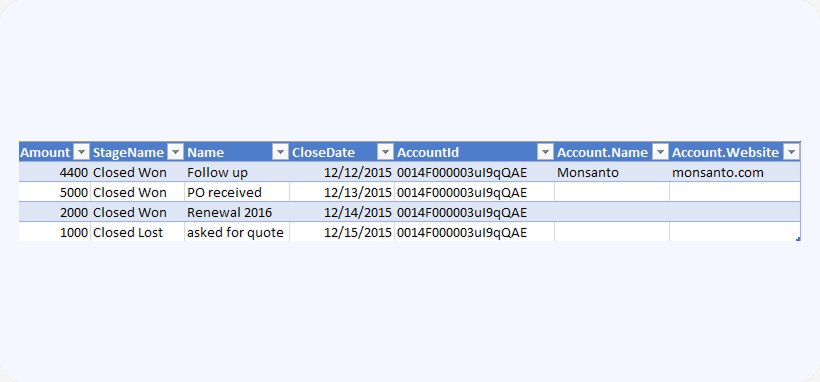
When running such flow, only one account will be created (first row), the remaining 3 rows will fail (no account name specified). However, the Id of the account that was created for the first row will be populated for all 4 rows so that all 4 opportunities can be linked to the same account in the next Flow Step:
See a detailed description of this upload scenario here.
Running a VBA Macro From a Flow Step
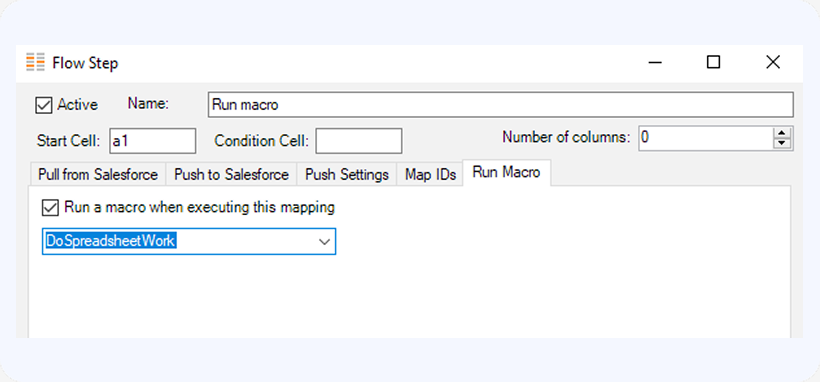
You can set up any custom macro to be run as a part of any flow steps. If you don’t set up anything under Pull from Salesforce and Push to Salesforce tabs, the flow step will only run the macro.
The easiest way to create a macro is to click on Record Macro button in the Developer tab in Excel and then immediately click on Stop Recording. Then you can place any custom code inside of the macro that was created for you and link it to a Flow Step by selecting the macro from the drop-down box:
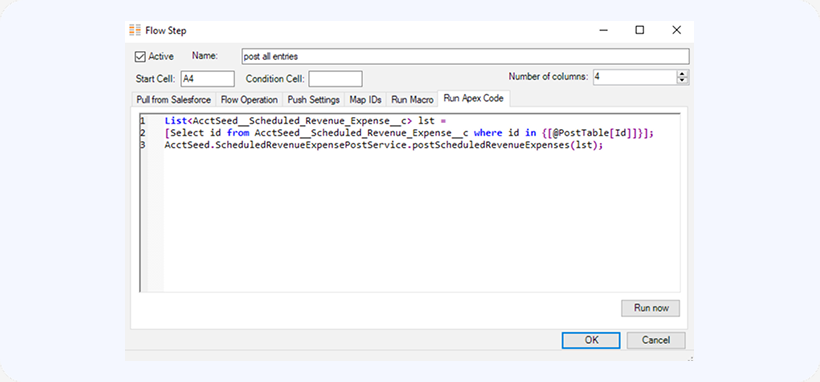
Running a Anonymous Apex code in your Salesforce org
You can set up any piece of Apex code to be executed as a part of your flow step. You can test it right here by clicking the Run Now button at the bottom: