Importing Data from Salesforce.com using SOQL (Salesforce Object Query Language)
XL-Connector 365 has a very powerful tool allowing you to pull any data from your Force.com database into Excel.
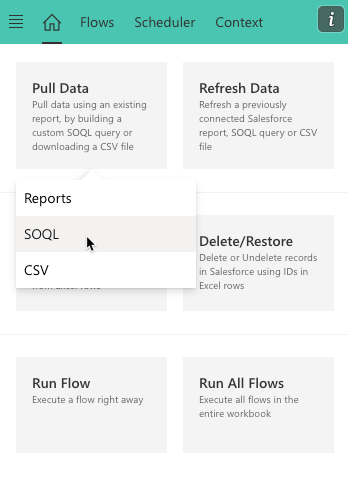
To pull data from a Force.com database to Excel using a SOQL query, click the SOQL button in your XL-Connector ribbon:
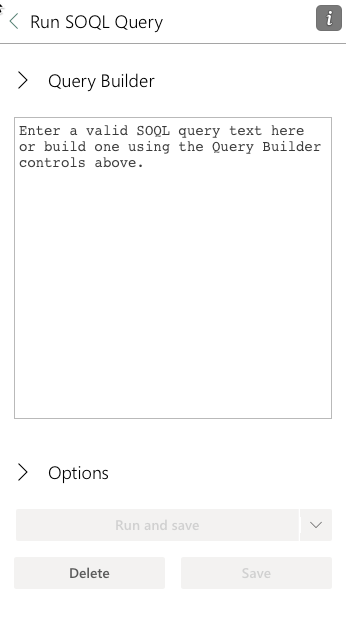
If you know your way around SOQL, you can simply type or paste your query directly into the query box and hit Execute:
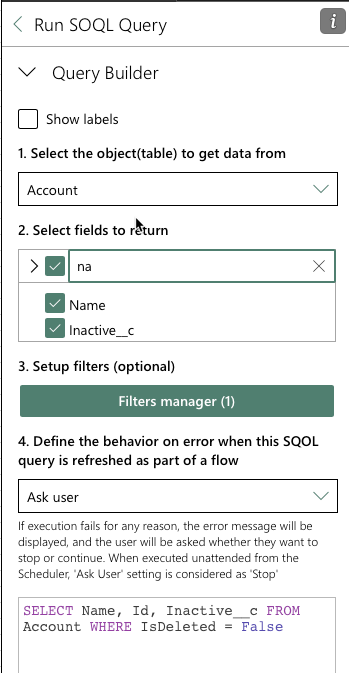
If you want to browse your objects and fields, you can use the query builder to put together a query using it’s controls:
There are some options that you can adjust for each query as well:
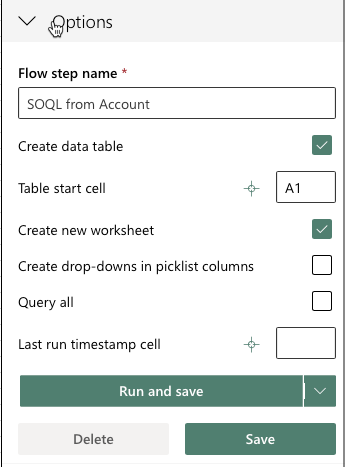
Flow step name – this will show ‘SOQL from <objectname>’ by default, but you can rename this flow step by entering any text in that edit box.
Create Data Table – will create an Excel Data Table around the pulled data.
Table Start Cell – identifies the location in the worksheet where the query data will be inserted.
Create New Worksheet – if checked, will always put the data in a new worksheet.
Create drop-downs in picklist columns – if checked, Excel will try to create Data Validation checkboxes in all cells of columns retrieved from Salesforce fields of type Picklist.
Last run timestamp cell – if specified, the timestamp of each query run or refresh will written to the specified cell.
Clicking on Run and save will pull the data and save the query along with all settings inside the corresponding worksheet as a flow step. Just clicking on Run will not save the flow step for subsequent reuse and you won’t be able to refresh such query later.
Clicking on Save will save the query inside of the currently active worksheet along with all the settings, but will not pull the data. You can pull the data later by clicking on the Refresh button on the app’s Home screen.
Clicking on Delete will delete this flow step (only enabled if editing a flow step).
XL-Connector lets you replace any part of your query with values coming from your spreadsheet by specifying the address(es) of where to take the text from within double curly braces: {{range}}
- Contents of a single cell. For example:
SELECT Id, Name FROM Opportunity WHERE Owner.Name = ‘{{C2}}’ – grabs the value from the C2 cell of the currently active sheet. Be careful with this one, if you have the ‘Create new sheet’ option checked in your Get Data dialog – it will look at the cell C2 of the newly created sheet and fail because it will be empty. To work around this you can use the absolute path to the cell:
SELECT Id, Name FROM Opportunity WHERE Owner.Name = ‘{{Sheet1!C2}}’
SELECT Id, Name FROM Opportunity WHERE Amount > {{Sheet1!H10}}
- A range of values. For example:
SELECT Id, Name FROM Opportunity WHERE Id IN {{MyCustomRange}}
SELECT Id, Name FROM Opportunity WHERE Id IN {{A1:A20}}
SELECT Id, Name FROM Opportunity WHERE Name IN {{Sheet1!C1:C10}}
When using a range, the double curly brackets and range address will be replaced with a list of quoted values from all non-empty cells of the range, enclosed in parentheses:
(‘Name1’, ‘Name2’, ‘Name3’)
Please note that you can’t use Date, DateTime, Boolean, or Number fields when using a dynamic range of values since all values in the range will be enclosed in quotes. - All values in a given Data Table column. For example:
SELECT Id, Name FROM Opportunity WHERE Id IN {{@TableName[ColumnName]}} - You can also replace other parts of the query with dynamic data, for example:
SELECT {{A1}}, {{B1}}, {{C1}} FROM {{D1}} WHERE {{E1}} IN {{MyCustomRange}}